A sewing machine needle might be the smallest part of your setup, but it has the biggest impact on your stitches!
The right needle helps your fabric move smoothly under the presser foot, keeps your thread from breaking, and prevents skipped or uneven stitches.
Many sewing issues come down to one simple thing – using the wrong needle for the fabric.
Once you know how to read needle sizes and understand the basic types, choosing the right one becomes quick and straightforward.
Let’s take a look at sewing machine needle sizes, fabric pairings, and needle types so you can select the best option for each project with confidence and ease.
Sewing Machine Needle Sizes Explained

Choosing the right sewing machine needle size is one of the easiest ways to improve your stitching results.
It affects how the thread moves, how the fabric feels under the presser foot, and how clean your stitches look.
Once you understand how needle sizes are labeled and what they mean, you’ll be able to match them to any fabric with confidence.
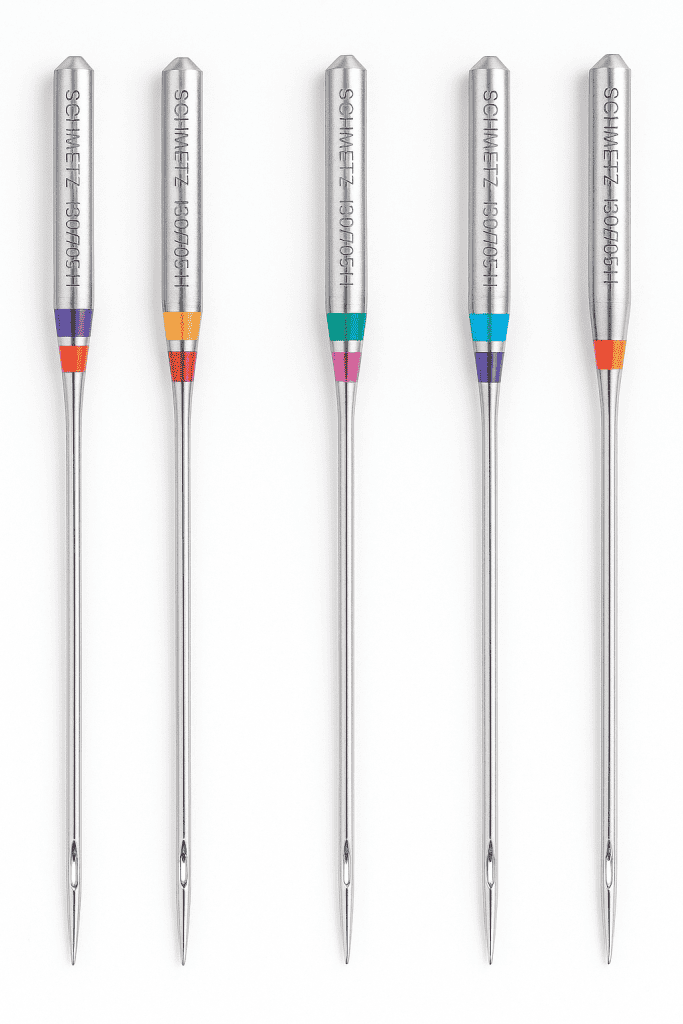
The Two Numbering Systems
Sewing machine needles use two sizing systems: European and American. You’ll usually see both numbers written together, such as 75/11 or 90/14.
- The European number measures the diameter of the needle in hundredths of a millimeter.
- The American number follows a simpler comparative scale – the higher the number, the thicker the needle.
In short: larger numbers = thicker, stronger needles.
For example, a 60/8 needle suits delicate fabrics, while a 100/16 is designed for heavier materials like denim or canvas.
Why Needle Size Matters
The needle must balance the fabric and thread. If it’s too large, it can leave visible holes; if it’s too small, it may flex or skip stitches.
The right size helps the thread glide smoothly, giving you even, reliable results.
A quick rule of thumb:
Light fabrics = small needle
Heavy fabrics = large needle
When to Change Your Needle
Needles wear down with regular use. Even when they look fine, the tip can dull or develop tiny burrs that affect stitch quality.
Replace your needle when:
- You switch to a new fabric type
- The thread begins to fray or break
- You hear a popping sound while sewing
- Stitches skip or look uneven
- The fabric shows small snags or punctures
For best results, start each new project with a fresh needle or replace it every 6–8 hours of sewing.
It’s a quick habit that keeps your stitches clean and your machine running smoothly.
How to Match Sewing Machine Needle Size to Fabric Weight

Every fabric behaves differently under the needle.
Lightweight cotton and heavy denim don’t need the same strength or sharpness, and that’s where needle size makes all the difference.
Here’s a simple breakdown to guide you:
Lightweight Fabrics (Needle Size 60/8–75/11)
Best for fabrics such as chiffon, organza, voile, silk, and lace.
These materials are thin and delicate, so they need a fine, sharp needle that glides through without snagging or leaving marks.
Tip: Pair with a fine thread and use a moderate sewing speed for even tension.
Medium-Weight Fabrics (Needle Size 75/11–90/14)
Ideal for quilting cotton, poplin, linen, broadcloth, or light denim.
This is the most commonly used range for everyday sewing projects. It balances flexibility with strength and works well for both woven and knit fabrics.
Tip: Universal needles in this range cover most household sewing needs.
Heavy-Weight Fabrics (Needle Size 100/16)
Suited for denim, canvas, twill, duck cloth, and vinyl.
Heavier fabrics require a thicker, stronger needle that can pierce through multiple layers without bending.
Tip: Match with a durable polyester or heavy cotton thread for sturdy seams.
Extra Heavy-Weight Fabrics (Needle Size 110/18 and Above)
Used for upholstery, thick leather, or heavy canvas projects.
These large needles handle dense materials that would strain a standard machine needle.
Tip: Sew slowly and use the appropriate presser foot to maintain control and prevent skipped stitches.
You can also check out my helpful thread and needle tips for more guidance.
Quick Reference Table
| Fabric Weight | Fabric Examples | Needle Size (EU/US) |
|---|---|---|
| Lightweight | Chiffon, organza, voile | 60/8–70/10 |
| Medium | Quilting cotton, linen | 75/11–90/14 |
| Heavy | Denim, canvas, twill | 100/16 |
| Extra Heavy | Leather, upholstery | 110/18–120/19 |
Matching needle size to fabric weight is simply paying attention to what your fabric needs.
Once you make it a habit, you’ll notice smoother stitching, fewer thread breaks, and a more professional finish every time.
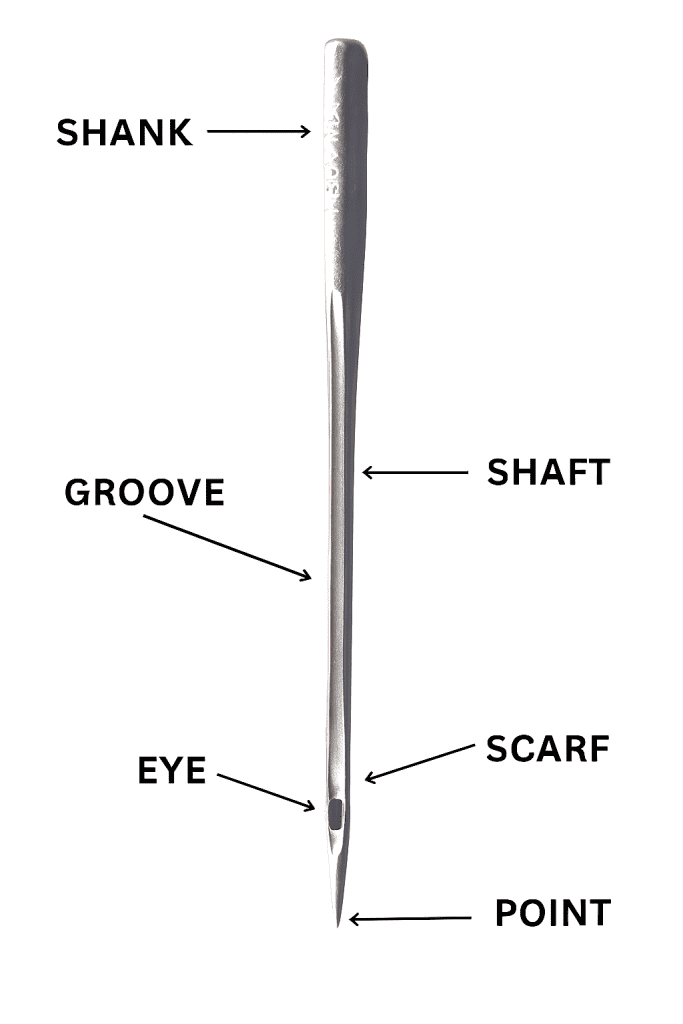
Anatomy of a Sewing Machine Needle (Know Your Tool)
Before you choose the right needle, it helps to understand how it’s built.
If you’re new to sewing machines, check out my post on the Anatomy of a Sewing Machine to see how all the parts work together. You can also read the Anatomy of a Serger if you’re curious about how sergers differ from regular machines.
Here’s a quick breakdown of the parts you’ll find on most standard needles:
a. Shank
The top portion that fits into your sewing machine.
It’s slightly rounded on the front and flat on the back to help you insert it correctly.
Tip: Always make sure the flat side faces the back of your machine when installing.
b. Shaft
The long body of the needle that determines its overall strength and size.
Thicker shafts handle heavier fabrics; finer ones are made for lightweight materials.
c. Groove
A small channel running down the front of the needle.
This groove holds the thread in place as it moves through the fabric, keeping stitches smooth and preventing friction.
d. Eye
The hole near the point of the needle where the thread passes through.
The size and shape of the eye differ between needle types – larger eyes reduce friction for specialty threads like metallic or embroidery.
e. Point
The very tip that pierces the fabric.
The shape of the point is what separates one needle type from another:
- Sharp points for woven fabrics
- Ballpoints for knits
- Cutting points for leather or vinyl
When you understand how each part works together, choosing the right needle becomes a straightforward process.
It’s one of those small bits of knowledge that make sewing more predictable and satisfying.
Common Types of Sewing Machine Needles (and When to Use Each One)
Once you understand sizes, the next step is choosing the right type of needle for your project.
Each needle type is designed for specific fabrics and threads, and using the right one helps you achieve smooth, consistent stitches without trial and error.
Here’s a straightforward guide to the most common sewing machine needle types and what they’re best for:
| Needle Type | Best For | Details |
|---|---|---|
| Universal | General sewing on woven and knit fabrics | A good all-purpose needle for everyday projects. Works best for medium-weight materials like cotton or linen. |
| Ballpoint (Jersey) | Knits and stretch fabrics | The rounded tip slides between fabric fibers instead of piercing them, preventing snags or holes in stretchy materials. |
| Stretch | Elastic or high-stretch fabrics like swimwear | Has a slightly different eye and scarf shape to reduce skipped stitches on elastic fabrics. |
| Sharp / Microtex | Fine woven fabrics such as silk, taffeta, or microfiber | Extremely sharp point for precise stitching and clean seams on delicate or tightly woven fabrics. |
| Denim / Jeans | Denim, canvas, or other tightly woven heavy fabrics | Strong shaft and reinforced point to handle thick layers without bending. Ideal for topstitching and seams. |
| Leather | Genuine leather, suede, or vinyl | Wedge-shaped point designed to cut cleanly through non-woven materials without tearing. Not for synthetic or knit fabrics. |
| Quilting | Quilting cotton and multiple layers | Slim, tapered point for piecing and stitching through quilt layers cleanly. Produces straight, even stitches. |
| Embroidery | Decorative stitching with rayon or polyester threads | Larger eye and deeper groove reduce friction and thread breakage when using delicate embroidery threads. |
| Topstitch | Heavy thread or decorative stitching | Extra-large eye and strong shaft to handle thicker threads cleanly, especially for visible seams or edge finishes. |
| Metallic | Metallic or specialty threads | Large, polished eye reduces shredding and allows smooth thread movement. Works best with slower stitching speed. |
| Twin Needle | Decorative parallel stitching | Two needles on one shank create evenly spaced, professional-looking double seams. Perfect for hems and decorative finishes. |
| Hemstitch / Wing Needle | Decorative heirloom stitches | Creates openwork or ladder-like holes in lightweight fabrics. Often used for heirloom or decorative details. |
Once you get familiar with these needle types, choosing one becomes second nature.
How to Choose the Right Sewing Machine Needle Every Time
Once you understand needle sizes and types, choosing the right one becomes a simple step in your sewing routine.
The goal is always the same: match the needle to your fabric and thread so the machine runs smoothly and your stitches stay consistent.
Here’s a straightforward process to follow every time you start a new project:
Step 1: Identify Your Fabric Weight
Take a quick look and feel of your fabric.
- Lightweight: chiffon, voile, silk, or lace
- Medium-weight: cotton, linen, or poplin
- Heavy-weight: denim, canvas, or upholstery
This step determines your needle size range.
Step 2: Match the Needle Size
Use your fabric weight to choose a needle size:
- Light fabrics → 60/8–75/11
- Medium fabrics → 80/12–90/14
- Heavy fabrics → 100/16–110/18
A needle that’s too small can cause skipped stitches, while one that’s too thick may leave visible holes.
A balanced size helps the thread glide easily through the fabric.
Step 3: Choose the Needle Type
Match the needle type to your fabric’s weave and stretch:
- Woven fabrics → Universal or Sharp
- Knits → Ballpoint or Stretch
- Heavy materials → Denim or Leather
- Specialty threads → Embroidery or Metallic
Step 4: Check Your Thread
Thread choice matters as much as fabric type.
- Use fine thread for lightweight fabrics.
- Use stronger polyester or cotton-wrapped thread for heavy materials.
- Always make sure the thread moves smoothly through the needle’s eye without catching.
Step 5: Test Before You Sew
Before you begin your project, sew a few test stitches on a scrap of the same fabric.
Watch and listen:
- Stitches should look even and flat.
- The fabric shouldn’t pucker or stretch.
- The needle should move quietly – no popping or tugging sounds.
If it doesn’t feel smooth, recheck your size and type combination.
Step 6: Replace Needles Regularly
A fresh needle is one of the simplest ways to keep your stitches consistent.
As a rule, replace your needle:
- Every 6–8 hours of sewing
- At the start of each new project
- Whenever you change fabric type
It’s a small habit that keeps your machine performing at its best.
Ready to Sew with Confidence? Start with the Right Needle
When your sewing machine is set up correctly – the right needle, thread, and fabric – sewing becomes easier, cleaner, and more enjoyable!
Keep a simple chart nearby, pay attention to how your fabric feels, and change your needle often.
Small, intentional steps lead to reliable results every time.
If you’ve learned something helpful or have a favorite go-to needle for a certain fabric, share your thoughts in the comments below.
Your experience might help someone else sew with more confidence too!
FAQs
1. How often should I replace my sewing machine needle?
As a general rule, replace your needle after every 6–8 hours of sewing or when starting a new project. Dull or worn needles can affect stitch quality even if they look fine.
2. Can I use the same needle for all fabrics?
You can use a universal needle for many everyday fabrics, but not for everything. Stretch, leather, denim, and delicate fabrics each perform better with specific needle types designed for them.
3. Why is my thread breaking even with a new needle?
Thread breaks can happen if the needle size doesn’t match the thread, or if the needle’s eye is too small. Check that your thread moves easily through the eye without resistance, and ensure the needle is inserted correctly (flat side facing back).
4. What happens if I use the wrong needle size?
The wrong size can cause skipped stitches, uneven tension, or visible holes in the fabric. A smaller needle struggles with thick material, while a large one can damage lightweight fabric. Always match needle size to fabric weight.
5. How do I store my sewing needles?
Keep needles in their original cases or a labeled organizer box. Store by type and size so you can easily find what you need and avoid mixing up used and new needles.
