Every sewing project offers an opportunity to learn and improve.
Sometimes it’s the satisfaction of a seam that aligns perfectly; other times, it’s a reminder that fabric, thread, and tools all need to work in harmony.
The good news is many of the challenges beginners face are entirely preventable.
A skipped step here, a rushed cut there – these are things you can notice and adjust with a little awareness.
By understanding the most common sewing mistakes, you set yourself up for smoother projects, sturdier results, and far less frustration at your machine.
In this article, I’ll walk you through thirteen mistakes that show up often, especially when you’re just starting out.
More importantly, I’ll share practical ways to avoid them so your time at the sewing table feels more confident, consistent, and genuinely enjoyable.
The Importance of Awareness in Sewing
Awareness is simply paying attention to the small choices that shape the bigger outcome.
When you stay aware of the details, your work feels more steady and your results look more polished.
Awareness also reduces frustration. Instead of wondering why seams don’t match or why fabric puckers, you notice what caused it and know how to adjust.
That kind of clarity builds confidence. You stop seeing mistakes as failures and start viewing them as signals pointing you toward a stronger habit.
The best part is that awareness grows naturally.
Each project teaches you something new – how fabric responds, how your machine sounds when it’s running smoothly, how pressing at the right moment transforms a seam.
Over time, these observations become second nature, and sewing feels more intuitive.
If you’re just starting your sewing journey, check out our guide on how to start sewing as a beginner to get the foundational tips you need to build steady habits from the start.
13 Common Sewing Mistakes You Must Avoid
Every sewer (beginner or experienced) runs into these mistakes at some point. They’re signals that help you refine your process.
By understanding why these mistakes happen and how they affect your work, you’ll not only avoid them but also strengthen your skills in the process.
Think of this list as a practical companion at your sewing table – ready to remind you of what truly matters.
1. Skipping Fabric Preparation

Fresh fabric off the bolt looks crisp and ready, but appearances can be misleading.
Many fabrics shrink the first time they’re washed, and some release excess dye that can stain other materials.
If you cut and sew before preparing the fabric, your careful work may warp, tighten, or fade unevenly after its first wash.
Taking time to wash, dry, and press fabric before cutting lets it settle into its true form.
This ensures your pieces will maintain their size and shape.
Pressing afterward also smooths out folds and creases, giving you a clean surface for precise cutting.
Think of preparation as your way of setting the stage – your project begins on stable ground instead of shifting beneath your stitches later.
You can also perform a burn test for natural fabrics to double-check what fibers you’re working with before starting your project.
2. Using the Wrong Needle
Not all needles are created equal, and this is one of the most overlooked details in sewing.
A universal needle might handle basic cotton, but stretch knits, heavy denim, or delicate silks demand specialized choices.
When the wrong needle is used, you may notice skipped stitches, fabric snags, or even damage to the fibers themselves.
Choosing the correct needle involves both size and type.
For example, ballpoint needles slide between the loops of knit fabric without breaking fibers, while a sharp needle pierces cleanly through tightly woven cotton.
Matching your needle to your fabric reduces strain on your machine, improves stitch quality, and extends the life of both your materials and your tools.
Simply swapping a needle can transform how smoothly your project comes together.
Check out our needle and thread tips for guidance on pairing the right tools with your fabric.
3. Ignoring Thread Quality
Thread isn’t just a line that holds fabric together – it’s part of the strength and finish of your project.
Bargain-bin thread often contains uneven fibers or weak spots, leading to breakage or tangles in your machine.
Over time, poor thread can even create excess lint buildup, which clogs the bobbin area and disrupts stitch tension.
High-quality thread, on the other hand, glides evenly through fabric, resists snapping, and creates consistent stitches.
It may cost a little more upfront, but it pays off in durability and fewer interruptions while you sew.
A good practice is to gently pull thread from the spool – if it feels wiry or brittle, it’s likely to fray.
Choosing a trusted brand and matching the fiber content (polyester thread for polyester fabric, cotton for cotton) ensures the seam has the same stretch and wear as the fabric itself.
4. Rushing Measurements
Measuring may feel less exciting than stitching, but accuracy here sets the framework for everything that follows.
When measurements are rushed, pattern pieces can come out uneven, seams won’t align, and the final garment may not fit as intended.
The frustration that follows is almost always traced back to this early stage.
Slowing down doesn’t mean complicating the process.
It means double-checking lengths and widths, ensuring your tape measure isn’t stretched or warped, and marking fabric with tools designed for precision (chalk, disappearing ink pens, or fine markers).
Even pausing to measure a second time before cutting can save fabric and hours of rework.
In sewing, the tape measure is your silent partner – respect it, and your projects will thank you.
You can also learn how to take body measurements to make sure your patterns match your actual shape perfectly.
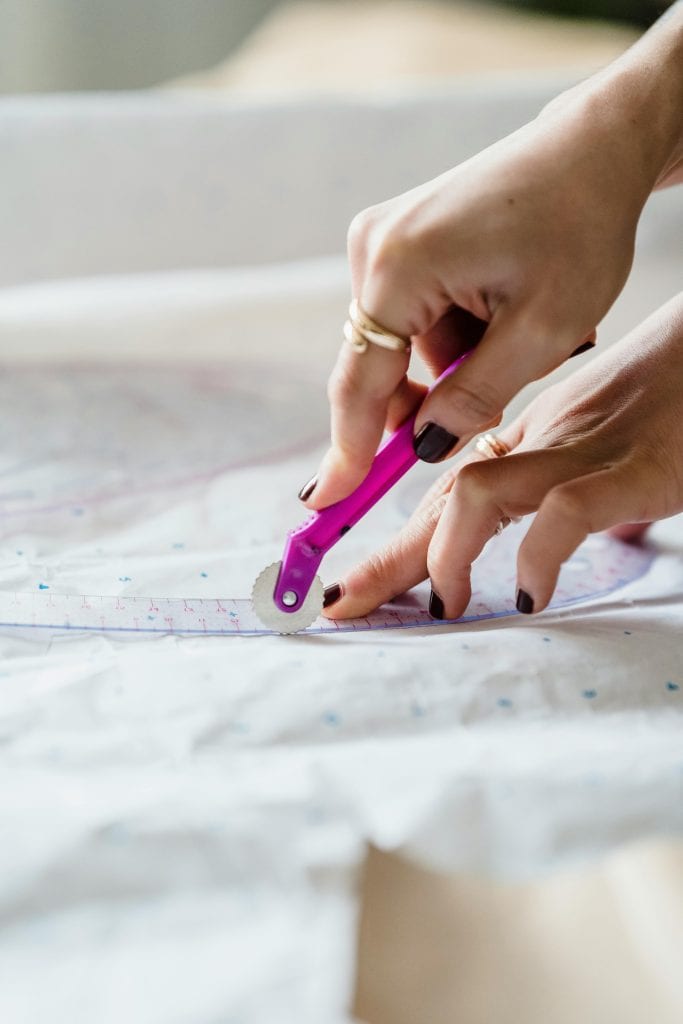
5. Cutting Without Precision
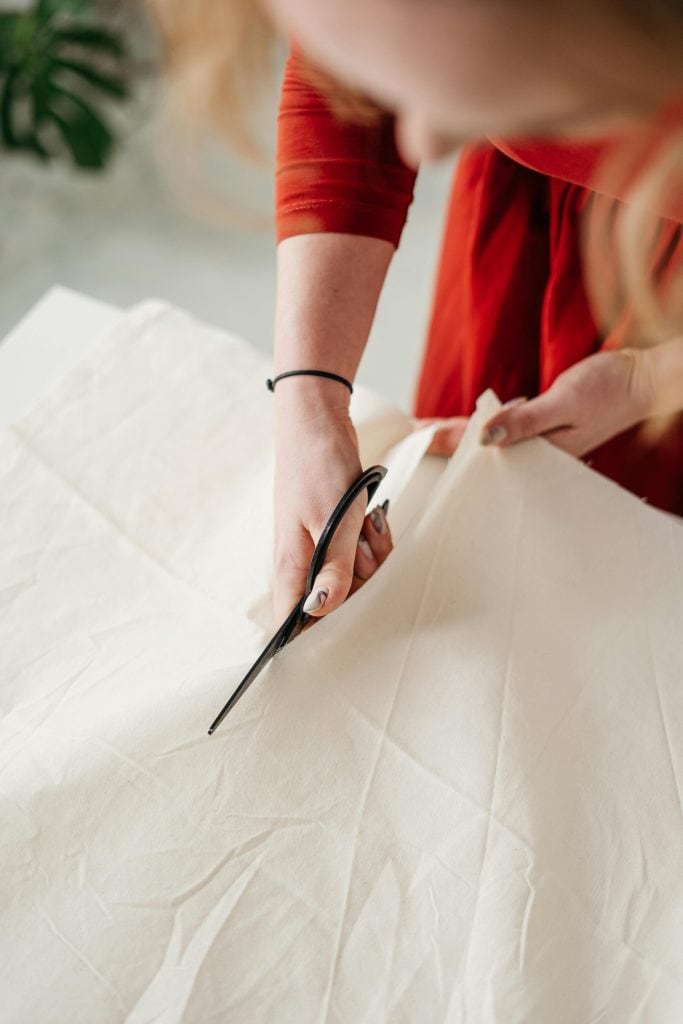
Cutting is more than separating fabric pieces – it’s about shaping the foundation of your project.
When cuts are uneven or rushed, the pieces won’t align, which leads to seams that twist, hems that don’t match, and garments that sit awkwardly on the body.
A dull pair of scissors or hasty rotary cutting can turn even the most beautiful fabric into wasted effort.
Precision cutting starts with sharp tools and a stable surface.
Keep fabric flat and smooth, pressing out wrinkles before laying down your pattern.
Use weights or pins to prevent shifting, and always cut with slow, deliberate strokes.
If you’re using a rotary cutter, pair it with a cutting mat and ruler for steady guidance.
Every clean, accurate cut you make sets the stage for seams that join effortlessly later.
Following a few must-do steps before cutting fabric ensures every clean, accurate cut sets the stage for seams that join effortlessly later.
6. Forgetting to Pin or Clip

It may feel quicker to skip pinning, but fabric has a way of shifting while you sew.
Without stabilization, layers slide, edges stretch, and corners don’t match up.
This can throw off seam allowances and create puckered or uneven lines, especially on curved or slippery fabrics.
Pins and clips act like extra hands – they hold your vision in place until the stitches secure it.
Pins work well for most woven fabrics, while clips excel on bulkier layers like fleece or multiple seams.
Even when working on a small project, taking the time to secure pieces ensures accuracy.
It’s less about slowing down and more about setting yourself up for clean results on the first try.
Learn how to pin fabric the right way to keep every layer perfectly aligned before stitching.
7. Overlooking Seam Allowances
Seam allowances may look like empty space, but they are the hidden framework that gives structure and fit to a project.
Inconsistent seam allowances can cause one side of a garment to feel tighter, a quilt block to fall out of alignment, or a tote bag seam to weaken under weight.
It’s not always the stitches themselves that cause problems – it’s how close or far they land from the fabric’s edge.
The easiest fix is building awareness into your process.
Use the seam guides etched onto your sewing machine’s plate, or mark your allowance directly onto the fabric.
A magnetic seam guide or washi tape on the machine can also provide a clear visual.
Once you train your eye and hands to maintain even seam allowances, you’ll notice garments fit better, projects look more professional, and your sewing feels more consistent overall.
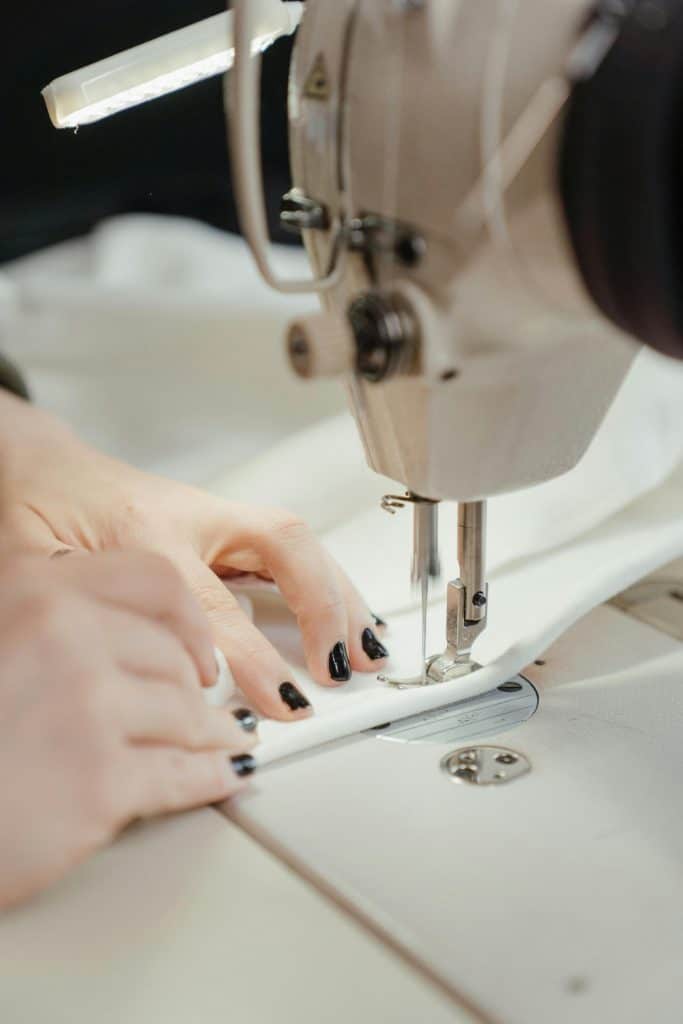
8. Sewing Too Fast
Speed can be tempting – especially when you feel momentum at the machine – but it often works against you.
Sewing too quickly increases the chance of stitches veering off, fabric stretching under the presser foot, or layers shifting out of place.
What looks like efficiency in the moment often leads to time spent ripping seams later.
A steady pace brings more control. Think of it like driving: a smooth, moderate speed allows for better handling and accuracy.
By slowing down, you’ll hear your machine’s rhythm, guide fabric with intention, and correct small adjustments before they become bigger issues.
Sewing is about creating something durable and beautiful, one consistent seam at a time.
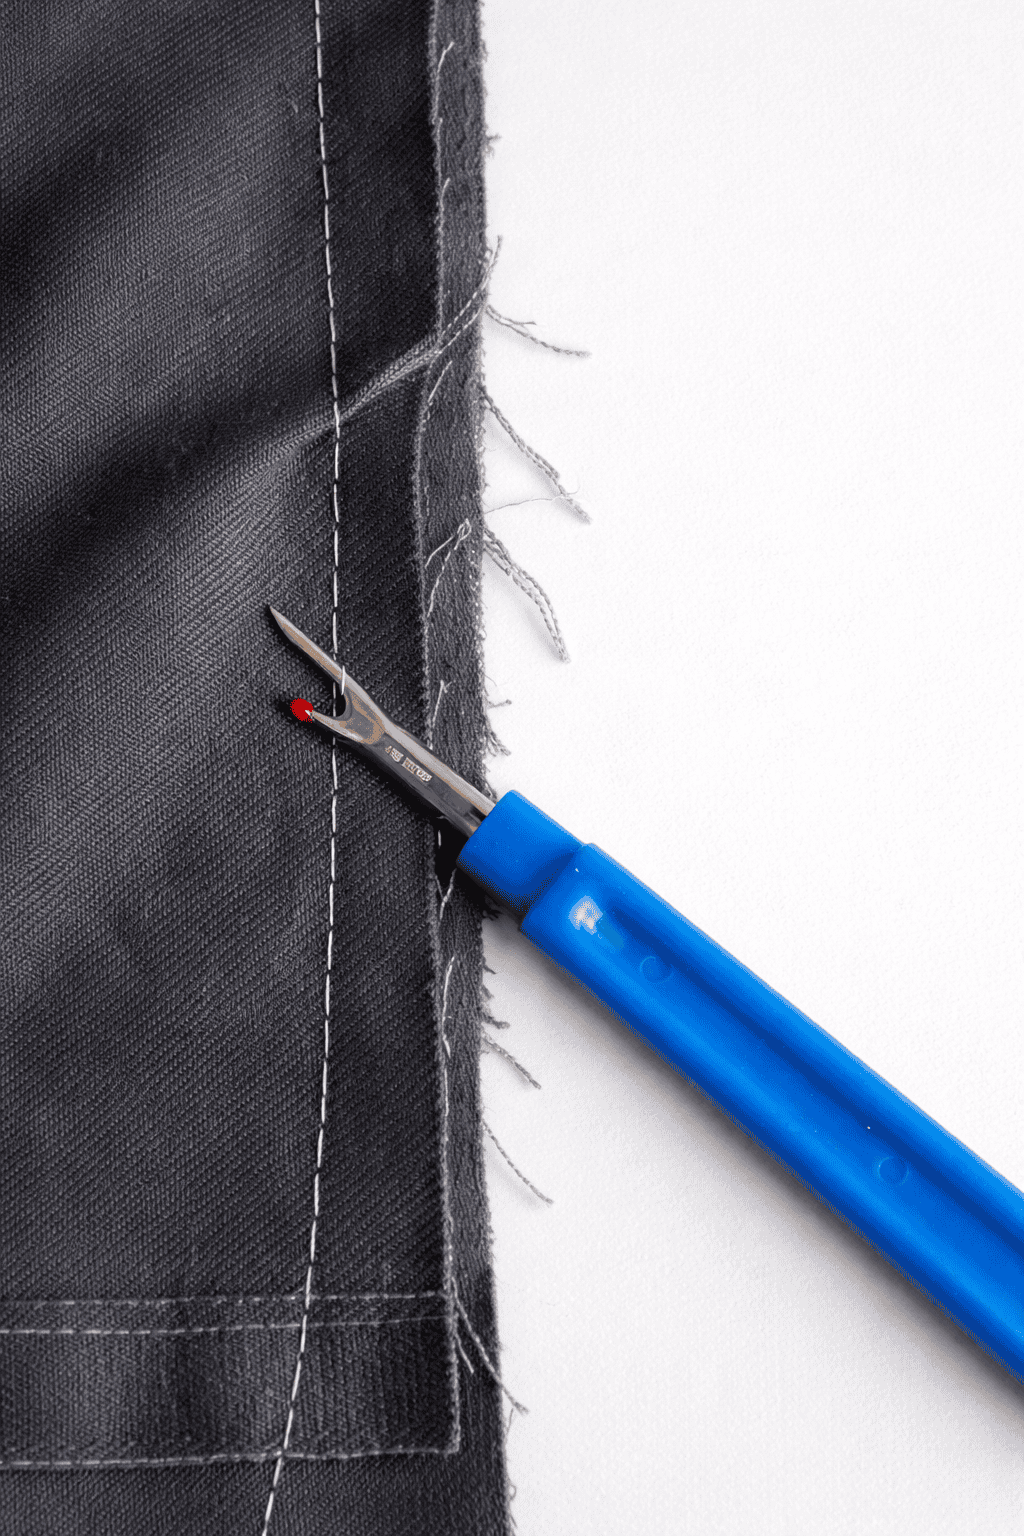
9. Not Finishing Seams

An unfinished seam may hold for a little while, but over time the raw edges fray.
This weakens the seam, shortens the life of the project, and makes the inside of a garment look rough.
Even sturdy fabrics can unravel after repeated washing or wear if seams are left unfinished.
Finishing is simple. A zigzag stitch along the raw edge helps prevent fraying, while pinking shears create a simple, saw-tooth edge that resists unraveling.
If you have access to a serger, it provides a professional-grade finish in one pass.
The method matters less than the intention – choosing any seam finish adds polish, strength, and durability to your work.
It’s one of those small steps that elevates a project from “homemade” to “well-made.”
10. Skipping Pressing While Sewing
Many beginners press only at the very end of a project, but pressing during construction is what gives sewing its professional shape.
Without it, seams can remain bulky, collars may not sit flat, and hems may look stiff.
Pressing “as you go” is like sealing each step – it locks the shape of the fabric into place.
A good habit is to press each seam after it’s sewn, first setting the stitches flat, then pressing them open or to one side as directed.
This removes puckering and helps the fabric relax into its intended form.
It may feel like an extra step, but pressing consistently actually makes sewing easier because pieces line up more smoothly.
11. Ignoring Tension Settings
Stitch tension controls how thread from the top and bottom of the machine lock together.
When the tension is off, stitches may look loose and loopy on one side or too tight and pulling on the other.
Left uncorrected, this weakens seams and makes projects look uneven.
The key is to test tension before starting on your actual fabric. Use a scrap from your project material and sew a test line.
If the stitches don’t look balanced, adjust gradually until both top and bottom threads lie smoothly in the fabric.
This simple habit takes only a minute, but it spares you the frustration of reworking entire seams.
Awareness of tension gives you consistent results, no matter what fabric or thread you’re using.
Learning how to adjust the tension on your sewing machine gives you consistent results, no matter what fabric or thread you’re using.
12. Neglecting Machine Maintenance
A sewing machine works best when it’s treated as the reliable tool it is.
Dust, lint, and thread buildup can clog moving parts, causing skipped stitches or even damage over time.
A dull or bent needle can also strain the motor and compromise fabric.
Neglecting these details shortens the lifespan of your machine and interrupts your sewing flow.
Regular maintenance doesn’t require advanced skill.
Brushing out lint after every few projects, oiling parts as recommended by the manual, and replacing needles after 8–10 hours of sewing keeps the machine running smoothly.
Periodic professional servicing adds an extra layer of care.
When your machine is well-maintained, it rewards you with even stitches and fewer interruptions – allowing you to focus fully on the creative side of sewing.
13. Choosing the Wrong Fabric for the Project
Fabric choice can make or break a project.
Some materials stretch, fray, or shift more than beginners expect, which can cause seams to misalign or garments to lose shape.
For example, slippery satins or stretchy knits demand a steady hand and often special tools, while thick denim may overwhelm a lightweight machine.
Choosing fabric that doesn’t suit your skill level or project type often leads to unnecessary frustration.
A more reliable approach is to match fabric to both the pattern and your current experience.
Stable fabrics like cotton, linen, or chambray are excellent for practice – they cut cleanly, hold their shape, and are forgiving to sew.
As your confidence grows, you can explore trickier fabrics like knits, silks, or heavier materials.
By respecting the role fabric plays, you set yourself up for projects that not only look better but also last longer.
Learning how to read fabric labels like a pro helps you choose materials that truly fit your pattern and skill level.
How to Build Steadier Sewing Habits
Avoiding mistakes comes down to developing habits that support you every time you sit at your machine.
Small routines go a long way: measuring twice before cutting, pressing seams as you sew, and keeping your tools in good condition.
Testing stitches on a fabric scrap before starting the real piece can save hours of correction later.
Another helpful practice is to keep a short checklist by your sewing space.
It should be simple – just a few reminders like “check needle type,” “prep fabric,” and “press seams.”
Over time, these steps become second nature, making the entire process smoother and more enjoyable.
Habits bring stability, and stability frees you to focus on the creative side of sewing.
If you’re looking for some clever sewing hacks for beginners, check out our guide to make your sewing process even easier and more fun!
Encouragement for Every Sewer
Every sewer, no matter how skilled, has made each of these mistakes at least once.
What matters is not avoiding them forever but learning how to respond when they appear.
With awareness, the same mistakes that once felt discouraging become guideposts that shape your skills.
Each stitch (straight or crooked) adds to your experience and builds confidence.
Celebrate the progress you’re making, and know that steady practice is what transforms sewing from a task into a craft you can trust.
The more you sew, the more capable and creative you become – one seam at a time.
Take Your Sewing Forward With Confidence
Sewing is a craft built on awareness, patience, and steady practice.
Now that you know the most common mistakes and how to avoid them, you’re better equipped to enjoy the process and create pieces that feel strong and intentional.
What sewing mistake have you learned from the most? Share your thoughts or tips in the comments below so we can keep encouraging one another.
Keep Your Sewing Patterns Neat and Easy to Find

As the seasons pass and projects add up, those little paper patterns have a way of piling into drawers and baskets.
And when you go to remake something, you end up searching instead of sewing.
So I created these Free Sewing Pattern Labels to make things easier.
They’re simple.
They’re pretty.
And they help you store your patterns in a way that feels calm and intentional.
Print them, fill them out, and tuck them onto your pattern envelopes. That’s it.
A small step that keeps your creative space feeling peaceful and ready for the next project.
FAQs
1. How often should I change my sewing machine needle?
A good rule is every 8–10 hours of sewing time, or at the start of a new project, especially if you’re switching fabric types. A fresh needle protects your fabric and prevents skipped stitches.
2. What’s the best type of thread for beginners?
All-purpose polyester thread is a strong and versatile choice that works on most fabrics. Cotton thread is great for natural fibers, but polyester tends to be more forgiving and durable when you’re learning.
3. Do I need special scissors just for fabric?
Yes. Fabric scissors should be reserved only for fabric to stay sharp. Using them on paper or cardboard dulls the blades, which leads to jagged cuts. A rotary cutter with a mat is another excellent tool for clean, precise cuts.
4. How do I know if my tension is set correctly?
Sew a test line on scrap fabric. The stitches should look even on both sides, with no loops on the back and no pulling on the top. If one side looks off, adjust the tension slightly until the stitch balances.
5. What fabric should beginners avoid?
Slippery materials like satin, very stretchy knits, or heavy fabrics like denim can be difficult to control. Beginners do best with stable, medium-weight fabrics such as cotton, chambray, or linen blends. These hold their shape and cut easily, making learning more enjoyable.
