Every sewist knows the deep satisfaction that comes from completing a project – the careful cutting, the focused stitching, and the final press that brings everything together.
But between projects, it’s easy for details to fade: the pattern adjustments that worked perfectly, the fabric that handled beautifully, or the lesson learned from a tricky seam.
That’s where a sewing journal becomes more than a notebook – it becomes a trusted companion in your creative process.
A sewing journal helps you stay connected to your craft.
It captures your methods, materials, and insights in one thoughtful place, so each new project builds on the wisdom of the last.
It’s a practical tool (part record, part reflection) that strengthens your skills and nurtures consistency.
By the time you’re done with this guide, you’ll know exactly how to use a sewing journal to document your projects, organize your ideas, and watch your craftsmanship grow (while actually enjoying the process).
Why Keep a Sewing Journal
A sewing journal is a living record of your growth as a maker.
It helps you see where you’ve been, understand what works best for you, and build confidence in your process.
Whether you sew for pleasure, practicality, or both, documenting your work gives your craft a stronger foundation and a clearer sense of direction.
Build Skill Awareness
Each project teaches something new – a technique refined, a better way to handle a fabric, a smoother finish on a seam.
Writing those lessons down turns experience into knowledge.
Over time, your journal becomes a personal reference book, tailored to how you sew.
You’ll start to recognize patterns in your work – what tools you reach for most, which stitches give the best results, and how your precision improves with each entry.
Capture Creative Flow
Inspiration can arrive anywhere – during a walk through a fabric store, or while sketching an idea over morning coffee.
A sewing journal gives those ideas a place to land.
It keeps your thoughts organized and your creativity accessible, so the next time you’re ready to sew, you already have a trail of inspired notes to follow.
Track Progress with Purpose
There’s quiet satisfaction in seeing your improvement laid out on paper.
When you track your projects, you witness the steady rhythm of your own progress – the garments that fit better, the finishing that becomes cleaner, the confidence that grows with every page.
That perspective fuels motivation and gives meaning to the time you spend at your machine.
Streamline Future Projects
Past projects hold valuable insights.
By recording measurements, fabric types (learn here how to read fabric labels), and adjustments, you save yourself from repeating work or guessing what went right before.
Your journal becomes a guide that streamlines decision-making, helping you cut down on trial and error and focus more energy on creative refinement.
Create a Personal Sewing Archive
Over time, your sewing journal transforms into a creative archive – a tangible record of your craftsmanship.
It tells the story of your style, your methods, and your evolution as a sewist.
Looking back, you’ll find more than projects; you’ll see the steady growth of your skills, the refinement of your taste, and the satisfaction of building something meaningful with your hands.
How to Choose Your Journal Format
Before you begin writing, it helps to choose a format that fits comfortably into your sewing rhythm.
The right journal is about what supports your habits and keeps you engaged.
Your sewing journal should feel like an extension of your workspace: clear, functional, and inspiring to open.
Analog vs. Digital
Some sewists love the tactile satisfaction of pen and paper – the act of writing by hand deepens focus and invites creativity.
Others prefer digital tools for their efficiency and searchability. There’s no wrong choice.
What matters is how you connect with your record-keeping.
If you love sketching and collecting fabric swatches, a physical notebook might suit you best.
If you rely on spreadsheets or cloud storage, a digital format keeps everything accessible wherever you sew.
Types of Journals
Your journal can take many forms.
Some prefer a bullet journal, adaptable and visually clean, perfect for checklists and quick notes.
A binder system allows easy rearranging of pages – ideal for sewists who like flexibility.
Others build a printable sewing planner, blending structure with customization.
You can even repurpose a sketchbook for sketches, fabric samples, and layout ideas.
What to Consider When Choosing
When deciding, think about:
- Portability: Will you want to bring it to fabric shops or keep it at your sewing table?
- Layout: Do you prefer clean lines and boxes or open, freeform pages?
- Durability: Choose materials that hold up to frequent handling and creative use.
- Personal Habits: The most effective journal aligns with how you already think and work.
Selecting a format that feels natural encourages steady use – it becomes part of your process instead of an afterthought.
Recommended Tools
If you’re working on paper, consider high-quality pens that don’t bleed through, fine markers for labeling, and tape or glue for fabric swatches and pattern envelopes.
Washi tape or small sticky tabs make quick indexing simple and neat.
For digital setups, use note-taking apps, spreadsheets, or project management tools – anything that lets you categorize projects, store photos, and make updates easily.
Your sewing journal just need to serve you – to make your thoughts visible and your projects easier to understand.
Once you find a format that supports your rhythm, journaling becomes a seamless part of your craft.
How to Set Up Your Sewing Journal
Once you’ve chosen the format that fits your style, it’s time to build the foundation of your sewing journal.
Foundational Pages to Include
Start with a few essential pages that will anchor your journal.
These sections provide structure without limiting your creativity:
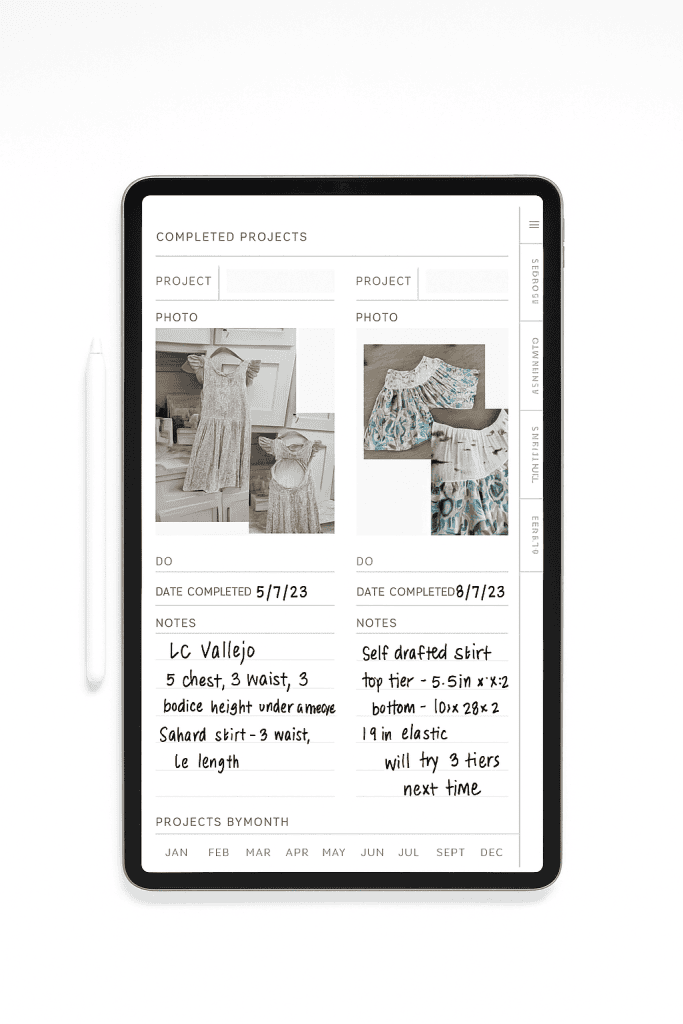
- Project Tracker or Table of Contents – a running list of your finished and ongoing projects, so you can easily look back or plan ahead.
- Measurements Chart – your current body or household measurements, regularly updated to ensure accuracy for garment or home projects. (If you’re new to this part, you can see my guide on how to take body measurements so you always start with the most accurate numbers.)
- Fabric Inventory – swatches, fiber content, yardage, and notes on texture or drape. It helps you match fabric to the right pattern later.
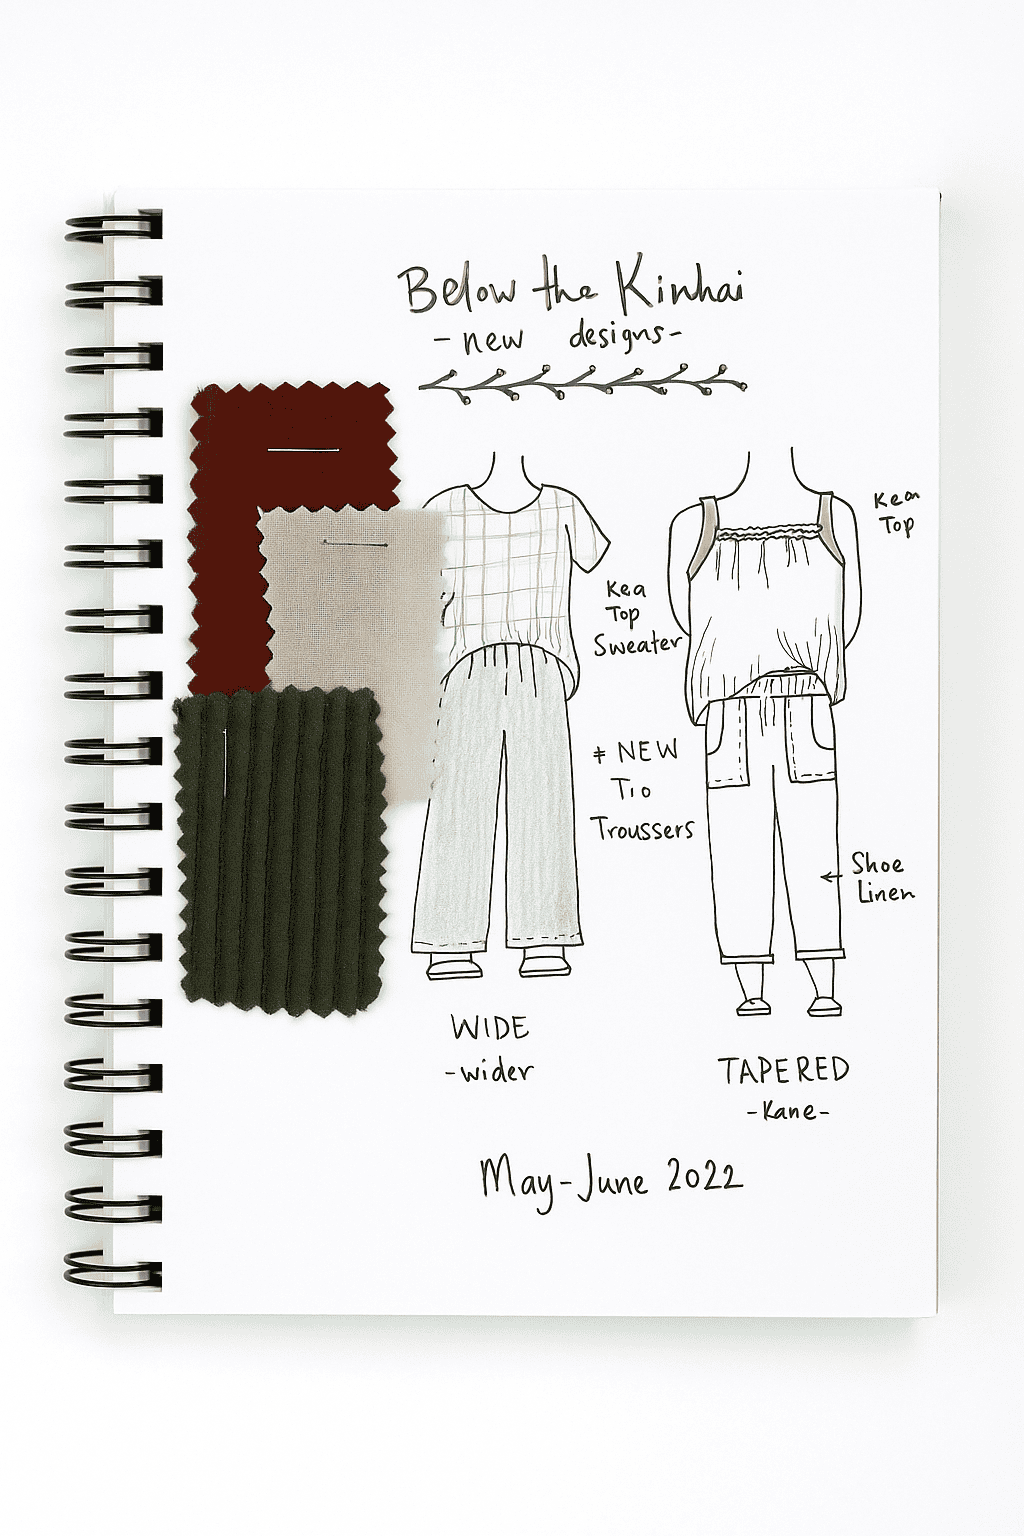
- Pattern Library – list or images of your patterns, including designer, size range, and what you’ve already used.
- Goals and Skill Development Section – a space to note techniques you want to learn or habits you want to strengthen, like improving fit or mastering buttonholes.
These pages become the backbone of your journal – always accessible, always relevant.
Layout Ideas
Your layout should make sense to you at a glance.
You might dedicate a full page to each project or divide it into smaller sections for quick notes.
If you prefer structure, use boxes or templates for consistency.
If you lean toward creative freedom, leave open space for sketches, photos, or pinned fabric.
Balance is key – enough order to stay organized, enough flexibility to stay inspired.
Establishing a Routine
Journaling works best when it becomes part of your sewing rhythm.
Set aside a few moments before and after each session:
- Before sewing: jot down your project goal, materials, and any adjustments you plan to make.
- After sewing: reflect on how the process went, what you enjoyed, and what you’d repeat or refine next time.
This rhythm reinforces intention. Over time, you’ll notice that journaling sharpens focus, saves time, and deepens satisfaction in your craft.
How to Document a Sewing Project Step-by-Step
Every project tells a story – from the first spark of inspiration to the final press of the iron.
Your sewing journal captures that story in a way that’s both practical and personal.
The goal is to record the kind of details that make your next project smoother and more intentional.
Here’s a simple rhythm to follow for each entry.
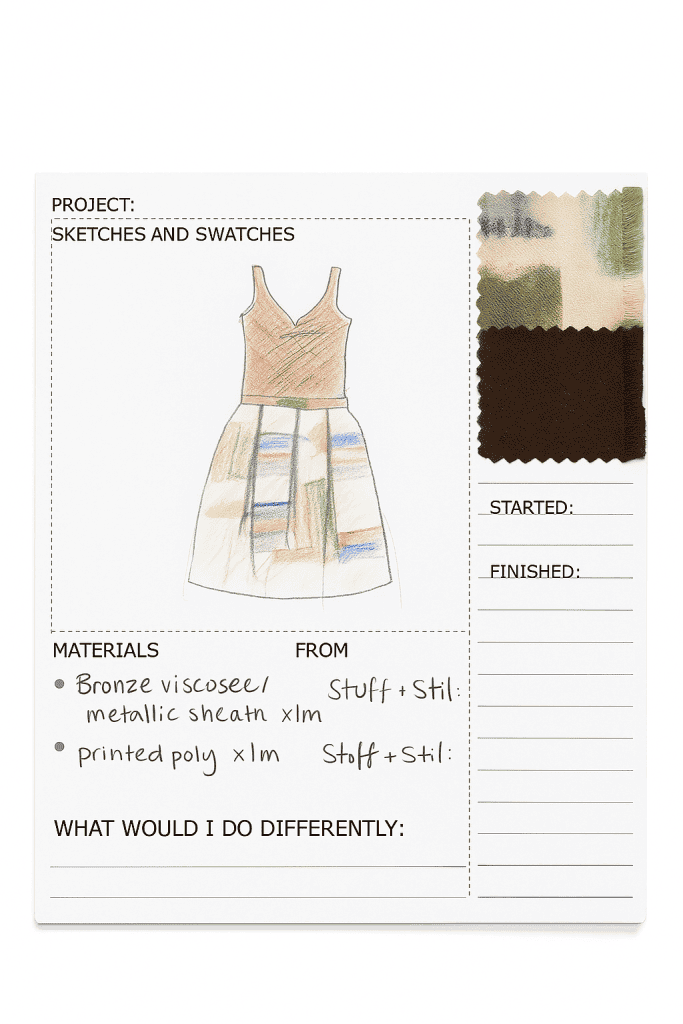
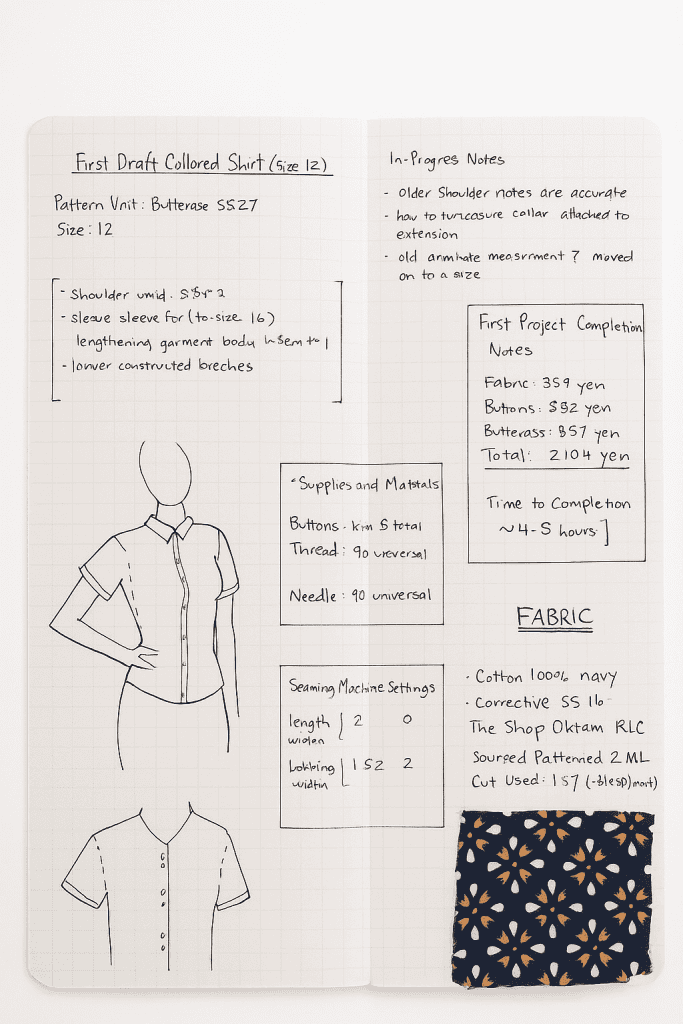
1. Project Overview
Begin with the essentials: pattern name, designer or brand, project type, and date started.
Include a short note about what drew you to this pattern – maybe it filled a wardrobe gap, or you wanted to try a new construction technique.
These details give each project context and meaning.
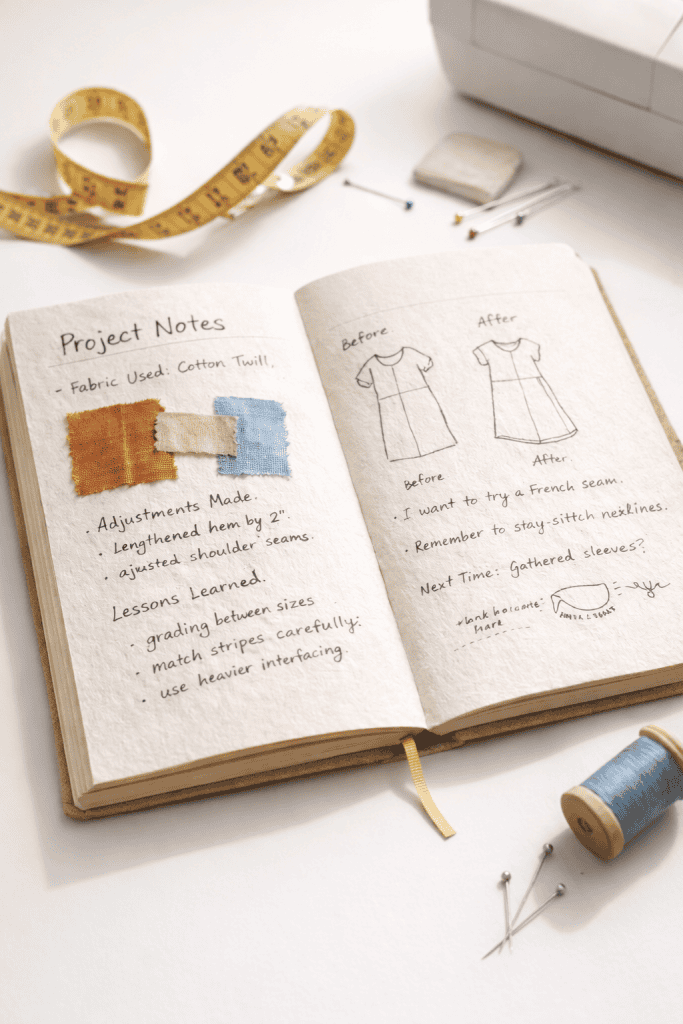
2. Materials Used
List everything you used – fabric type, fiber content, weight, color, and where it came from.
You can also check out how to do a burn test for natural fabrics to better understand your fabric.
Add notes about notions such as zippers, buttons, interfacing, or special threads.
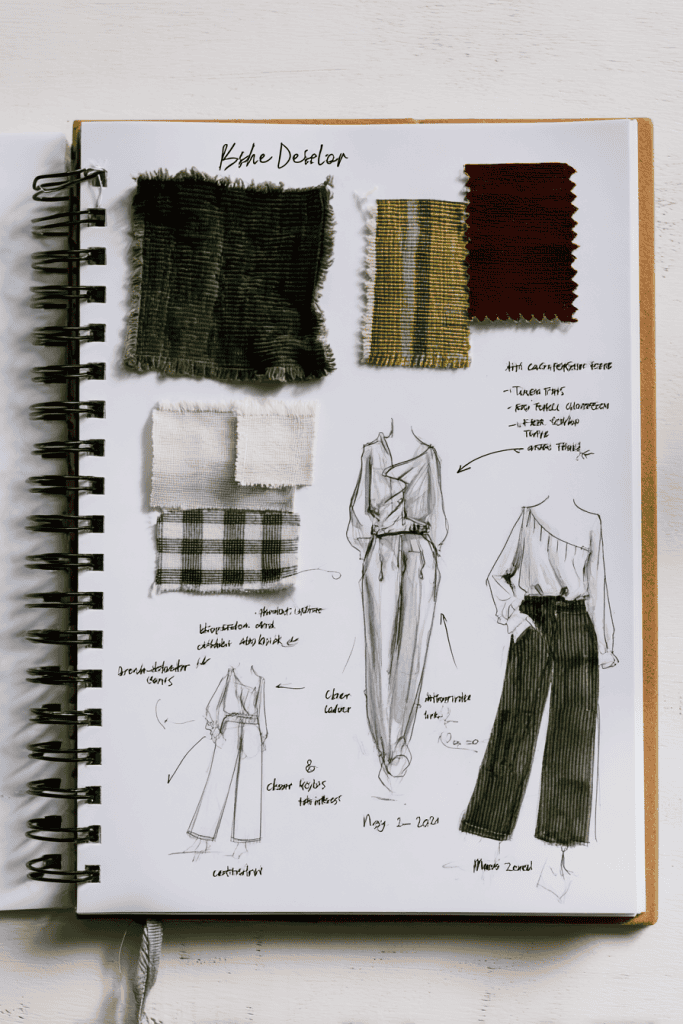
Including a small swatch or a printed photo helps you remember texture and color later.
This section makes it easy to duplicate results when a project turns out beautifully.
3. Modifications Made
No project stays exactly as printed – that’s part of the joy of sewing.
Record the changes you made, such as adjustments to fit, seam allowances, or design tweaks.
Include your reasoning so you can evaluate it later.
These notes become incredibly helpful when repeating a pattern or adapting it for another fabric.
4. Process Reflections
After finishing, take a few minutes to note how the sewing experience felt.
- Which parts came together smoothly?
- Which techniques elevated the result?
- Which tools or steps saved you time?
Treat this as a conversation with your future self – your insights today will be your guidance tomorrow.
5. Photos or Swatches
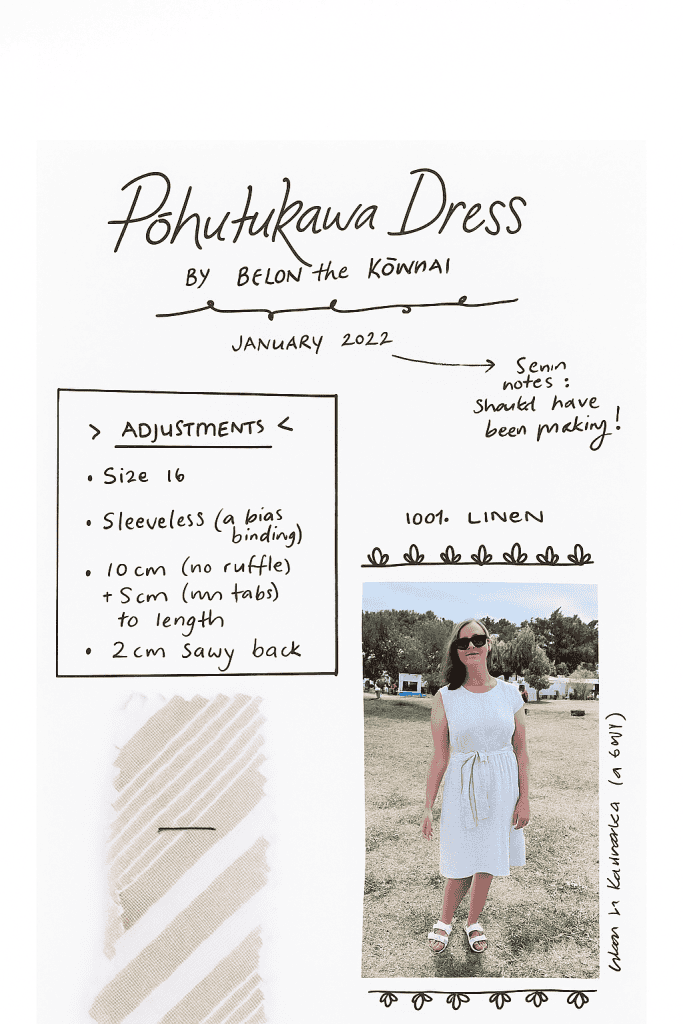
Attach photos of the finished project, progress shots, or fabric samples.
Visuals make your journal more engaging and help you recall scale, texture, and fit.
Even a simple printed image can refresh your memory more clearly than words alone.
6. Lessons Learned
Every project adds to your understanding – a better pressing technique, a fabric that performs beautifully, a new method you’ll return to.
Write these discoveries down.
They remind you how far you’ve come and give direction for what to refine next.
7. Next Steps or Revisions
End each entry with forward movement.
If you’d like to recreate the project in another fabric, scale the design, or explore a related technique, note it here.
This step turns journaling into planning – not just recording the past but shaping what comes next.
A sewing journal is most powerful when it supports your process, not interrupts it.
Over time, you’ll see your pages fill not just with projects, but with proof of steady, meaningful growth.
Using Your Sewing Journal Beyond Documentation
Once your sewing journal becomes part of your process, you’ll discover it offers far more than project notes.
It can serve as your planning board, design book, and creative compass – guiding not only what you sew, but how you grow as a maker.
The beauty of a well-used journal is its versatility. It evolves with your skill, your interests, and your lifestyle.
Here are ways to expand its purpose and turn it into a tool for ongoing creativity and mastery.
Skill-Building Tool
Your sewing journal can double as a training log.
Create pages to track specific techniques you’re practicing – inserting zippers, mastering topstitching, or refining fit adjustments.
Note what method or tutorial you followed, the tools you used, and the outcome.
Over time, these entries show measurable improvement and reveal which techniques come most naturally to you.
You’ll start to see patterns in your learning – areas of strength to celebrate and areas ready for refinement.
This keeps your progress visible and encouraging.
Planning Seasonal or Themed Collections
Many sewists enjoy working toward a focused goal – like creating a capsule wardrobe, a gift collection, or a set of home projects.
Your journal is the perfect space for planning these themes.
Use it to sketch combinations, track completion timelines, and note which fabrics coordinate well together.
Organizing by theme turns sewing into a cohesive creative practice rather than a series of isolated projects.
It helps you design with purpose and make the most of what you already have.
Design Exploration
Not every idea is ready to cut and stitch – and that’s where your journal shines.
It’s a safe place to experiment on paper before committing to fabric.
Use it to explore silhouettes, color stories, or embellishment ideas. (If you’re experimenting with pretty details, my guide on how to sew lace on fabric can help spark ideas.)
Jot notes about textures you want to try or patterns you want to combine.
These creative drafts often become future projects, helping you bridge inspiration and execution with confidence.
Fabric and Pattern Curation
Your journal can help you build harmony between your stash and your pattern collection.
Cross-reference your fabrics with the patterns you own – note which fabrics drape best for each silhouette, or which projects would make use of leftover yardage.
(If you’re newer to this part, check out how to read a sewing pattern for beginners to prep your projects well from the start.)
This approach brings clarity and purpose to your sewing space, reducing overwhelm and turning your supplies into inspiration.
Reflection and Motivation
A sewing journal is also about celebrating it.
When you look back through your pages, you’ll see tangible proof of your craftsmanship – from uneven first stitches to beautifully finished garments.
Reflection cultivates gratitude for your journey and confidence for what’s next.
Reviewing past entries reminds you of your resilience, your curiosity, and your creative discipline – all the qualities that make sewing such a rewarding lifelong skill.
7 Helpful Tips from Experienced Sewists
The most rewarding habits in sewing come from small, consistent actions.
These simple, time-tested practices will help you keep your sewing journal practical, inspiring, and genuinely supportive of your craft.
1. Record Details While They’re Fresh
The best time to write is soon after you’ve finished sewing.
That’s when small insights – like a better stitch setting or the perfect seam finish – are still clear in your mind.
Even a few quick notes will capture information you’ll appreciate later.
2. Include Visuals Whenever Possible
Photographs, sketches, or fabric swatches make your notes far more powerful.
Visuals help you recall color combinations, textures, and proportions better than words alone.
They also make your journal more inviting to revisit and update.
3. Keep Reference Materials Close
Slip in pattern envelopes, instruction sheets, or fabric tags.
These quick references save time when you want to recreate or modify a project.
You can even jot notes directly beside them – like recommended thread types or seam allowances that worked best.
4. Add Fabric Care and Maintenance Notes
A finished project deserves care that matches the effort you put into making it.
Include washing instructions, fiber reactions, and pressing preferences.
When you revisit a fabric later, you’ll already know how to treat it properly.
5. Use Color Codes or Tabs for Easy Navigation
Organization keeps your journal efficient.
Try using small sticky tabs, color-coded markers, or index symbols to separate project types, pattern brands, or learning notes.
This helps you locate information quickly – especially when your journal starts to grow.
6. Review Older Entries Regularly
Your past projects are full of lessons worth revisiting.
Set time every few months to flip through your journal and highlight insights that still serve you.
You’ll see how your accuracy has sharpened, your taste has matured, and your confidence has grown – page by page.
7. Let Your Journal Evolve
Your sewing habits will change as your skills and interests expand – let your journal change with you.
Add new sections, rearrange your layout, or switch formats if needed.
The most effective journal is the one that moves naturally with your creative rhythm.
Start Your Sewing Journal Today!
Go ahead and grab your sewing journal and just start.
Don’t worry about making it perfect – just jot down what you notice, what works, what doesn’t, little wins, little mistakes.
Over time, you’ll start to see your skills growing right there on the pages, and honestly, it’s such a nice way to keep track of your progress.
If you already have a sewing journal, or you’re thinking about starting one, I’d love to hear about it.
Share a tip, a struggle, or even just a little story in the comments.
You never know – what you write might be exactly the nudge someone else needs to start their own first page.
FAQs
1. How often should I update my sewing journal?
Update your journal as naturally as you sew. Most sewists find that making short notes after each session works best – it keeps details accurate without adding extra work. For larger projects, quick mid-process updates help capture fabric behavior or pattern adjustments while they’re still fresh.
2. What’s the best way to store fabric swatches in my journal?
Cut a small square of fabric (about one inch) and attach it with clear tape, a glue stick, or a small staple. Label it with fiber content, width, source, and washing results. If your journal is digital, take a close-up photo of the fabric in natural light and insert it next to your notes.
3. Can I use my sewing journal to plan future projects?
Absolutely. Many sewists dedicate a section for upcoming ideas – fabric pairings, pattern sketches, or seasonal goals. Planning in your journal keeps ideas organized and ensures that when you’re ready to sew, everything you need is already mapped out.
4. How can I keep my sewing journal organized when it starts getting full?
Use tabs, color codes, or a simple index to navigate easily. If you prefer a binder or disc system, you can rearrange pages by theme or year. For notebooks, add a contents page and number your entries. The goal is clarity, not formality – whatever helps you find information quickly.
5. Should I track mistakes or only successful projects?
Track both – but in a constructive way. Instead of labeling something as a mistake, describe what you discovered: a fabric that stretched unexpectedly, a better interfacing choice, or a new stitch that worked well. Every observation adds to your knowledge, and your journal becomes more valuable because of it.
