There’s a basket in my sewing nook that has its own quiet little life. Strips of cotton from the linen wrap dress I hand-sewed last spring, leftovers from my littlest one’s cloth diapers, a few floral bits I couldn’t bear to toss after finishing a pinafore. The pile keeps growing — I keep adding to it, the way some folks tuck pennies into a jar.
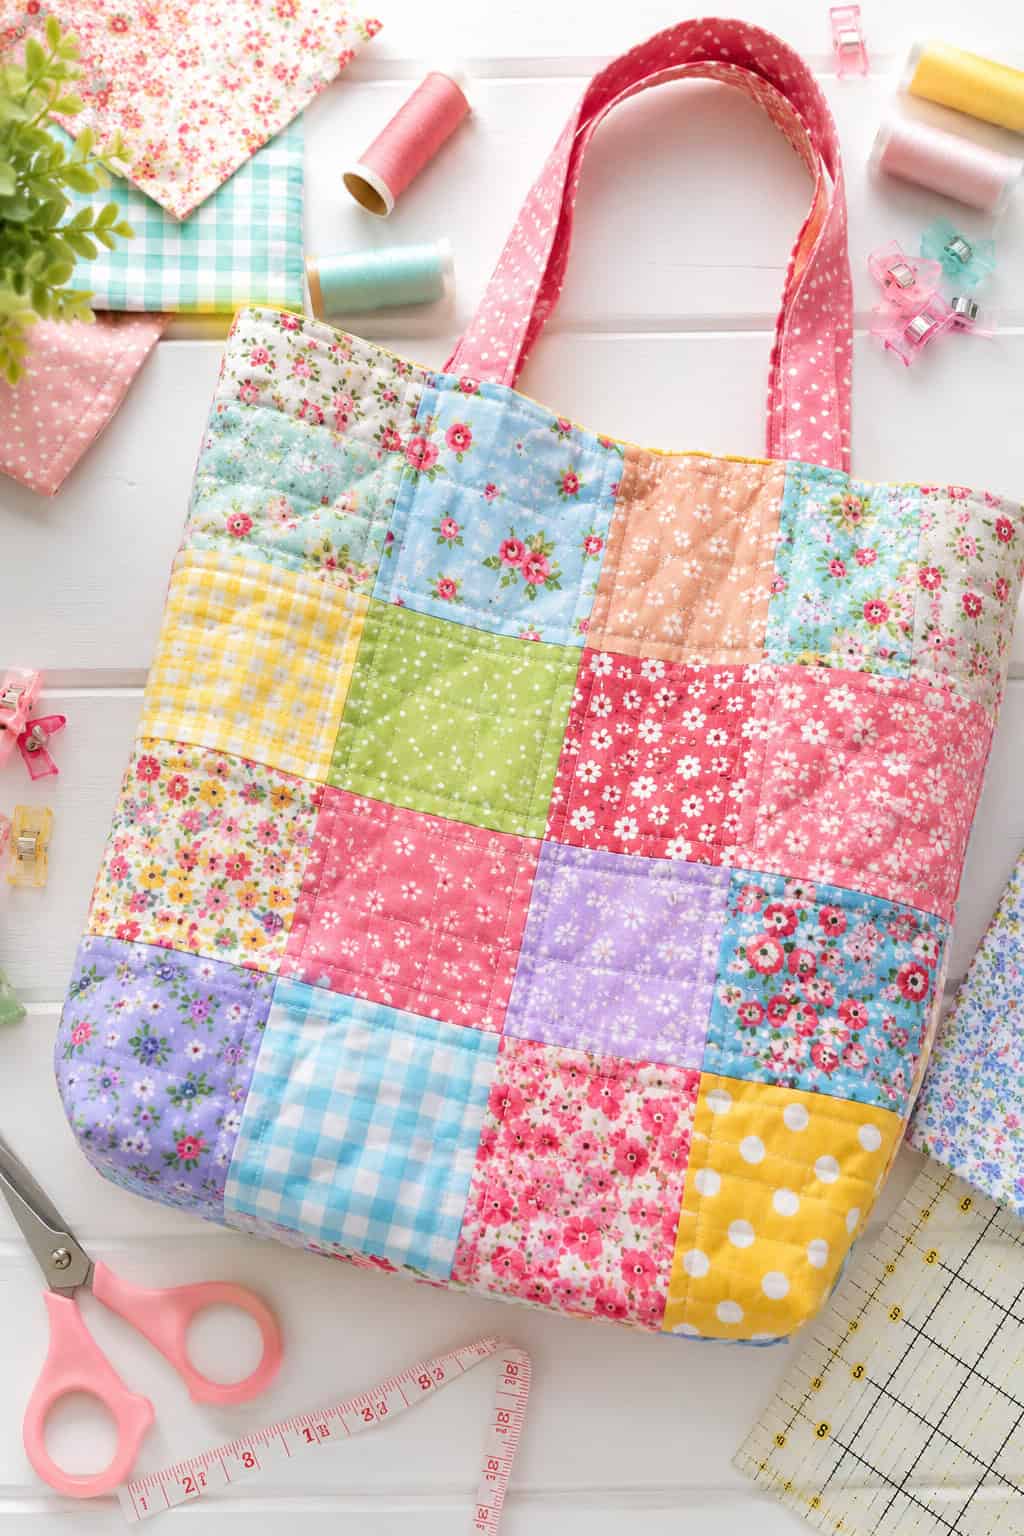
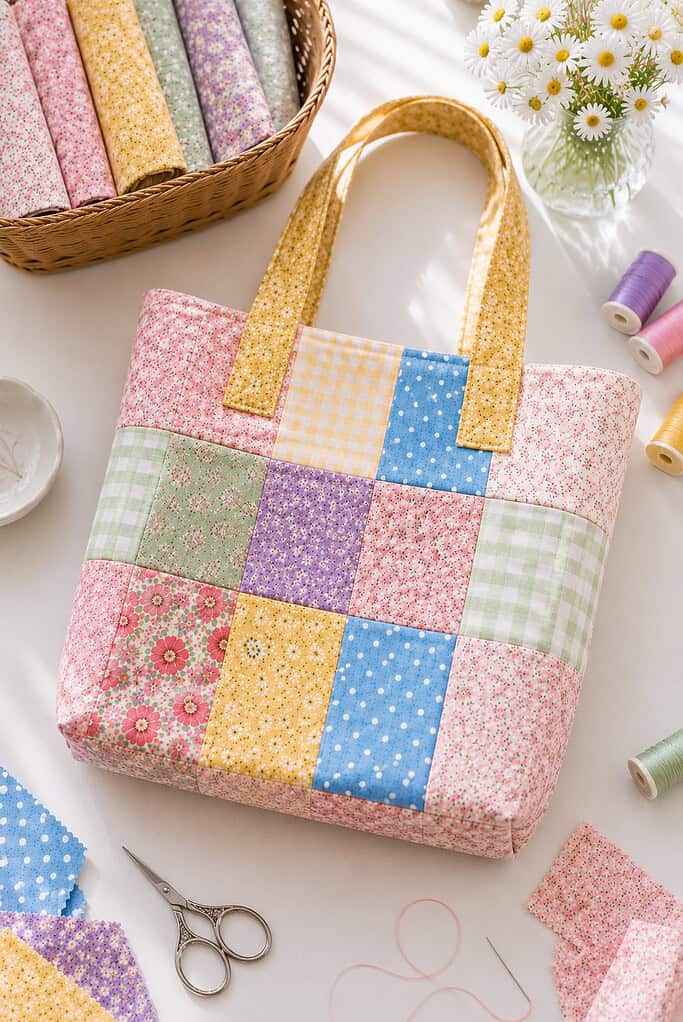
This past week, while the baby napped and the older two were stacking blocks on the kitchen rug, I finally pulled that basket onto my lap. And I made the cutest little patchwork tote bag from scraps that were destined for the bin. It carries my Bible to church now, the kids’ library books, even a few jars of raw honey from our neighbor’s hive.
If you’ve been eyeing your own basket of leftovers and wondering what to do with them, let me show you. This is one of the gentlest sewing projects you’ll ever try, and I’ll walk you through every measurement and stitch so you know exactly what to do.
The finished tote measures about 17½ inches wide by 17 inches tall by 4 inches deep — roomy enough for a stack of library books, a loaf of sourdough, and a small Bible all at once.
why a patchwork tote stitched from scraps is so sweet
A patchwork tote is the kind of project that meets you exactly where you are. New to sewing? The seams are forgiving — every imperfect stitch only adds to the charm. Been sewing for years? It’s a slow, satisfying break from anything that has to be precise.
It’s also a small act of stewardship. Every scrap that becomes part of a tote is one less piece tossed in the bin, and there’s something quietly beautiful about that. The verse I’ve been chewing on this week fits right alongside the work:
Whatsoever ye do, do it heartily, as to the Lord, and not unto men. — Colossians 3:23
Even something as small as stitching a little bag from leftovers can be a way of doing simple work with care. And practically? You’ll end up with a sturdy, washable, natural-fiber tote that holds far more than its size suggests. Mine has carried six pounds of sourdough flour without a single complaint.
what you’ll need to sew a patchwork tote bag
Most everything on this list might already be tucked in your sewing basket. If you’re missing a thing or two, no rush — you can pick them up over time, and most are well worth keeping on hand for future projects.
sixteen cotton fabric scraps, each at least 5½ by 5½ inches
You’ll cut these down to exact 5 by 5 inch squares once you start, so a little extra room around the edges is helpful. Quilting cotton, linen, lightweight chambray, and cotton from outgrown shirts all work beautifully. If you’ve already got a basket of fabric scraps tucked into a basket somewhere, you’re already halfway there.
half a yard of sturdy lining fabric (about 18 by 44 inches)
Choose something soft but tightly woven. Natural linen, unbleached muslin, and quilter’s-weight cotton are my favorites. Half a yard gives you enough for two 19 by 19 inch lining panels with a little spare for an inner pocket if you’d like one.
a quarter yard of fabric for the handles (about 9 by 44 inches)
You can use a coordinating cotton, sturdy linen, or even a strip of denim from old jeans. You’ll cut two strips at 24 by 4 inches — long enough to comfortably go over your shoulder once finished.
one spool of all-purpose cotton thread, 50 weight
A neutral thread blends quietly across many fabrics. Ecru or natural is my go-to for almost everything in the patchwork basket. One spool with 200 yards is plenty for a tote.
a Universal 80/12 sewing machine needle
The right needle makes such a difference. An 80/12 Universal handles cotton and linen beautifully without leaving big holes or getting dull halfway through. Pop in a fresh one before you start.
fabric scissors or a rotary cutter (45mm)
Sharp 8-inch fabric scissors will do the job, but a 45mm rotary cutter is kinder to your hands and gives you cleaner edges across sixteen squares. Whichever you use, keep the blade sharp.
a quilting ruler (6 by 24 inches) and a self-healing cutting mat (18 by 24 inches)
For trimming your patchwork squares to a uniform 5 by 5 inches. This is the small, slow step that makes the finished tote look polished. A 6 by 24 inch ruler is the most useful size if you’re just building your kit.
an iron and a clean ironing board
You’ll press seams open as you go, on the cotton or linen setting (highest heat with steam). It honestly makes more difference than you’d think — pressed seams are the whole secret to patchwork that lays flat and pretty.
about 30 pins or fabric clips
Either works. Clips are lovely for thicker fabrics and stacked layers, pins for finer ones. You’ll want enough to pin every seam intersection as you join your rows.
a hand-sewing needle and a chopstick
The needle is for slipstitching the lining opening closed at the very end. The chopstick (or a knitting needle) is for poking out crisp corners when you turn the bag right side out.
a sewing machine
Any beginner-friendly sewing machine will sew this project beautifully. A simple straight stitch set to about 2.5mm is all you really need — nothing fancy, nothing fussy.
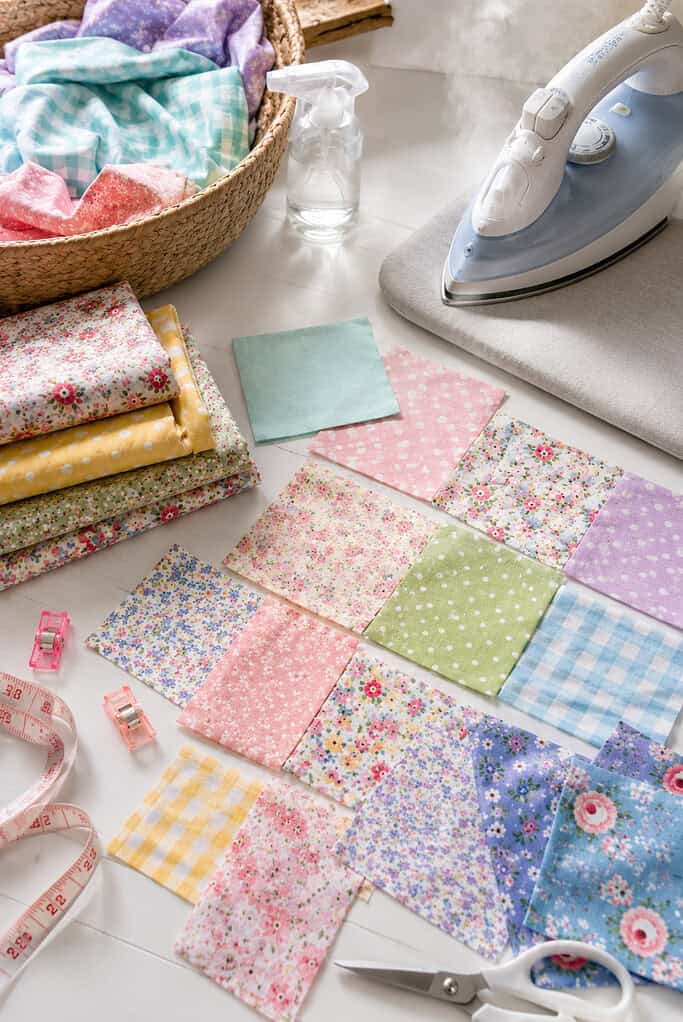
choosing fabrics that play nicely together
The fun begins long before you start cutting.
Lay your scraps out on a clean table or the kitchen floor and sort by color and pattern. Try to mix florals with simple stripes, light with dark, busy with quiet. The eye loves a little variety, and patchwork sings when there’s gentle contrast.
Stick with natural fibers if you can. Cotton and linen wash well, age beautifully, and feel good in your hands. Try to keep all sixteen scraps at a similar weight (quilting cotton is around 4 ounces per square yard, mid-weight linen is 5 to 6 ounces) so the finished panel has an even drape.
If you have a few pieces in colors that feel a little flat, you can dye plain cotton at home using the stovetop method. It’s a sweet way to bring tired fabric back to life. A quiet afternoon, a stockpot, and a packet of dye can transform a whole basket of beige into something soft and rosy.
A small tip: take a step back from your layout and squint your eyes. If one fabric jumps out too loudly, it’s the one to swap. Quiet harmony makes the prettiest patchwork.
how to sew a patchwork tote bag, step by step
Set aside about three to four hours total, or split the work across two slow mornings. I usually do my piecing during the first naptime and my assembly during the second, with a cup of tea between.
A few notes before we begin: use a ¼ inch (0.6 cm) seam allowance for all the patchwork piecing, and switch to a ½ inch (1.3 cm) seam allowance for the bag assembly and lining. Set your stitch length to 2.5mm and backstitch at the start and end of every seam.
step 1: prewash, dry, and press all your fabric
Toss your scraps, lining fabric, and handle fabric into the washing machine on a cold gentle cycle, then tumble dry on low heat. Cotton typically shrinks 3 to 5 percent and linen as much as 8 percent on its first wash, and you don’t want a tote that puckers after its first cycle.
Once everything is dry, press each piece flat with the iron on the cotton or linen setting (about 400 degrees Fahrenheit), using steam if your iron has it. Smoothing every wrinkle now will save you a lot of trouble later.
step 2: cut sixteen squares at 5 by 5 inches
Lay your first scrap on the cutting mat with the right side facing up. Place the quilting ruler so the 5-inch line is aligned along one straight edge of the fabric, and use the rotary cutter to trim the opposite edges to make a perfect 5 by 5 inch square.
Repeat for all sixteen squares. If a scrap is just barely too small, you can stitch two smaller pieces together with a ¼ inch seam, press the seam open, and trim the joined piece to 5 by 5 inches. This little improvisation often makes the prettiest squares in the finished tote.
Stack your sixteen squares in a tidy pile and take a moment to admire the colors. This is the slow, quiet part of the work and it’s worth lingering over.
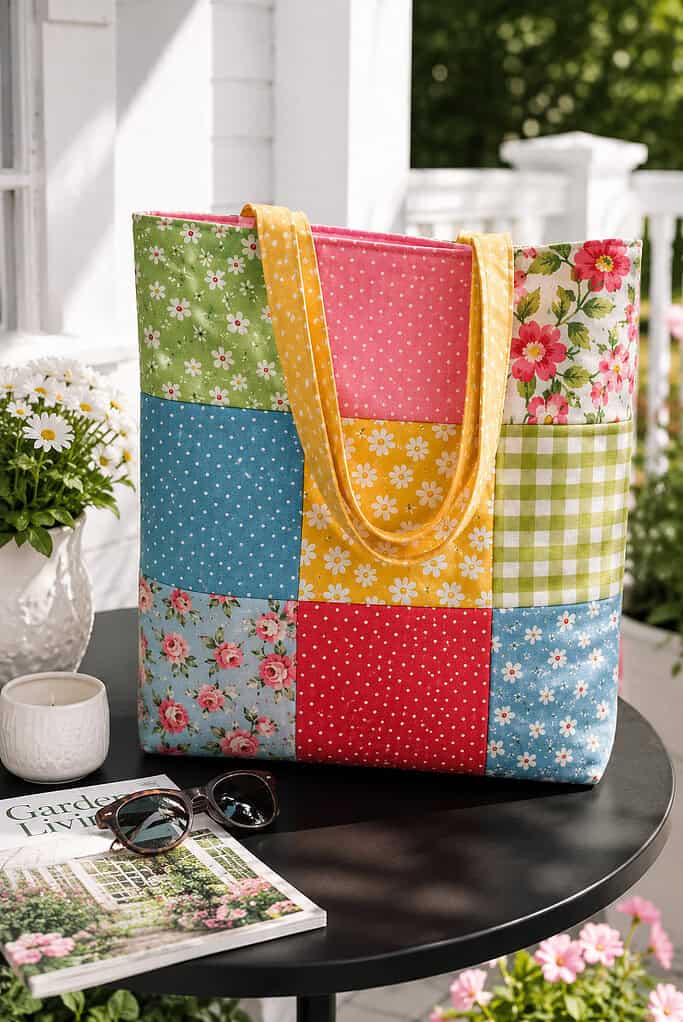
step 3: arrange your squares in a 4 by 4 grid layout
You’ll need two patchwork panels for your tote (one for the front and one for the back) so split your sixteen squares into two sets of eight. Each panel will be a 4 wide by 2 tall grid for this version of the tote.
If you’d prefer a taller, deeper tote, you can use a 4 by 4 grid for each panel, which would mean cutting thirty-two 5-inch squares total, sixteen for each side. For the 4 by 2 layout I’m describing in this tutorial, sixteen squares is exactly right.
Move the squares around on your work surface until you love how the colors and patterns fall. Try not to put two of the same fabric next to each other. Try not to cluster all your darks in one corner. This part is honestly the most fun — kind of like arranging wildflowers in a jar.
Once you’re settled, snap a quick photo with your phone so you can rebuild the layout if it gets bumped while you carry it to the sewing machine.
step 4: sew the squares into rows with a ¼ inch seam

Take the first two squares of your top row, place them right sides together, and pin along one side. Sew a ¼ inch seam down that side, backstitching at the start and end. Press the seam open with your iron.
Open the joined pair, lay it flat, and place the third square right sides together with the second. Pin, sew another ¼ inch seam, press open. Add the fourth square the same way.
Now you have one row of four squares, measuring about 18½ by 5 inches. Repeat for the remaining three rows so you end up with four rows total, two for each panel.
If this is your very first piecing project, you might also love my tutorial on how to sew a simple pillow. Same straight stitches, same gentle pace.
step 5: sew the rows together to form your two panels
Take two rows that will form one panel. Place them right sides together and pin generously, especially at every seam intersection where the squares meet. Try to line up the vertical seams as closely as you can.
Sew along the long edge with a ¼ inch seam, going slowly over the pinned intersections. Backstitch at both ends, then press the seam open.
Repeat with your other two rows to form the second panel. Each finished panel should measure about 18½ inches wide by 9½ inches tall. Don’t fret if your seams don’t match perfectly — handmade isn’t meant to be machine-perfect, and the little wobbles are part of what makes a piece yours.
Trim any uneven edges so each panel is a clean rectangle.
step 6: cut your lining and handle pieces
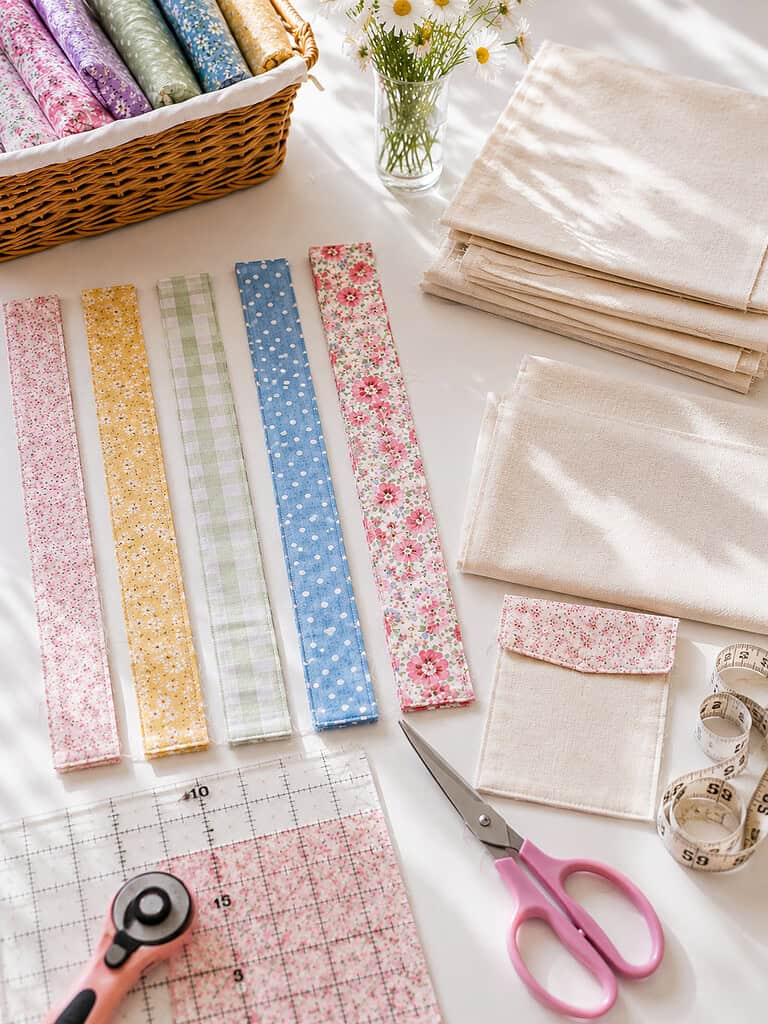
Now that you know the exact size of your patchwork panels, cut your lining and handles to match.
From your lining fabric, cut two rectangles, each 18½ by 9½ inches — the same size as your finished patchwork panels. From your handle fabric, cut two strips, each 24 by 4 inches.
If you’d like to add an inner pocket, cut one more rectangle from your lining fabric at 7 by 7 inches. Fold the top edge down by ½ inch, then again by ½ inch, and topstitch to make a clean hem along the top of the pocket. Set it aside for now.
step 7: sew the outer tote (sides and bottom)
Place your two patchwork panels right sides together so they’re perfectly aligned. Pin along the two short sides and the bottom, leaving the top open.
Sew a ½ inch seam down each side and across the bottom, backstitching at the top corners and where you start and stop. Don’t sew across the top — that’s where the handles and lining will go later.
If you have a serger or pinking shears, finish those raw seam edges now to keep them from fraying. A simple zigzag stitch on a regular sewing machine works just as well.
step 8: box the bottom corners for a flat-bottomed tote
This is the small step that turns a flat pouch into a real tote that stands up on its own.
With the tote still inside out, pinch one of the bottom corners flat so the side seam meets the bottom seam, forming a small triangle. Use your ruler to mark a straight line across the triangle 2 inches in from the point (so the line is 4 inches long across).
Sew along that marked line, backstitching at both ends. Trim the triangle off about ½ inch beyond your stitching line. Repeat on the other bottom corner.
When you turn the tote right side out, you’ll see it now has a 4 inch deep flat bottom. Tuck it back inside out and set it aside while you work on the lining.
step 9: sew the lining (and leave a 4-inch gap)
If you’re adding a pocket, this is the moment. Pin your hemmed 7 by 7 inch pocket onto the right side of one lining rectangle, about 3 inches down from the top edge and centered horizontally. Topstitch around the two sides and the bottom (leaving the hemmed top open), with a small backstitch at the start and end for strength.
Now place your two lining rectangles right sides together. Pin along the two short sides and the bottom, just like you did for the outer tote. Sew a ½ inch seam down both sides, but along the bottom, sew about 4 inches in from one corner, then leave a 4 inch gap unstitched in the middle of the bottom seam, then sew the rest of the way to the other corner. You’ll need that little gap to turn the bag right side out at the end.
Box the lining bottom corners exactly the same way you did for the outer tote (a 4 inch line across each triangle, ½ inch beyond the stitching trimmed away).
step 10: make the handles
Take one of your 24 by 4 inch handle strips. Fold it in half lengthwise, right sides together, so you have a long skinny tube measuring 24 by 2 inches. Pin along the long raw edge.
Sew along that long edge with a ½ inch seam, backstitching at both ends. Don’t sew the short ends closed.
Now turn the tube right side out. Slide your chopstick into one open end and gently coax the fabric through — this is the slow, fiddly part, but it’s worth it for the clean finish. Once turned, press the handle flat with the seam centered along the back, then topstitch ¼ inch in from each long edge.
Your finished handle should measure about 24 inches long by 1½ inches wide. Repeat for the second handle.
step 11: pin and baste the handles to the outer tote
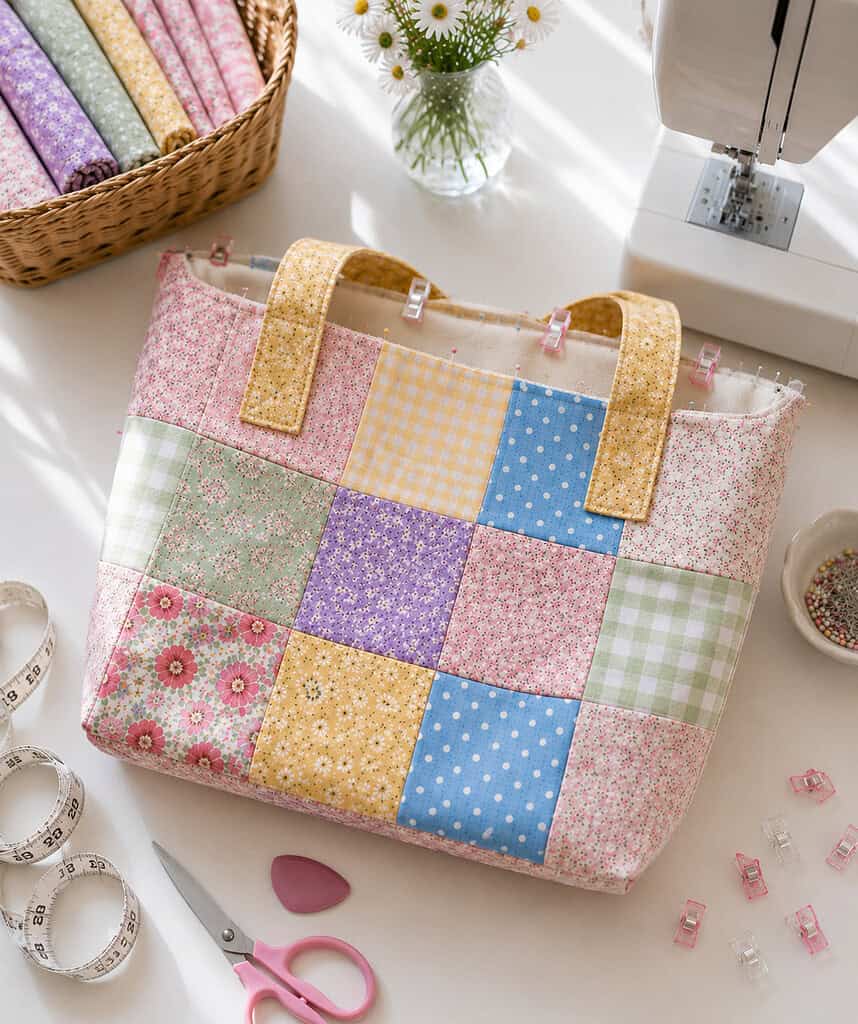
Turn your outer tote right side out so the patchwork is showing. Find the top edge and measure 4 inches in from each side seam. Mark with a pin or a small chalk dot.
Pin one handle to the front of the tote, with the raw ends of the handle aligned with the top raw edge of the tote at those 4-inch marks. The handle itself should hang down into the bag (it’ll feel backwards, I know — trust me). Make sure the handle isn’t twisted.
Repeat with the second handle on the back of the tote, lining up the placement so the handles are symmetrical. Baste the handle ends in place with a long stitch about ¼ inch from the top raw edge — this just holds them while you assemble the lining.
step 12: assemble the outer tote and the lining together
Keep the outer tote right side out, with the handles tucked down inside. Take your lining (still inside out) and slip it over the outer tote so the right sides of the lining and outer are facing each other. The lining will be wrapping around the outside of the patchwork tote.
Line up the side seams of the lining with the side seams of the outer tote, and pin all the way around the top edge. The handles should be sandwiched neatly between the two layers.
Sew all the way around the top edge with a ½ inch seam, backstitching where you start and end. Go slowly over the spots where the handles are tucked — you’ll be sewing through several layers and the machine will appreciate a gentle pace.
step 13: turn the bag right side out through the lining gap
Reach into the 4 inch opening you left in the bottom of the lining and gently pull the entire bag through to the right side. Take your time — tug carefully on the patchwork, then on the handles.
Once everything is right side out, push the lining down inside the outer tote. Use the chopstick to coax out the top corners until they look crisp, and press the top seam flat with your iron, rolling the lining slightly to the inside so it doesn’t peek out from the front.
step 14: topstitch the top edge and slipstitch the lining closed
With the bag right side out, topstitch around the top edge ¼ inch from the top, going all the way around. This stitch keeps the lining tucked neatly inside and adds strength to the seam where the handles attach.
Last step: thread your hand-sewing needle and slipstitch the 4 inch opening in the bottom of the lining closed. Push the lining down into the bag, fluff the corners, and step back to admire your work.
Your patchwork tote is done.
little finishing touches that make it feel handmade
A few small details turn an okay tote into one you’ll reach for again and again.
Press every seam as you go, not just at the end. I know it slows you down, but pressed seams give the bag that polished, intentional look that almost makes it look store-bought. Almost.
Topstitch around the top edge a second time, ½ inch below your first topstitch, in a coordinating thread. Two parallel lines of topstitching add strength where the handles attach and pull the whole thing together visually.
Sew a small fabric label or initial onto the inside lining before you assemble the tote. A 1 by 2 inch piece of ribbon with a hand-stitched cross or a single embroidered initial makes the bag feel like a small heirloom.
If you want more inspiration for using up your leftovers, these scrap fabric projects beginners can actually finish are full of gentle ideas. And for everyday makes that earn their place in your kitchen and entryway, these useful fabric craft ideas for everyday life are some of my most-loved.
caring for your patchwork tote so it lasts for years
A handmade tote built from natural fibers can hold up for a long, long time when you treat it gently.
Wash it on cold, gentle cycle with a mild, fragrance-free detergent. Avoid bleach and fabric softener — both shorten the life of cotton and linen. I love a swish of pure castile soap or a wool dryer ball with a drop of lavender oil.
Line dry whenever you can. The sun is the gentlest thing for natural fibers, and there’s something quietly lovely about pulling a tote off the clothesline that smells like fresh air.
If a seam ever begins to wear, hand-stitch a small reinforcement in matching thread before it grows into a hole. A tiny mend in time saves a much larger one later.
Looking for more cozy makes to keep your sewing machine humming? You might enjoy these easy springtime sewing projects or these summer sewing projects for warm weather. Both baskets are full of the kind of little makes that fit into naptime.
stitch your patchwork tote this weekend
There’s something quietly grounding about making a useful thing with your own hands. A patchwork tote is small enough to finish over two or three naptime sessions and lovely enough to use for years. Mine goes everywhere — to the farmer’s market, the library, the chapel on Sunday morning.
If you’ve been waiting for a sign to start, sweet friend, here it is. Pull the scrap basket off the shelf, brew a mug of tea, and see what beautiful thing comes together over a slow morning or two.
I’d so love to hear how yours turns out. Did you piece a pretty patchwork? Run into a tricky step? Find a clever twist on the pattern that made it your own? Leave a comment below and tell me about it. Reading your stories is one of the sweetest parts of my week.
Grab Your FREE Sewing Pattern Labels Today

As the seasons pass and projects add up, those little paper patterns have a way of piling into drawers and baskets. And when you go to remake something, you end up searching instead of sewing.
That’s exactly why I created these Free Sewing Pattern Labels.
They make it simple to keep every pattern neat, easy to find, and ready whenever inspiration strikes. Just print the labels, fill them out, and attach them to your pattern envelopes.
In a few minutes, your patterns go from scattered to beautifully organized.
A small change that makes your sewing space feel calmer, clearer, and ready for your next project.
frequently asked questions
how long does it take to sew a patchwork tote bag from start to finish?
For a beginner, plan on about three to four hours total, including ironing and cutting. The piecing takes about 90 minutes, the lining and handles about 45, and the final assembly about an hour. Once you’ve made one, the next will likely come together in two hours or less. I usually break mine into two naptime sessions and finish over a quiet weekend.
what’s the best fabric weight for a patchwork tote bag?
Quilting cotton (around 4 ounces per square yard) and mid-weight linen (5 to 6 ounces) are my two favorites. They’re sturdy, breathable, easy to wash, and forgive a beginner’s seams beautifully.
Avoid stretchy or slippery fabrics like jersey and satin, and skip anything heavier than 8 ounces — canvas and denim can work for the lining or handles, but they make patchwork piecing tricky on a home machine.
do I need a sewing machine, or can I sew the tote by hand?
You can absolutely hand-sew a patchwork tote, especially if you enjoy slow, quiet stitching by lamplight. Plan on around 12 to 15 hours of hand-sewing time spread across several evenings. Use a strong backstitch with a doubled cotton thread, and keep your stitches at about 8 to 10 per inch for durability through plenty of grocery runs.
how do I keep my patchwork seams from looking uneven?
Two things help most: a consistent ¼ inch seam allowance (a quarter-inch presser foot is a small splurge worth making), and pressing each seam open as you go. If matching seam intersections feels tricky, pin generously through every intersection and sew slowly. And remember — handmade always has small variations, and that’s part of its quiet beauty.
can my children help with this sewing project?
Yes, and it’s such a sweet way to bring them into the work. Little ones (ages 2 to 4) can help sort scraps by color, place squares in a layout on the floor, or hand you clips one at a time.
Older children (ages 6 and up) can sew straight seams under your watchful eye, especially the rows of squares in step 4. My toddler likes to be the official fabric inspector, which mostly involves squishing each square before approving it for the layout.
