
When your sewing machine starts acting up with loops, puckers, or uneven stitches, it’s easy to assume something’s wrong with the machine.
But most of the time, it’s not broken – it just needs a little tension tweak.
Tension is what keeps your stitches looking neat and balanced, and every sewist (no matter how experienced) runs into tension trouble now and then.
Learning how to adjust it is simply part of getting to know your machine and how it responds to different fabrics and threads.
In this post, I’ll break down everything you need to know about sewing machine tension: what it is, how to tell when it’s off, and the step-by-step process for fine-tuning both your top and bobbin tension until your stitches look smooth and even again!
Understanding Needle and Bobbin Tension
To get those nice, even stitches that look the same on both sides of your fabric, your sewing machine relies on two partners working together – needle tension and bobbin tension.
One moves on top, one below, and when they’re in sync, the stitches meet perfectly in the middle.
Needle (Top) Tension
The needle, or top tension, comes from the thread that travels through the upper part of your machine – through the tension discs, the take-up lever, and finally the needle itself.
You’ll usually adjust this with a numbered dial or a digital setting on your machine.
- If the top tension is too tight, the needle thread will pull the bobbin thread up so you can see it on the surface.
- If it’s too loose, the opposite happens – the bobbin thread peeks out on the underside of your fabric.
Most of the time, a small tweak to this top tension dial is all it takes to get things back to normal.
And if you’re unsure whether your thread and needle are part of the problem, it might help to choose the right sewing needle and thread for your project first. Sometimes mismatched materials can throw your tension off more than you’d expect.
Bobbin (Bottom) Tension
The bobbin tension comes from the thread inside your bobbin case.
It balances the pull of the top thread so everything meets in the middle of your fabric layers.
Usually, the factory setting is just fine and doesn’t need to be touched – but if you’re using a different thread weight, or if you’ve dropped the bobbin case (we’ve all done it), it might need a gentle adjustment.
- If the bobbin tension is too tight, the top thread will get pulled underneath and cause puckering.
- If it’s too loose, you’ll see loose loops of bobbin thread on the underside of your fabric.
When both tensions are balanced, the two threads lock neatly inside the fabric. No loops, no puckers, just smooth, professional-looking stitches.
If you want a quick refresher on all the main parts inside your sewing machine, check out my guide to the anatomy of a sewing machine.
How to Tell If Your Sewing Machine Tension Is Off
When your stitches start looking weird – maybe loopy, tight, or uneven – it usually means your sewing machine tension needs a little tweak.
Don’t worry, this happens to everyone. The good news is, once you know what to look for, it’s an easy fix.
(And if tension issues are making you want to give up, my guide on how to overcome sewing beginner frustrations might help you feel a lot less alone.)
Here are a few clear signs your tension might be off (and what to do about it):
1. Loops or Thread Nests Under the Fabric

Seeing a mess of loops underneath your fabric? That’s a classic sign your top tension is too loose.
The needle thread isn’t pulling hard enough to meet the bobbin thread in the middle.
Turn the top tension dial up just one number at a time and test after each small change.
2. Puckered or Tight Stitches on Top
If your fabric looks bunched or your stitches feel stiff, the top tension is too tight.
The needle thread is pulling the bobbin thread up to the surface.
Loosen the dial slightly and test again on a scrap piece before going back to your project.
3. Bobbin Thread Showing on Top
When you start seeing little dots or strands of bobbin thread on the top side, that usually means the top tension is too loose (or sometimes the bobbin tension is too tight).
Start by tightening the top tension first – most of the time, that’s all it takes.
4. Needle Thread Showing on the Underside
If the top thread is visible underneath your fabric, your top tension is probably too tight.
Loosen it a little, then re-test.
5. Uneven or Skipped Stitches
Sometimes it’s not tension at all.
Uneven or skipped stitches can happen if your machine isn’t threaded correctly, your needle is dull, or your thread isn’t right for the fabric.
Double-check those before changing any settings.
Quick Tip: If the top thread lies flat on your fabric and loops show underneath, your top tension is too loose. If the top thread looks tight and the fabric puckers, it’s too tight. The sweet spot is when both threads meet neatly inside the fabric – invisible, balanced, and smooth.
How to Adjust the Top (Needle) Tension on a Sewing Machine
When your stitches start looping, puckering, or pulling unevenly, the first place to check is your top (needle) tension.
This setting controls how tightly the upper thread is pulled as each stitch forms and honestly, most tension problems can be fixed right here, without even touching the bobbin.
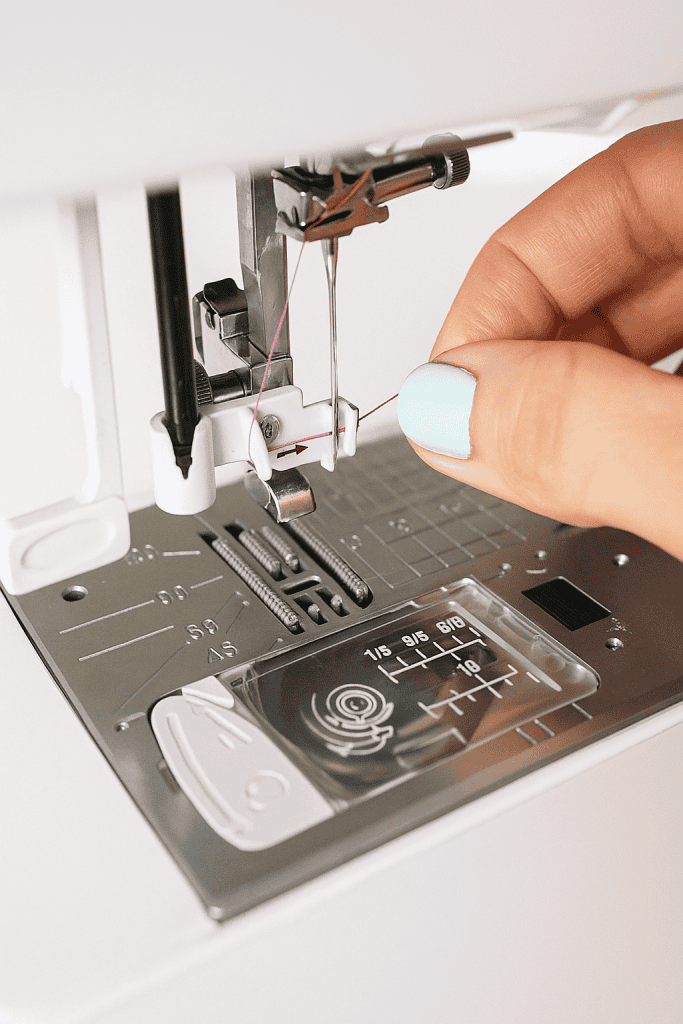
1. Start with a Clean, Properly Threaded Machine
Before adjusting anything, take a moment to re-thread your machine completely.
(If you’re new to sewing or want a quick refresher, my guide on how to set up your sewing machine walks you through threading, winding the bobbin, and getting your machine ready for perfect stitching.)
It sounds simple, but one missed guide or a thread that didn’t sit correctly can throw everything off.
Make sure the presser foot is up while threading so the tension discs open and the thread slides neatly into place.
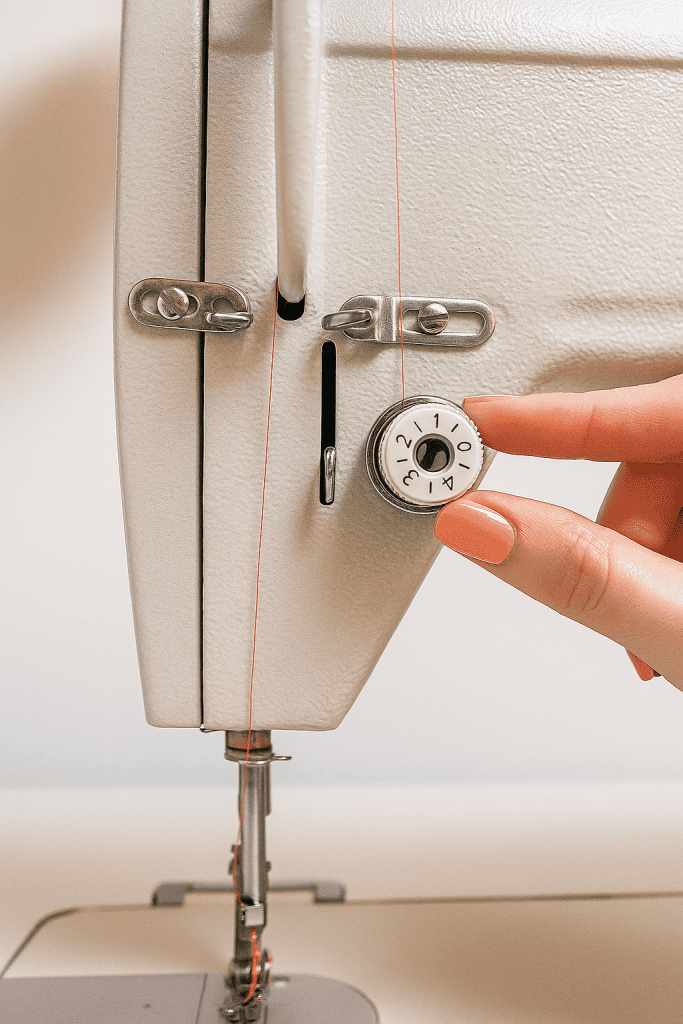
2. Set the Tension Dial to the Middle
Most sewing machines have a numbered tension dial (usually between 0 and 9).
(Not all machines offer the same level of control, so if your current one feels limited, you can check out my ultimate guide to picking a sewing machine to see what features to look for.)
The middle range (around 4 or 5) is a solid place to start.
From there, you can tweak the tension depending on how your test stitches look.
3. Adjust Gradually
Don’t rush it. Turn the dial just one number at a time, then sew a few lines on a scrap piece of the same fabric and thread you’re using for your project.
- If you see loops on the underside, tighten the top tension slightly (turn the dial to a higher number).
- If your stitches look tight or your fabric starts to pucker, loosen it a little (turn to a lower number).
Small changes make a big difference, so take it slow.
4. Check the Stitch Balance
The sweet spot is when the needle and bobbin threads meet perfectly in the middle of your fabric – not sitting on top or pulling underneath.
Stitch a few inches, then gently tug the fabric.
If both threads stretch evenly and snap at the same time, you’ve nailed it.
5. Adjust for Specialty Threads
Metallic, silk, and monofilament threads are delicate and usually need a lighter tension.
On the other hand, thick fabrics like denim or canvas often need a bit more tension for strong, even stitches.
Pro Tip: If you switch between different fabrics a lot, keep a quick note or snap a photo of the tension settings that worked best for each one. It’ll save you from guessing (and a lot of frustration) the next time you sew!
How to Test Sewing Machine Tension for Perfect Stitches

Before jumping into your real project, it’s worth taking a few minutes to test your tension on a scrap of fabric.
It’s the best way to see how your top and bobbin threads are working together, and it can save you a lot of frustration (and seam ripping) later on.
1. Use the Same Fabric and Thread as Your Project
Grab a scrap from the exact fabric you’re planning to use – same interfacing, same thread, everything.
Even a small difference in thickness or texture can change how your stitches behave.
Testing with the same materials gives you a true picture of what your tension is doing.
2. Choose a Straight Stitch or a Medium Zigzag
Set your machine to a regular straight stitch (around 2.5 mm) or try a medium zigzag if you want to see both threads more clearly.
(If you’re still getting used to using zigzag stitches, you can check out my guide on how to sew a perfect zigzag stitch to understand width, length, and tension basics before testing.)
Using contrasting colors for your top and bobbin threads makes it super easy to spot where the threads meet and if something’s off.
3. Stitch on the Bias
Sew a few test lines diagonally across your fabric (this is called sewing on the bias).
It stretches the fabric just enough to show how evenly the threads lock together under tension.
4. Do the Stretch Test
Once you’ve sewn a few lines, gently stretch your fabric sample:
- If both threads break at the same time, your tension is balanced.
- If only the top thread breaks, your top tension is too tight.
- If only the bottom thread breaks, your top tension is too loose.
This little test tells you a lot in just a few seconds.
5. Check for Balanced Stitches
Flip your sample over and look closely at both sides.
Perfect tension means your stitches look even and the two threads meet right in the middle of the fabric – not sitting on top or pulled underneath.
6. Test with a Zigzag Stitch
If you try a zigzag stitch, don’t worry if you see a few tiny loops on the back. That’s totally normal.
As long as the top looks smooth and the loops aren’t excessive, your tension is right where it needs to be.
Quick Tip: Keep a little “tension sampler” in your sewing kit. Each time you find that sweet spot for a new fabric or thread, save a scrap and jot down the settings. Over time, you’ll build your own mini reference guide – and it’ll make future projects so much easier.
How to Adjust Bobbin Tension on a Sewing Machine

If you’ve already played around with your top tension and your stitches still aren’t behaving, it might be time to take a peek at your bobbin tension.
You’ve probably heard the old rule, “Never touch the bobbin tension.” But sometimes, a tiny adjustment can make all the difference.
Bobbin tension doesn’t need to be changed often but if you’ve switched to a new thread type, dropped your bobbin case, or keep seeing loops underneath your stitches, a gentle tweak might fix things right up.
When to Adjust Bobbin Tension
You might need to adjust your bobbin case tension if:
- The thread slips out too easily when you pull it.
- The thread feels overly tight or jerky.
- You’ve replaced or dropped your bobbin case and the settings have shifted.
Just remember: these adjustments are super delicate. Tiny turns make a big difference!
For Removable Bobbin Cases
If your sewing machine has a removable bobbin case, here’s how to check it:
- Hold the bobbin case by the thread like a little yo-yo (yep, really).
- Give the thread a gentle jerk. The case should drop slowly when you do this.
If it drops too quickly, the tension is too loose.
If it doesn’t move at all, it’s too tight.
Find the small tension screw (it’s the one closest to where the thread exits the case) and make tiny adjustments:
- Turn the screw clockwise to tighten the tension.
- Turn it counterclockwise to loosen it.
Move in small steps (about a quarter turn at a time), testing your stitches after each adjustment.
For Built-In (Drop-In) Bobbin Cases
If your machine has a built-in or drop-in bobbin case, don’t worry – you can still fine-tune it.
The screw might be smaller and slightly recessed, but it works the same way.
- Pull the thread to test it. It should feel snug, not stiff.
- If it slips out too easily, tighten the screw slightly (¼ turn clockwise).
- If it feels tight or jerky, loosen it a little (¼ turn counterclockwise).
Keep a Dedicated Bobbin Case for Adjustments
If you sew a mix of projects – say, soft quilting cotton one day and thick denim the next – it’s smart to keep two bobbin cases on hand:
- One with the factory setting for everyday sewing.
- Another one adjusted for specialty threads or decorative work.
Mark the adjusted one with a small dot of nail polish so you can tell them apart in a snap.
Take Control of Your Sewing Machine Tension Today
Perfect tension is something you learn by observing, testing, and adjusting with care.
Once you understand how your sewing machine’s needle and bobbin tension work together, you’ll have the confidence to handle any fabric or thread combination that comes your way.
Keep it simple: re-thread when things go wonky, clean your machine often, and make small, thoughtful changes instead of big ones.
Even the most experienced sewists still test on scraps before jumping into a project because every fabric has its own personality.
So go ahead – thread your machine, grab a few fabric scraps, and give your tension settings a try!
Have your own favorite way to test or adjust sewing machine tension?
Share your tips or questions in the comments below – I’d love to hear what’s worked for you.
FAQs
1. Why does my sewing machine thread keep looping underneath?
Loops on the underside of your fabric usually mean your top tension is too loose or your machine isn’t threaded correctly. Re-thread the top thread with the presser foot up and try tightening the tension dial slightly.
2. How often should I clean my sewing machine to avoid tension problems?
Clean your machine every 8–10 sewing hours, or after each large project. Lint and dust can build up in the tension discs and bobbin case, causing thread to snag or tighten unpredictably.
3. Should I adjust tension when switching fabric types?
Yes. Lightweight fabrics like voile or silk usually need lower tension, while heavier fabrics like denim or canvas require slightly higher tension. Always test your stitches on a scrap first before sewing your actual project.
4. Why does my thread keep breaking while I sew?
If your thread keeps snapping, your top tension may be too tight, or your needle could be dull or the wrong size. Also check for rough spots in the thread path or burrs on the needle plate that might be catching the thread.
5. Is it safe to adjust my bobbin tension myself?
Absolutely, just be gentle. Use a small screwdriver and turn the bobbin tension screw only ¼ turn at a time. Always test after each adjustment and record what works best for your machine.
