
Every sewing journey starts with a little curiosity (and maybe a bit of confusion) about what all those machine parts actually do.
Most of us start by just… pressing the foot pedal and hoping for the best.
Until the thread tangles, or the fabric refuses to move, or your stitches suddenly look like a plate of tangled spaghetti.
That’s usually the moment you realize, okay, time to actually learn what these parts are for.
(If you eventually dip your toes into more advanced tools, you might also love reading the anatomy of a serger to see how the two compare.)
So today, let’s take a closer look (yes, literally) and get to know the main parts of your sewing machine!
The 7 Main Parts of a Sewing Machine (and What They Do)
Once you get to know what each one does, you’ll begin to understand why your thread sometimes bunches up or why your fabric gets stuck halfway through a seam.
Suddenly, those little frustrations start making sense.
So let’s take it piece by piece and get to know the parts that keep your machine running smoothly.
1. Bobbin Case
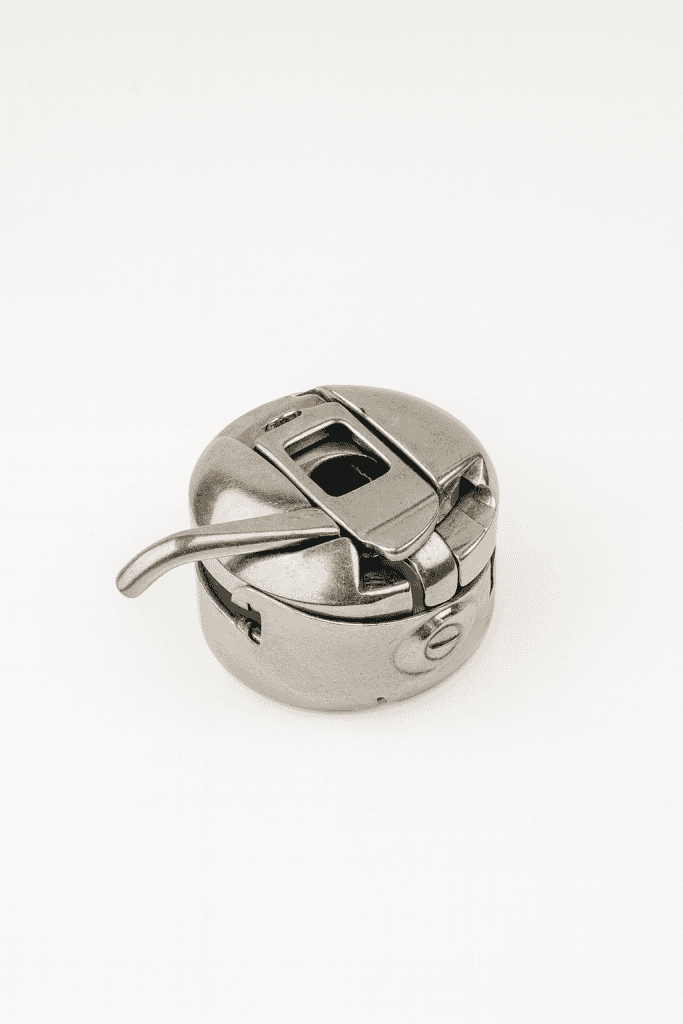
This little compartment holds your bobbin, the small spool that feeds the lower thread.
It also controls how tight or loose your lower thread is.
There’s a tiny screw on the case that adjusts the bobbin tension – usually you don’t mess with it unless things start looking messy underneath.
If your case has a bobbin finger, thread through that small hole before sewing.
It keeps the tension even and helps the bobbin thread stay hidden instead of showing as tiny dots on top.
2. Feed Dogs
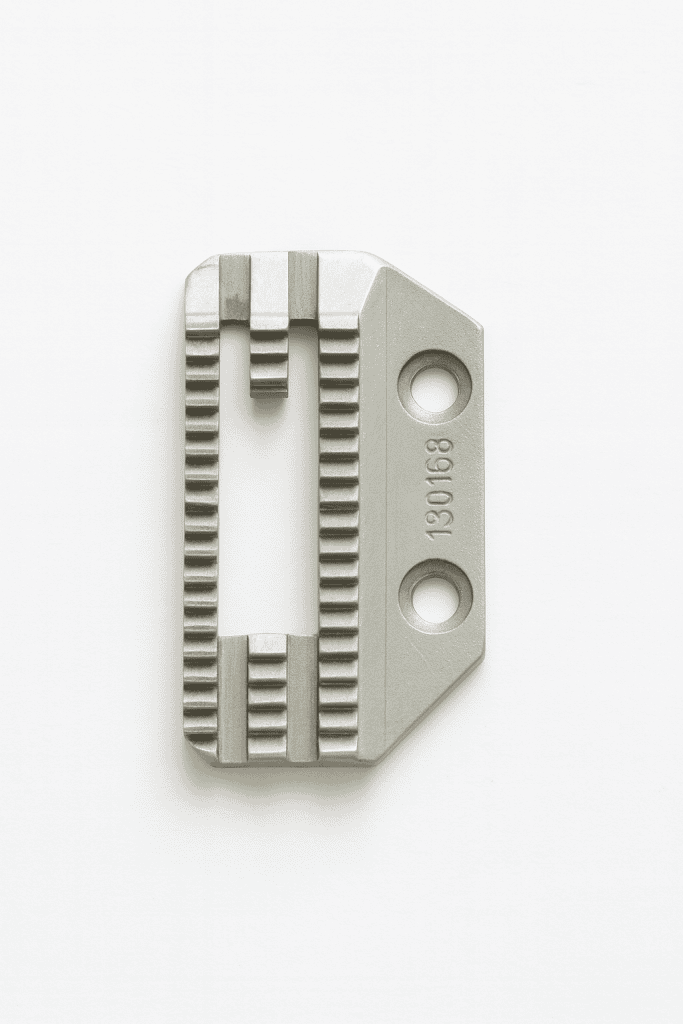
If you look closely under the needle, you’ll spot a row of tiny metal teeth.
Those are your feed dogs, and their whole job is to grip the fabric and move it through the machine as you sew.
When you want full control – like during free-motion quilting or embroidery – you can switch things up.
Most newer machines let you drop the feed dogs so the fabric glides freely under your hands.
Some older or simpler models don’t drop them, though. Instead, they use a little metal plate that covers the feed dogs to stop them from pushing the fabric.
If that setup feels too cramped, skip the cover, set your stitch length to zero, and guide the fabric yourself.
The dogs will still move underneath, but they won’t pull your fabric along.
3. Needle Plate

The flat metal surface under your needle (also called the throat plate) supports your fabric and keeps it from being pulled down into the machine.
You’ll notice some have a small round hole (for straight stitching on delicate fabrics), while others have a wider opening for zigzags or decorative stitches.
If your machine’s been “swallowing” fabric lately, try switching to a straight-stitch plate.
And if you don’t have one, cover the zigzag hole with a small piece of masking tape and lower the needle a few times to pierce it.
It’s a quick, scrappy fix that actually works (just remember to clean your needle with a bit of rubbing alcohol after so it’s not sticky).
4. Presser Foot
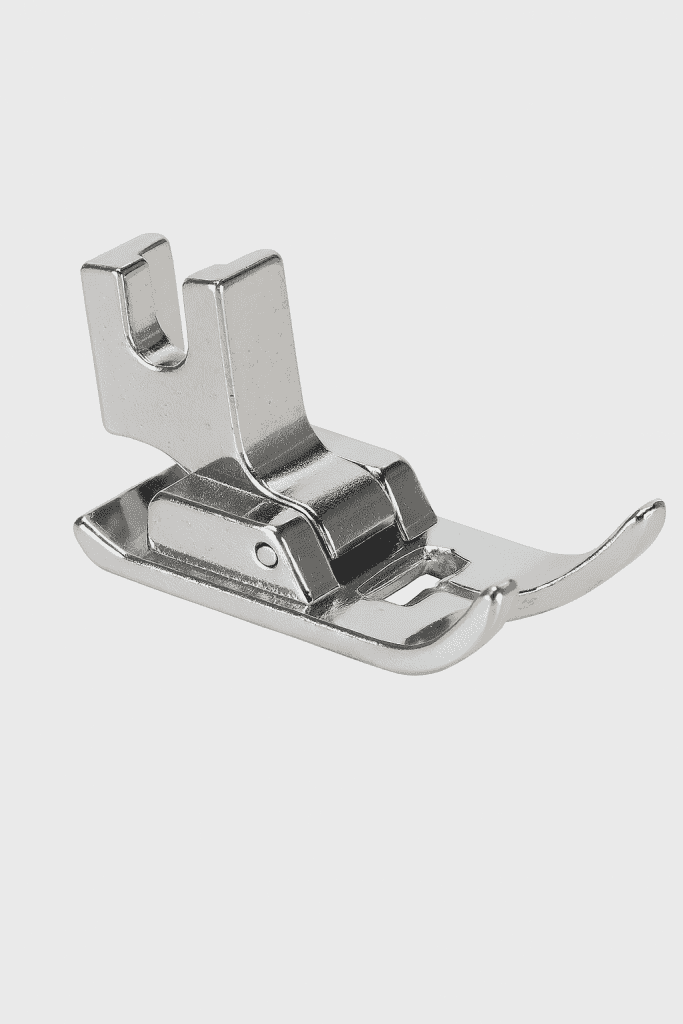
The presser foot keeps your fabric flat while the needle moves up and down.
Each stitch type usually has its own foot, so it’s worth swapping them out when needed.
A zipper foot, for example, lets you sew close to the edge, while a buttonhole foot does the measuring for you.
If the clear plastic ones give off too much glare under your sewing light, try finding a metal or opaque version instead.
Can’t find one for your brand? Generic presser feet often fit just fine (and usually cost a lot less).
Check out my list of the 10 most common presser feet to see which ones you might want for your projects.
5. Spool Pins

These little posts on top of your machine hold your spool of thread.
Some machines have just one, others have two for twin-needle stitching or decorative double lines.
Even with a single pin, though, you can often still do twin-needle work – just wind a second bobbin of thread and use that as your “extra spool.”
The main thing: make sure your thread unwinds smoothly.
A snagging spool can make even the most patient sewist grumble.
6. Tension Discs
Tension discs control how tightly your upper thread is pulled.
If your stitches are looping or too tight, it’s usually because the thread isn’t sitting properly between the discs.
What you can do is to rethread your machine – but this time, lift the presser foot while threading.
That opens the discs so the thread can slip in exactly where it should.
Also, dust loves to hide in there. A soft brush or even a slip of paper can help clear lint that’s messing with the tension.
If you’re still getting messy stitches, you can dive deeper into how to adjust the tension of your sewing machine so everything runs smoother.
7. Thread Guides

Those tiny metal hooks and loops that your thread passes through are called thread guides.
They keep the tension steady as the thread travels from the spool to the needle so every stitch comes out smooth instead of loopy or uneven.
It’s tempting to skip one when you’re threading in a hurry, but don’t. Each guide plays its part.
The only time you might want to bend the rules is when working with tricky metallic threads.
In that case, try skipping the guide just above the needle. It can help the thread flow more freely and reduce breakage.
If you ever feel like your thread keeps snapping or your needle just isn’t cooperating, you might want to check out these helpful needle and thread tips.
If you’re feeling ready to actually start sewing, a good next step is just making sure your machine is set up right. Check out our guide on how to set up your sewing machine so you don’t run into any surprises.
Get Comfortable With Your Machine (and Start Sewing!)
Now that you know what each main part does, it’s time to put that knowledge to work.
Start with maybe a few straight lines, a messy zigzag, or a tiny practice project – and pay attention to how the bobbin, feed dogs, presser foot, and tension all play together.
The more you sew, the more comfortable you’ll feel using your machine.
Got a tip, a question, or even a “what on earth is this part?” moment?
Drop a comment below – your questions (or tips!) might help someone else too!
FAQs
1. How do I know if my needle is the right size for my fabric?
A general rule: thin, delicate fabrics need smaller needles (60/8–70/10), while thicker fabrics like denim or canvas need larger needles (90/14–110/18). Always test on a scrap piece first.
2. Can I use different brands of bobbins in my machine?
Some machines work best with their brand-specific bobbins, but many newer machines accept standard class 15 or J bobbins. Check your manual to be sure.
3. What’s the easiest way to fix skipped stitches?
Skipped stitches usually mean a bent or dull needle, incorrect threading, or tension issues. Replace the needle, rethread the machine with the presser foot up, and test again.
4. How often should I clean my sewing machine?
Light cleaning (removing lint and dust) can be done weekly if you sew often. A more thorough cleaning and oiling (if recommended by your machine) every few months keeps things running smoothly.
5. Is it normal for my machine to make a clicking or humming noise?
Yes, a gentle mechanical sound is normal. If it starts grinding, skipping, or making irregular noises, check for lint, bent needles, or improper threading before calling a technician.
