
Seam allowance is one of those quiet fundamentals in sewing that makes every project possible.
It holds a big responsibility: giving your seams strength, your garments flexibility, and your finished projects a clean, polished look.
By understanding seam allowance, you gain a steady foundation for sewing with confidence.
Whether you’re making clothes, piecing a quilt, or crafting something useful for your home, this simple concept guides every stitch.
In this article, I’ll explore what seam allowance is, why it matters, and how you can use it to achieve durable, professional results.
What Is Seam Allowance?
Seam allowance is the extra strip of fabric between the stitching line and the raw edge.
It isn’t part of the finished garment, but it’s what holds everything together.
This margin gives your stitches something to grip onto, keeps seams secure, and allows room for finishing techniques.
In sewing patterns, seam allowance is either:
- Included (already factored into the template, so you cut on the outer line), or
- Add-your-own (you measure and mark the allowance yourself before cutting).
For example, if a pattern calls for a 5/8-inch seam allowance, you’ll cut your fabric with that extra width beyond the piece size, then sew along the seam line.
The Importance of Seam Allowance in Sewing
Seam allowance is what gives your sewing projects structure and reliability.
By allowing space between the stitches and the raw edge, it ensures that seams stay intact through wear, washing, and daily use.
That small margin creates durability you can trust, whether you’re sewing a child’s dress or a set of kitchen napkins.
Skipping or misjudging seam allowance is actually one of the common sewing mistakes to avoid if you want your projects to last.
Strength and Durability
The strength of any seam comes from both the thread and the fabric surrounding it.
With an adequate seam allowance, stitches are supported by enough fibers to keep them secure.
This makes garments last longer, quilts hold their shape, and home décor items withstand regular use.
Flexibility for Fit
Seam allowance also provides room for adjustments.
When sewing garments, a slightly wider allowance at side seams or the center back can give you the flexibility to let out or take in fabric as needed.
It’s a small detail that offers peace of mind – your projects have space to be tailored, reshaped, or refined over time.
A Professional Finish
A consistent seam allowance also creates a polished appearance.
Edges align, stitches look intentional, and the inside of your project feels just as finished as the outside.
Even simple projects gain a professional touch when seam allowance is handled with care.
It’s one of those foundational habits that elevates your sewing from handmade to well-made.
Standard Seam Allowance by Project Type

Seam allowance isn’t one-size-fits-all.
The width you choose often depends on the kind of project you’re sewing and the type of fabric you’re working with.
Here are the most common standards:
Garments: 5/8 Inch (1.5 cm)
In clothing, the most common seam allowance is 5/8 inch.
This width provides enough strength for seams to last through wear and washing, while still allowing a bit of room for fitting adjustments.
Most commercial garment patterns are written with this measurement in mind.
Quilting: 1/4 Inch (6 mm)
Quilting relies on precision.
A 1/4-inch seam allowance ensures patchwork pieces align perfectly, so quilt blocks fit together without gaps or shifting.
Quilters often use a special 1/4-inch presser foot to keep this measurement consistent.
Home Décor and Crafts: 1/2 Inch (1.2 cm)
For projects like pillows, bags, and curtains, a 1/2-inch allowance is practical.
It balances strength with a tidy finish, especially when working with thicker fabrics or seams that see more stress.
Specialty Fabrics and Techniques
Some projects call for wider or narrower seam allowances depending on fabric behavior.
For example, delicate silks may use a narrower seam to reduce bulk, while heavyweight denim may benefit from extra width for flat-felled seams.
Matching the allowance to the fabric ensures both durability and comfort.
How to Read Patterns for Seam Allowance
Most commercial patterns (like Simplicity, McCall’s, or Butterick) already include seam allowance in their design.
That means you can cut along the solid line without making adjustments.
Many indie or PDF patterns, on the other hand, may leave seam allowance out so you can choose the width that works best for your project. (If you’re new to working with digital files, learning how to use PDF sewing patterns can help you spot details like seam allowances before you start cutting.)
Always check the pattern’s instructions or legend first – it will tell you whether the allowance is included and how much.
If it isn’t included, just measure outward from the stitching line by the allowance you want (for example, ½ inch or 1 cm), draw a clear new cutting line, and cut along that.
To stay organized, mark your pattern pieces with the allowance you added so you’ll remember later.
This little habit saves time and helps avoid mistakes when sewing everything together.
For a broader overview, check out our guide on how to read sewing patterns for beginners.
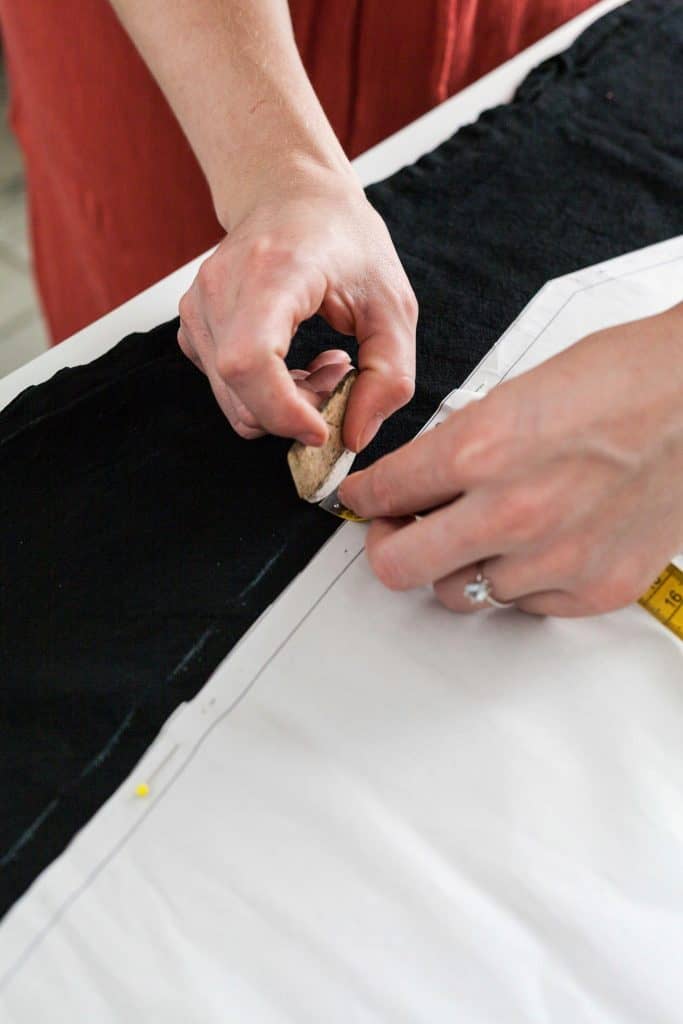
How to Measure and Mark Seam Allowance with Accuracy
Getting seam allowance right is one of the simplest ways to improve your sewing.
Accuracy keeps seams consistent, which means your pieces will fit together the way the pattern intended.
A careful approach at this stage saves you from uneven seams or mismatched edges later.
Tools That Help
Reliable tools make marking seam allowance straightforward.
A seam gauge is especially useful because it has a sliding marker that locks at your chosen measurement, so you can repeat the same allowance across multiple edges.
A clear ruler helps when you want to draw long, straight lines, while a measuring tape is flexible for working around curves.
For visibility, use a chalk pencil, tailor’s chalk, or heat-erasable pen to mark the lines – they wash out or fade with pressing, leaving your project neat.
If you’re building your toolkit, our guide to essential sewing tools covers the basics that make measuring, marking, and cutting more accurate.
Straight Seams
For straight edges, start by placing the ruler or seam gauge at the raw edge of the fabric.
Make small marks at the chosen distance (for example, every inch along the edge if you’re adding a 5/8-inch allowance).
Once the marks are in place, connect them with a line using chalk or fabric pen. This creates a clear stitching guide.
Some sewists prefer to skip drawing a line and instead mark just a few reference points – both methods work as long as you stay consistent.
Curves and Corners
Curves and corners need extra care since they don’t follow straight edges.
Mark them carefully and smooth out your lines.
For detailed tips on clipping, notching, and trimming, see the section on Seam Allowance for Curves, Corners, and Special Fabrics.
On the Sewing Machine
If you prefer not to mark directly on fabric, your sewing machine already has built-in guides.
The throat plate has etched measurement lines – choose the one that matches your seam allowance and keep the fabric edge aligned with it as you sew.
You can also use a magnetic seam guide or a piece of washi tape placed at the correct measurement to create a strong visual guide.
Many sewists also use a specialty presser foot, such as a 1/4-inch foot for quilting, to ensure precise seams without extra marking.
Learning about the most common presser feet can help you choose the right one for clean, consistent stitching.
How to Add Seam Allowance to Pattern Pieces

Some patterns already include seam allowance, while others leave it out so you can customize it yourself.
If yours doesn’t have it built in, simply add the allowance before cutting your fabric.
This gives your seams the extra space they need for strength, a neat finish, and an accurate fit.
Step 1: Trace the Pattern
Start by tracing your pattern onto paper, especially if it’s a digital download or if you want to preserve the original.
Tracing gives you a clean outline to work from and makes it easier to mark seam allowance evenly around the edges.
Step 2: Mark the Seam Allowance
Using a ruler, seam gauge, or compass-style seam allowance ruler, measure the chosen width (for example, 1/2 inch or 5/8 inch) from the stitching line.
Make small marks all the way around the piece at that distance.
If the pattern only shows the finished edge or stitching line, these marks become your guide for where to cut.
Step 3: Connect the Marks
Once the marks are placed, connect them with a smooth line.
This becomes your new cutting line.
On curves, take extra care to make the line smooth – using a French curve or curved ruler helps maintain accuracy.
Step 4: Adjust Where Needed
You don’t always need the same seam allowance everywhere.
For example, you may want wider allowances at side seams or center back to leave room for fitting adjustments.
In areas like collars, facings, or armholes, a narrower allowance (such as 1/4 inch) reduces bulk and makes the seam easier to shape.
Adjusting seam allowance by section helps you get both strength and precision.
Step 5: Label Clearly
Once seam allowance is added, label your pattern piece with the exact measurement you used.
Write it on the piece itself and, if needed, note any areas where you used a different width.
This avoids confusion the next time you sew the pattern.
Adding seam allowance may feel like an extra step, but it gives you control and flexibility.
With clear markings and even measurements, your fabric pieces will sew together smoothly and your seams will look neat.
Sewing Machine Guides for Consistent Seam Allowance

Once your fabric is cut, the sewing machine becomes your main tool for keeping seam allowance even.
Most machines include built-in guides that make this easy, and with a little practice, you can rely on them instead of marking every seam by hand.
- Throat Plate Lines – The metal plate under the presser foot has etched lines (in inches or centimeters) that show common seam allowances like 1/4″, 1/2″, and 5/8″. Align your fabric edge with the right line to keep your seam straight.
- Presser Foot Landmarks – Many presser feet work as built-in guides. A 1/4″ quilting foot is perfect for patchwork, an edge-stitch foot helps with topstitching, and even standard feet often match up to 1/4″ or 3/8″.
- Extra Guides and Tools – Magnetic seam guides, painter’s tape on the throat plate, or specialty presser feet can help you achieve consistent results, especially for quilting or repeat projects.
If you’re just getting started, learning how to set up your sewing machine ensures these guides work exactly as intended from your very first stitch.
Pressing Techniques that Support Seam Allowance

Pressing is just as important as stitching when it comes to neat seams.
The way you press seam allowance affects the strength, shape, and finish of your project.
Press as You Go
Always press after sewing a seam – don’t wait until the end of the project.
First, press the seam flat in the direction you stitched to set the thread into the fabric.
Then, press the seam allowance either open or to one side, depending on the instructions. This helps seams lie smooth and reduces bulk.
Open vs. To One Side
- Pressing open: Common in garments, it spreads the seam allowance evenly on both sides of the stitching line. This creates a flat, professional look and makes finishing easier.
- Pressing to one side: Often used in quilting or in areas that need extra strength, such as jeans, it layers both allowances together for durability. Follow the pattern directions for the best result.
Tools That Make a Difference
A standard iron works well, but pressing tools help with tricky areas.
A tailor’s ham supports curves like darts or sleeves, a seam roll prevents ridges on light fabrics, and a clapper holds heat and steam in place for sharper creases.
Always adjust your iron’s heat setting to suit the fabric type – cotton can handle high heat, while delicate fabrics need a cooler setting.
Seam Finishes that Protect Seam Allowance
Once a seam is stitched, the raw edges of the seam allowance are still exposed.
If left unfinished, some fabrics may fray or wear down over time.
Adding a seam finish keeps the allowance neat, protects the fabric, and extends the life of your project.
Quick Finishes
- Pinking shears: Cutting edges with zigzag scissors reduces fraying on many woven fabrics. It’s a fast option for projects that won’t see heavy wear.
- Zigzag stitch: Running a zigzag along the raw edge is simple and works well on most home sewing machines. It binds the fibers just enough to keep the edge tidy.
- Overcast stitch: Many machines include an overcast setting that mimics a serger stitch, wrapping the raw edge with thread for a clean result.
Professional Finishes
- Serged or overlocked edges: A serger trims and encloses the raw edge in one step, creating a durable, professional look.
- Hong Kong finish: Binding the seam allowance with bias tape adds a neat and decorative edge, especially for unlined jackets or garments where the inside is visible.
- Bound seams: Similar to the Hong Kong finish, but the entire seam allowance is enclosed with binding, giving extra strength and polish.
Strong Finishes
- French seams: The raw edge is fully enclosed inside the seam itself. This method works well on lightweight fabrics like cotton lawn or silk.
- Flat-felled seams: Common in jeans and workwear, this finish tucks one seam allowance under the other and stitches it down. The result is extremely durable and lies flat.
Choosing the right seam finish depends on the fabric, the project’s purpose, and how much wear the item will receive.
Even a simple finish makes a noticeable difference in how your project holds up and how polished it looks.
Seam Allowance for Curves, Corners, and Special Fabrics

Seam allowance can be adapted to suit different shapes and materials.
Handling seam allowance properly in these situations keeps your project looking neat and prevents bulky or uneven seams.
Curves
When sewing curved seams – like armholes, necklines, or rounded hems – seam allowance needs to be adjusted so the fabric lies flat.
- Inward curves (concave): Clip small slits into the seam allowance, stopping just short of the stitching line. This lets the fabric spread and prevents it from bunching.
- Outward curves (convex): Notch small “V” shapes into the seam allowance so the fabric can fold smoothly around the curve without creating excess bulk.
Corners
At sharp corners, trim the seam allowance diagonally across the point before turning the fabric right side out. This removes extra bulk and helps the corner turn crisply. For inside corners, clip directly into the seam allowance up to – but not through – the stitching line so the fabric can spread without pulling.
Special Fabrics
- Lightweight fabrics (silk, voile): Narrower seam allowances, around 1/4 inch, reduce bulk and keep the fabric looking delicate. French seams are a good choice for finishing.
- Heavy fabrics (denim, canvas): Wider seam allowances, such as 3/4 inch, provide strength and give more room for durable finishes like flat-felled seams.
- Stretch fabrics (knit, jersey): Use a smaller allowance (about 3/8 inch) with stretch stitches or a serger. A narrow allowance prevents wavy seams and keeps the stretch comfortable.
Managing seam allowance this way ensures that even tricky shapes and fabrics result in seams that are smooth, strong, and professional-looking.
Seam Allowance vs. Hem Allowance: Clear Differences
Seam allowance and hem allowance are both extra fabric margins, but they serve different purposes.
Seam Allowance
Seam allowance is the strip of fabric between the stitching line and the raw edge where two pieces of fabric are joined together.
It’s usually narrower – commonly 1/4 inch, 1/2 inch, or 5/8 inch – and it gives strength to seams while leaving space for finishing techniques.
Seam allowance runs along the edges that will be sewn to other pieces.
Hem Allowance
Hem allowance is the extra fabric turned up at the bottom of a garment, sleeve, or project edge to create a finished border.
It’s usually wider than seam allowance, often ranging from 1 inch to 3 inches depending on the design.
A hem allowance allows you to fold, press, and stitch the fabric neatly so the raw edge is hidden inside.
Patterns may note seam allowance and hem allowance separately, so it’s important to read carefully. Seam allowance keeps seams strong and aligned, while hem allowance gives a garment or project a clean, finished edge. Both work together to create a polished final result.
Build Stronger Seams by Mastering Seam Allowance
Now that you understand how seam allowance works, you can approach your next sewing project with clarity and confidence.
Start by paying attention to the seam guides on your machine, practicing on scraps, and choosing the right seam finish for your fabric.
With these steps, your sewing will immediately look more polished.
What seam allowance tips have helped you the most in your sewing? Share your thoughts and questions in the comments below – I’d love to hear from you.
Keep Your Sewing Patterns Neat and Easy to Find

As the seasons pass and projects add up, those little paper patterns have a way of piling into drawers and baskets.
And when you go to remake something, you end up searching instead of sewing.
So I created these Free Sewing Pattern Labels to make things easier.
They’re simple.
They’re pretty.
And they help you store your patterns in a way that feels calm and intentional.
Print them, fill them out, and tuck them onto your pattern envelopes. That’s it.
A small step that keeps your creative space feeling peaceful and ready for the next project.
FAQs
What is the difference between seam allowance and seam line?
The seam line is where you sew – the stitching path marked in the pattern. The seam allowance is the fabric outside that line, between the stitching and the raw edge.
Can I change the seam allowance in a pattern?
Yes. You can widen seam allowance for more fitting options or narrow it to reduce bulk. Just be consistent across all pieces so they still fit together.
How do I keep seam allowance even without marking it?
Use the etched lines on your sewing machine’s throat plate, a magnetic seam guide, or tape placed at the right distance. Keeping the fabric edge against the guide ensures even seams.
What seam allowance should I use for children’s clothing?
Most children’s clothing uses 1/2 inch or 5/8 inch seam allowance. This gives room for growth and adjustments, while still keeping seams strong.
How do I finish seam allowance if I don’t have a serger?
You can use pinking shears, a zigzag stitch, or an overcast stitch on a regular sewing machine. These options protect the edges and keep fabric from fraying.
