
Noah’s Ark is one of those timeless stories that kids love – animals, a big ark, and a rainbow at the end.
What better way to bring the story to life than with hands-on crafts?
These 10 Noah’s Ark crafts are simple, fun, and perfect for kids aged 3 to 8.
Using everyday materials you probably already have at home, your little ones can create everything from colorful rainbows to paper bag animal puppets.
Not only will they have a blast making these projects, but they’ll also learn about teamwork, creativity, and the story of Noah in a memorable, interactive way.
Whether it’s a rainy afternoon, a Sunday school activity, or a playdate, these crafts will keep kids engaged and inspired!
10 Noah’s Ark Crafts Kids Can Make in One Afternoon
Below are ten creative crafts – from arks and rainbows to animals and more – that kids can make in one afternoon.
These ideas keep it simple and enjoyable, so even the youngest crafters can participate. Let’s dive in!
1. Paper Plate Noah’s Ark
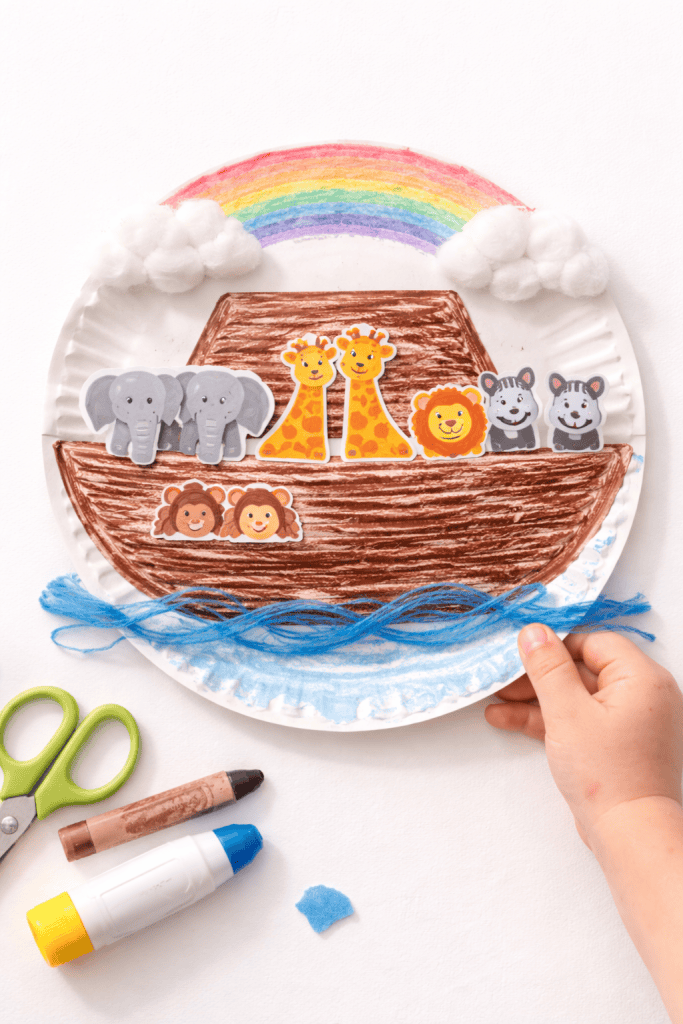
This classic craft transforms paper plates into Noah’s Ark. Kids will love making a little ark boat filled with animals. It’s simple, uses just a few paper plates, and is easy to customize.
Materials: 2 paper plates, scissors (with adult help), tape or glue, brown and blue crayons or paint, animal pictures or stickers (pairs of animals), cotton balls (optional for clouds), blue yarn or paper (optional for waves).
Instructions:
- Create the Ark Shape: Take one paper plate and cut it in half. These two halves will become the sides of the boat. Attach them to the top of the second paper plate (the base) to form a boat shape – use glue or tape (an adult can help secure them). Now you have a simple ark with a flat base and curved top sides.
- Color the Ark: Have your child color the ark’s body brown. They can also color the bottom of the plate or the surrounding area blue to represent water. If using paint, ensure it’s washable and let the paint dry a bit before the next step.
- Add Animals “Two by Two”: Help your child draw or cut out small animal figures from paper (or use animal stickers/printables). Make pairs of each animal and glue or stick them onto the ark and around it. Talk about how Noah brought two of every animal into the ark.
- Finishing Touches: Create a scene around the ark. Stretch out cotton balls and glue them above as fluffy clouds. Add strands of blue yarn or wavy strips of blue paper along the bottom as waves. You could even draw a rainbow in the sky above the ark.
- Let it Dry and Display: If anything is painted or very wet with glue, let the craft dry. Then your child can proudly display their Noah’s ark paper plate craft – a tangible piece of the Bible story they created themselves!
For more ideas, check out my other post on meaningful crafts that teach the Ten Commandments – it’s full of hands-on projects that make learning Bible lessons fun and memorable.
2. Tissue Paper Rainbow Collage
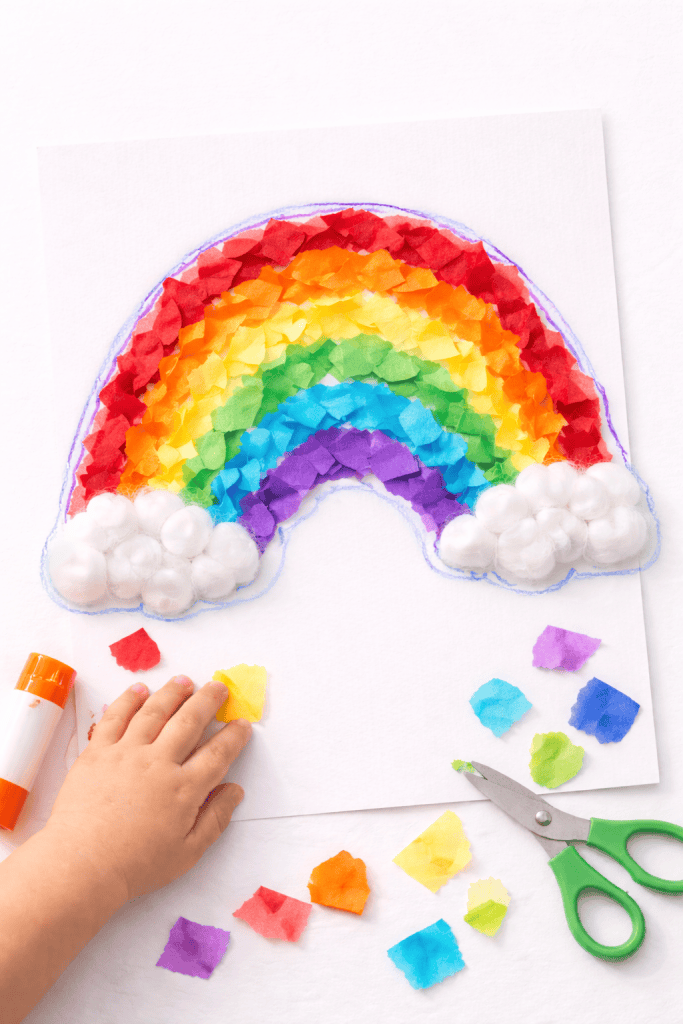
After the flood, God’s promise came as a beautiful rainbow. This colorful collage lets kids create that rainbow of promise using torn tissue paper or paper scraps. It’s a great craft for little hands to practice color recognition and gluing, and it reinforces the hopeful message of the story.
Materials: Various colors of tissue paper (red, orange, yellow, green, blue, purple) or construction paper, a sheet of paper or cardstock (as a base), pencil (to sketch the rainbow outline), glue stick or white glue, cotton balls for clouds.
Instructions:
- Prep the Rainbow Pieces: Together with your child, tear or cut the colored tissue paper into small pieces (roughly 1-inch bits). This is a fun task for kids – the pieces don’t need to be perfect.
- Draw a Rainbow Guide: On the base paper, lightly draw an arc for each color of the rainbow (or simply guide your child to where each color should go). Starting from the top arc: red, then orange, yellow, green, blue, and purple in order.
- Create the Rainbow: Apply glue in one arc section at a time. Have your child stick the colored tissue pieces onto the glue. Do one color band at a time: first red pieces along the top arc, then orange on the next, and so on. The torn pieces give the rainbow a pretty mosaic look.
- Add Clouds: Once all the rainbow colors are in place, glue a few cotton balls at each end of the rainbow to look like fluffy clouds. You can stretch the cotton a bit for a cloud texture.
- Let it Dry and Display: Allow the collage to dry flat. The result is a vibrant rainbow artwork. Explain how the rainbow was a sign of God’s promise in the Noah’s Ark story. Your child can hang their rainbow collage on the fridge as a cheerful reminder of the story’s happy ending.
3. “Animal Spotting” Toilet Roll Binoculars
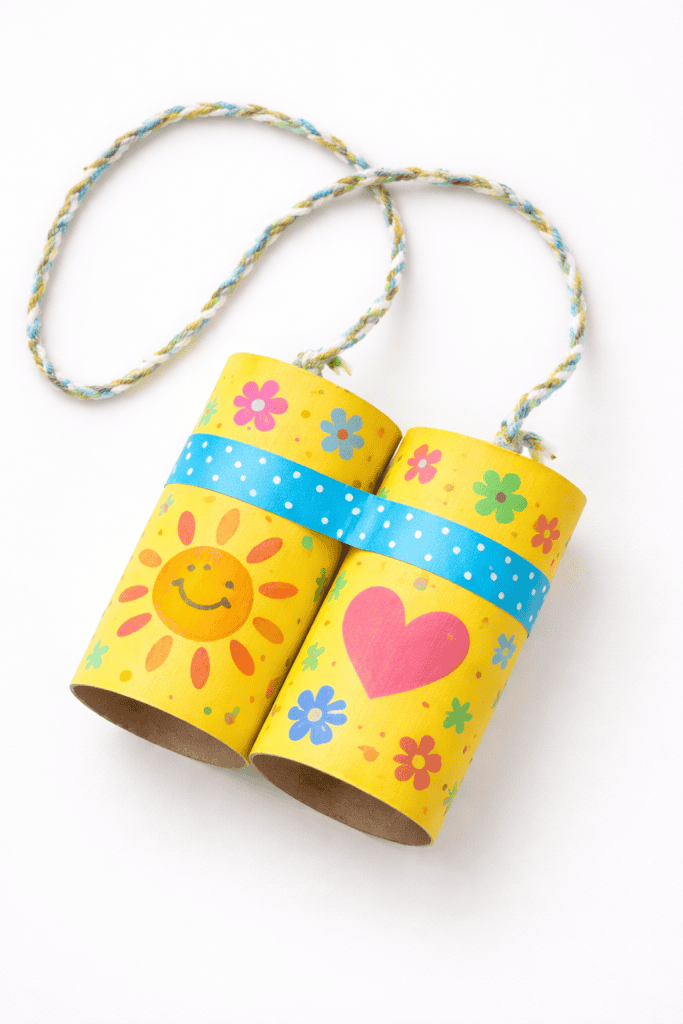
Before Noah brought the animals onto the ark, imagine how exciting it would be to spot all those animals! Kids can make their own pretend binoculars from empty toilet paper rolls.
This craft turns into a toy for imaginative play – children can “search” for animals two-by-two in your home or backyard after making it.
Materials: 2 empty toilet paper rolls, markers or paint, tape or glue, a hole-punch (optional), string or yarn (optional, to make a neck strap), stickers or construction paper for decoration.
Instructions:
- Decorate the Tubes: First, let your child decorate the two toilet paper rolls. They can color them with markers, paint them, or wrap them in construction paper. For a Noah’s Ark theme, they might draw little animal patterns (like stripes for a zebra or patches for a giraffe) or just fun colors.
- Join the Tubes: Place the two tubes side by side (so they resemble binocular shapes) and tape or glue them together securely. Tip: It might be easier for an adult to wrap tape around both tubes a couple of times to hold them firmly.
- Add a Strap (Optional): If you want binoculars that can hang around the neck, an adult can punch a hole near the end of each tube. Tie a piece of string or yarn through the holes on each side to create a strap. Make sure the loop is large enough to go over the child’s head (and supervise so it doesn’t become a hazard).
- Go Animal Spotting: Now the binoculars are ready! Kids can look through them and pretend they are spotting animals far away. Encourage them to play a game: call out an animal and have them search for two of that item or toy around the room. It’s a fun way to imagine gathering animals for the ark.
- Story Connection: While playing, remind your child how Noah gathered the animals (or rather, how the animals came to Noah). These crafty binoculars make the story interactive and spark imaginative play long after craft time is over.
This is a perfect example of a creative Sunday school craft that keeps kids engaged, encourages imaginative play, and ties in a meaningful Bible story.
4. Popsicle Stick Mini Ark
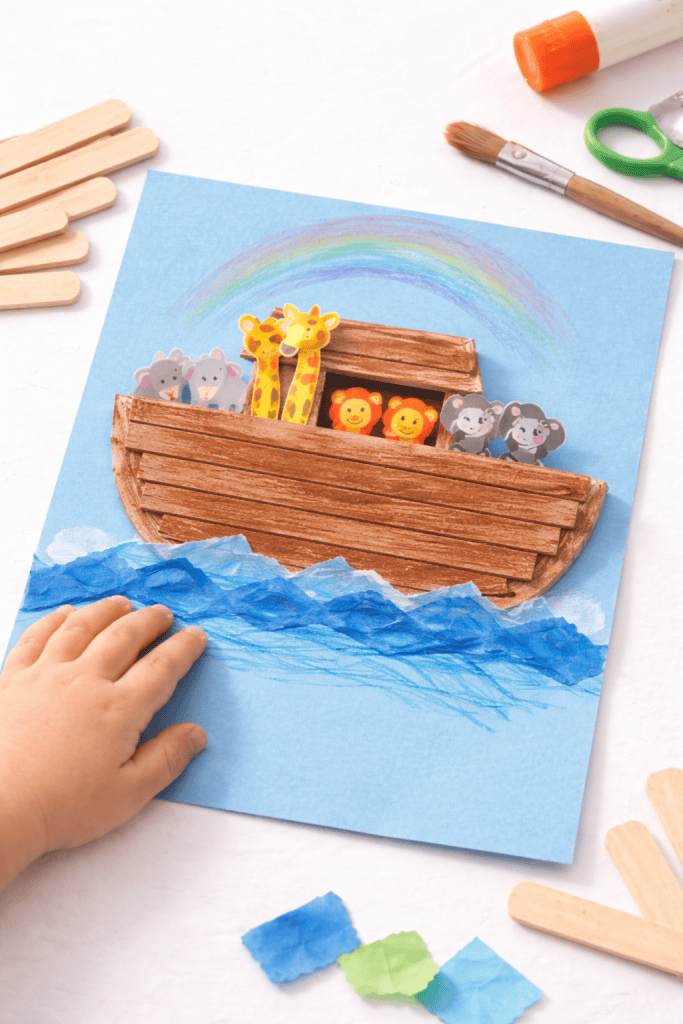
Build a mini Noah’s Ark using popsicle sticks! This craft mimics the idea of constructing an ark, giving kids a chance to practice simple building skills. Using popsicle (craft) sticks and glue, children will make a flat ark shape that can be decorated and displayed.
It’s great for fine motor skills and feels like building a tiny boat.
Materials: Popsicle sticks (craft sticks) – about 10 to 15 sticks, a small piece of cardboard or cardstock, scissors, glue, brown paint or marker, blue paper or crayon for waves, animal stickers or drawings.
Instructions:
- Prepare the Base: Cut a piece of cardboard or cardstock into a boat shape (a long rectangle with one pointed end, for example) about the length of a popsicle stick. This will be the backing to glue your sticks onto. (Alternatively, you can work directly on a table protected with wax paper and peel the ark off later once the glue dries.)
- Build the Ark Hull: Have your child lay popsicle sticks side by side across the cardboard shape, forming the sides of the ark. Glue each stick in place. They might all be parallel (forming a flat raft-like shape). If you have enough sticks, you can layer a second row on top, staggering them like brickwork, to make it look more like planks of an ark.
- Add a Cabin (Optional): Break or cut a couple of sticks in half and glue them vertically at one end of the ark to resemble Noah’s cabin/door on the ark’s deck. This adds a cute detail but isn’t necessary if it’s too fiddly for younger kids.
- Color the Ark: Once the glue is dry and the sticks are secure, help your child paint or color the popsicle sticks brown (to look like wood). If using paint, let it dry thoroughly.
- Create a Scene: Glue the finished popsicle stick ark onto a sheet of blue construction paper (which looks like the sea). Your child can then add animal stickers on the ark or draw animals and cut them out to stick on. Draw some waves around the ark or add pieces of torn blue paper to make water. You can even draw a small Noah figure if your child wants.
- Display: This mini ark can be propped up on a shelf or stuck to the refrigerator. It’s a proud little construction project that connects to the story’s theme of Noah building the ark. Talk about how Noah had to build a big ark – and imagine doing it with sticks and wood, much like the popsicle sticks used here.
5. Paper Bag Animal Puppets
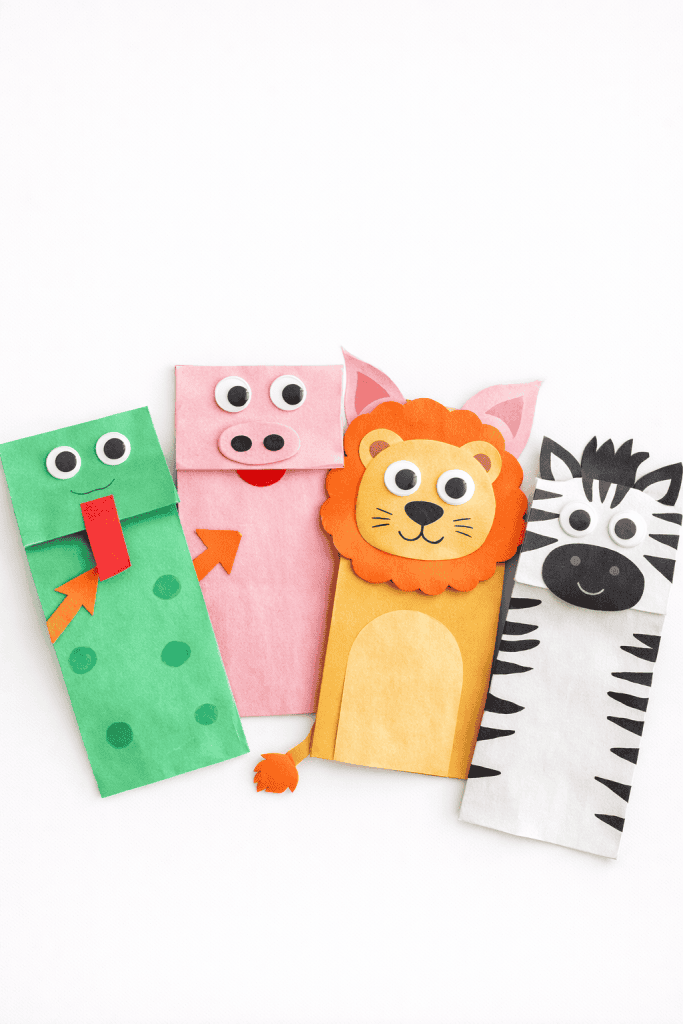
Simple animal puppets (like zebras, giraffes, and lions) make the Noah’s Ark story interactive and fun for kids.
Turn lunch bags or paper into animal puppets that kids can play with! In this craft, children create pairs of their favorite animals and then use the puppets to act out the Noah’s Ark story. Puppets bring the story to life and encourage imaginative play and storytelling.
Materials: Brown or white paper lunch bags (or cardstock paper to cut into puppets), markers or crayons, googly eyes (optional), colored paper scraps, glue, scissors, craft sticks (optional, if making stick puppets instead of bag puppets).
Instructions:
- Choose Your Animals: Ask your child which animals are their favorite from the Noah’s Ark story. Lions, elephants, birds, giraffes – any animal works! You’ll be making two of each, so maybe pick 2–3 kinds of animals to start.
- Paper Bag Puppet Method: If using paper bags, turn the bag so the bottom fold (flap) is the puppet’s “head” or mouth. For example, the bottom of the bag can be a lion’s face. Have your child draw or glue on features: ears, eyes, nose, and mouth on that flap. Use yellow paper for a lion’s mane, grey for an elephant trunk, etc. Glue on googly eyes or draw eyes. The rest of the bag becomes the body – they can draw fur, stripes, or spots on it.
- Cardstock Puppet Method: If you prefer, you can draw animal faces on cardstock, cut them out, and then tape them to craft sticks to make stick puppets. Decorate the faces with crayons and paper pieces (like floppy ears for elephants or beaks for birds).
- Make Pairs: Help your child make a second puppet of each animal so that every creature has a partner (two by two!). It’s okay if the pair isn’t identical – encourage your child to make each one unique (one could be bigger, have a different expression, etc.).
- Playtime – Act Out the Ark: Once the puppets are ready, use them to retell the Noah’s Ark story. Your child can hold up the puppets and make them “board” an imaginary ark. For example, two lion puppets can roar and walk in together. This activity encourages imagination and helps children actively participate in the story. It’s especially fun in a group: each child can contribute an animal puppet and together you assemble the whole ark’s crew!
- Story Connection: As they play, kids reinforce their understanding of the story – they remember that animals went in by pairs and they can practice naming the animals and making animal sounds. After playtime, the paper bag puppets can also double as little toy storage bags for the animal cut-outs, or just be used again for another storytelling session later.
For more engaging, faith-based activities, check out our hands-on crafts to teach children about Jesus’ disciples for ideas that bring Bible stories to life.
6. Fingerprint Animal Pairs Art
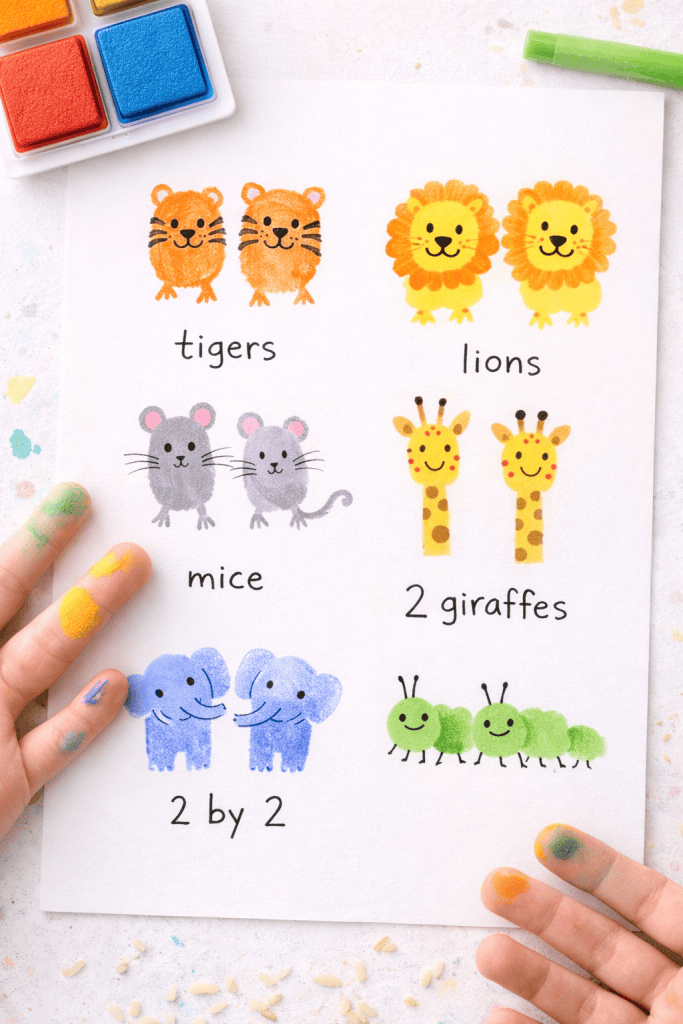
This craft is quick, slightly messy (in a good way!), and perfect for even the youngest crafters. Kids will use their fingerprints dipped in paint or ink to create cute little animals two-by-two on paper.
It’s a wonderful way to illustrate the idea of the animals entering the ark in pairs, and each fingerprint critter can be turned into a different animal with a few added details.
Materials: White paper, washable ink pads or non-toxic paint (various colors), markers or pen for drawing details, wipes or soap for cleaning fingers.
Instructions:
- Set Up: Lay out a sheet of white paper. Decide how many pairs of animals you want to make. You might fold or divide the paper into sections for each pair, or just do them scattered around.
- Make Fingerprints: Have your child press a finger onto an ink pad (or dab it in a little blob of paint spread on a plate) and then press it onto the paper. Do this twice next to each other – these will be the “pair” of animals. Repeat this process for as many different animals as you want, using different finger (or thumb) sizes and different colors for variety. Leave some space around each fingerprint pair for drawing features.
- Create the Animals: Once the fingerprint marks are dry (if using paint, give it a minute or two), use a marker or pen to transform each set of fingerprints into animals! For example:
- Add triangle ears, a tail, and little dots to make fingerprint mice.
- Draw manes and tiny faces on yellow thumbprints to create a pair of lions.
- Put black stripes on orange fingerprints for tigers or stripes on white for zebras.
- Add long necks and spots above two brown thumbprints for giraffes.
- A green thumbprint with eyes can become a caterpillar (draw a few legs) – get creative!
Each pair of fingerprints should end up as two of the same animal kind.
- Label or Decorate: You can label each animal pair with its name (“two lions,” “two mice,” etc.), or have older kids write a short sentence about the scene (“Two by two, the lions came.”). Kids might also draw a tiny ark or some grass/trees around their animals to set the scene.
- Share the Artwork: This fingerprint animal art makes a cute keepsake. It’s also a good opportunity to count each pair (count by twos) and recall that Noah brought the animals in twos. The activity is quick, so you can do several rounds if the child is enjoying it, or even create a little booklet of “animal pairs” made from fingerprints!
7. Toilet Paper Roll Animal Pairs
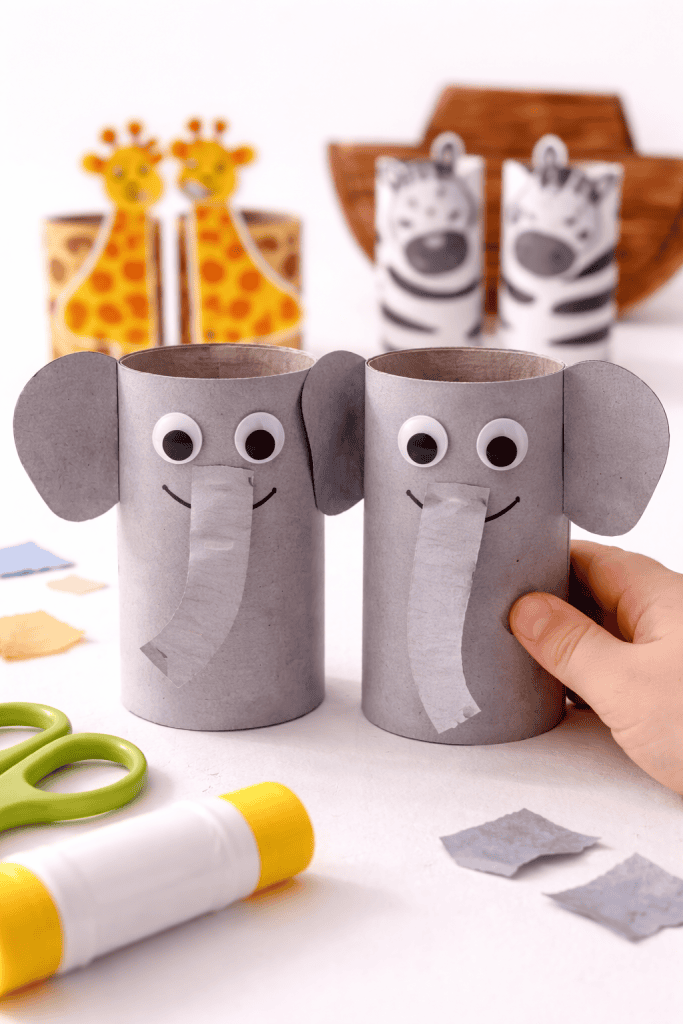
Empty toilet paper rolls can be magically transformed into all sorts of animals! In this craft, kids will create a pair of animals (like two elephants, two giraffes, etc.) using toilet rolls as the bodies. It’s a fun way to recycle and craft at the same time.
By making two matching animal figures, children reinforce the theme of animals boarding the ark in pairs.
Materials: 2 toilet paper rolls per animal pair, construction paper in various colors, googly eyes or markers, scissors, glue or tape, crayons/markers, and any decorative bits like pipe cleaners or buttons (optional).
Instructions:
- Pick an Animal: Ask your child which animal they’d like to make. Big animals like elephants, giraffes, zebras, or even birds can all be done with a bit of creativity. Let’s say you choose an elephant for example (you can repeat steps for other animals).
- Wrap the Rolls: Take two toilet rolls (for the two elephants). Cover each roll with grey construction paper (elephant color) – cut a rectangle that fits around the roll and glue or tape it on. If no colored paper, your child can color the roll with grey crayon/marker or paint it.
- Add Features: Now, from construction paper, cut out the animal’s features for each roll:
- For elephants: cut out two big ear shapes and a long trunk for each. For giraffes: cut spots and little horn-like ossicones; for zebras: black stripes to glue on a white-covered roll, etc.
- Glue the ears on the sides of the roll, and the trunk on the front. Attach googly eyes or draw eyes just above the trunk. Draw a mouth if desired.
- If making an animal with legs (like maybe a dog or cat), you can cut four little strips of paper and glue them as legs at the bottom of the roll.
- Use crayons/markers to add any other details (nose, stripes, spots, etc.).
- Create the Partner: Now make the second one so the first animal has a friend! Encourage your child to make it look similar, but it’s okay if it’s not exactly the same. It can be fun to have one elephant trunk pointing up and the other down, for instance.
- Play or Display: Once dry, these toilet roll animals can stand up on a table. Line them up as if “walking” into the ark two-by-two. You might even build a simple ark out of a box to put them in (optional). This craft yields actual toys that kids can play pretend with. They could set up a whole zoo or ark scene. Plus, you’ve recycled those paper rolls into something creative!
- Extend the Fun: If you have time and supplies, make more animal pairs on another afternoon – eventually, you could have a whole collection of toilet roll ark animals (a pair of elephants, giraffes, lions, etc.). This can turn into an ongoing project whenever you finish a toilet roll!
If you’re looking for hands-on activities for kids that will keep them engaged and happy, check out these irresistible felt craft ideas.
8. Egg Carton Noah’s Ark
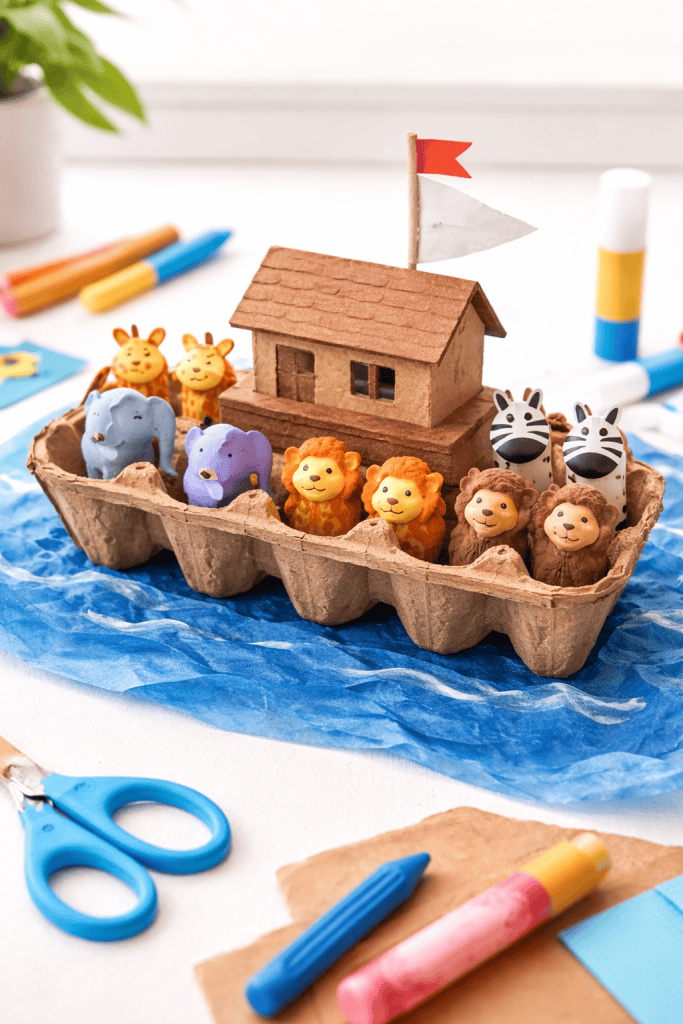
Don’t toss that empty egg carton – turn it into a mini Noah’s Ark! This craft uses a recycled egg carton to form the base of the ark, which kids can paint and fill with tiny animal figures or drawings.
It’s like creating a small boat diorama. Even though it’s a bit more involved, it can still be done in an afternoon and offers a great tactile building experience.
Materials: A cardboard egg carton (12-count carton works well), scissors or a utility knife (adults only), brown paint or markers, construction paper, glue, small animal figurines or pictures of animals, blue construction paper or tissue paper for water, and optional: popsicle stick or toothpick with paper for a sail/flag.
Instructions:
- Cut the Ark Shape: Adult step: Cut the egg carton in half lengthwise. You’ll use the bottom half (the part with the egg cups) as the hull of the ark. If it’s a 12-egg carton, cutting lengthwise gives you two long boat-like pieces. Trim the edges to make them a bit boat-shaped (the carton already looks like a rowboat bottom).
- Paint the Hull: Let your child paint the outside of the egg carton piece brown (to look like wood). If you don’t have paint, brown crayon or marker can work, or even wrapping it in brown paper. This messy step is often a favorite. Set it aside to dry for a short while.
- Build a Deck and Cabin: Using the top half of the egg carton or scrap cardboard, cut out a rectangle that can sit on top of the “hull” as a deck or roof. You can also cut a small square or triangle piece to be the cabin/roof on the ark. Have your child paint or color these pieces as well (maybe a different shade of brown or grey). Once everything is dry, glue the flat piece on top of the egg cups (covering the “eggs”) as a deck, and then glue the small cabin piece on top of that. Now it really looks like a little ark!
- Add Details: Kids can decorate the ark by drawing windows or doors on the sides or cabin. For a finishing touch, you could tape a popsicle stick or toothpick upright inside one egg cup and attach a small paper flag or sail to it. (The biblical ark probably didn’t have a sail, but it’s fun for pretend play.)
- Prepare the Animals: If you have tiny plastic animal toys (like from a board game or set), those can be passengers on your ark. Otherwise, have your child draw a few small animals on paper and cut them out. You could also print some from a template if available. Make pairs of each animal, of course! Place or glue the animal pairs inside the egg carton ark (they can sit in the egg cup “seats” nicely).
- Create the Flood Waters (Optional): On a sheet of blue paper or cardboard, make some “water” for the ark to float on. For example, you can glue down crumpled blue tissue paper around the area where you’ll place the ark, or just draw waves with crayons. Then set the ark on this ocean backdrop.
- Play & Display: Your child now has a mini Noah’s Ark playset. They can sail it (in pretend play) and imagine the animals inside. This craft can also be a visual aid as you read the Noah’s Ark story – kids can move the little animals and talk about what happened first, next, and last. It’s a wonderful way to bring the story to life in 3D. Keep the ark to play with again, or let it dry thoroughly and display it on a shelf.
9. Handprint Dove with Olive Branch
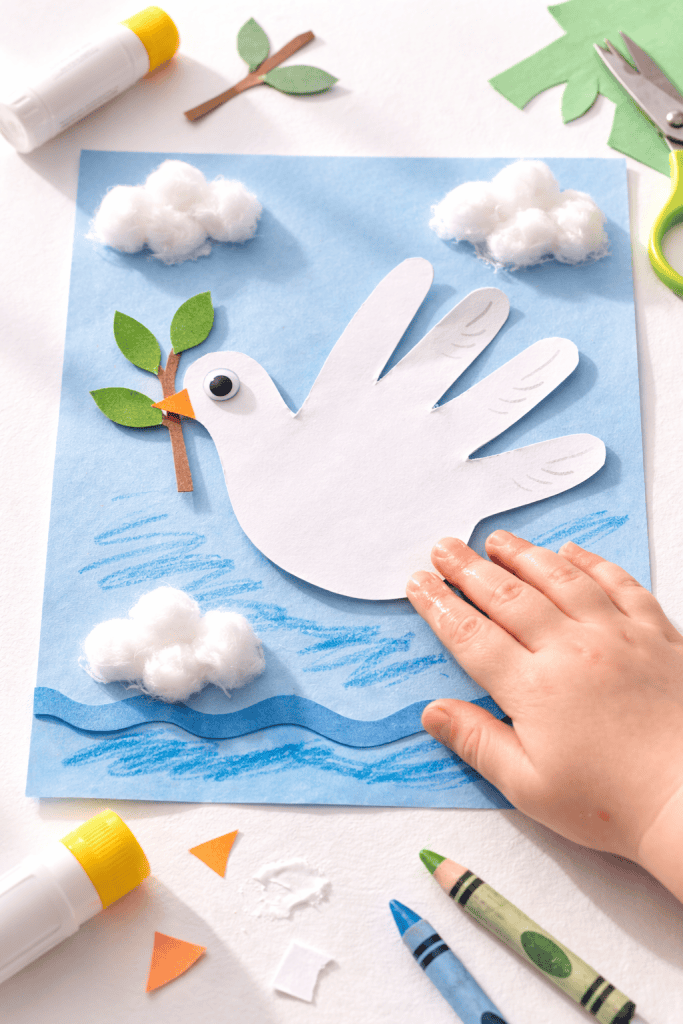
The dove and olive branch are important symbols in Noah’s Ark – the dove brought back a sign of new life (an olive leaf) after the flood. In this craft, kids will create a peaceful dove from their own handprint.
This is a meaningful and hands-on activity (literally!) that reminds children of the hope at the end of the story.
Materials: White paper, pencil, safety scissors, white craft paint (optional), a small scrap of green paper (for the olive leaf) or green crayon, glue, googly eye or black marker for the dove’s eye.
Instructions:
- Trace the Hand: Place your child’s hand (fingers closed together, thumb extended) on the white paper. Trace around their hand with a pencil. The fingers will look like the dove’s feathers and the thumb will be the dove’s head/neck.
- Cut Out the Dove Shape: Cut out the handprint outline (adults may need to help younger kids with cutting). If using paint instead of tracing, you could paint the child’s hand with white paint and have them stamp it on blue paper, but tracing gives a cleaner shape for this craft.
- Add Dove Details: Flip the cut-out so the fingers point backward (like tail feathers) and thumb is the head. Have the child draw or glue a small googly eye on the thumb area (dove’s head). You can draw a tiny orange triangle beak at the tip of the thumb area. If the paper is not white (say you traced on another color), you can have the child color the handprint white or glue cotton on it – but using white paper is simplest.
- Make the Olive Branch: Cut a slender little “twig” from brown or green paper, and a couple of tiny leaf shapes from green paper. Glue the leaves to the twig. Now attach this olive branch to the dove: either glue it onto the dove’s beak area or one of the “feathers,” so it looks like the dove is carrying it. If cutting tiny pieces is too tricky, simply draw a green leaf or two directly onto the handprint, near the beak.
- Mount the Dove (Optional): You can glue your finished dove onto a light blue background paper to resemble the sky. Cotton ball pieces can be added as clouds here too. Write a word like “Hope” or “Peace” on the page if you like, to underscore what the olive branch symbolizes.
- Talk About It: As the handprint dove craft dries, remind your child how Noah sent out a dove to check for land. The dove returned with an olive leaf, meaning the flood was ending and new life was beginning. This craft not only looks sweet but also opens a conversation about hope and new beginnings. Hang up the dove as a symbol of peace and promise.
10. Rainstorm “Rainstick” Shaker
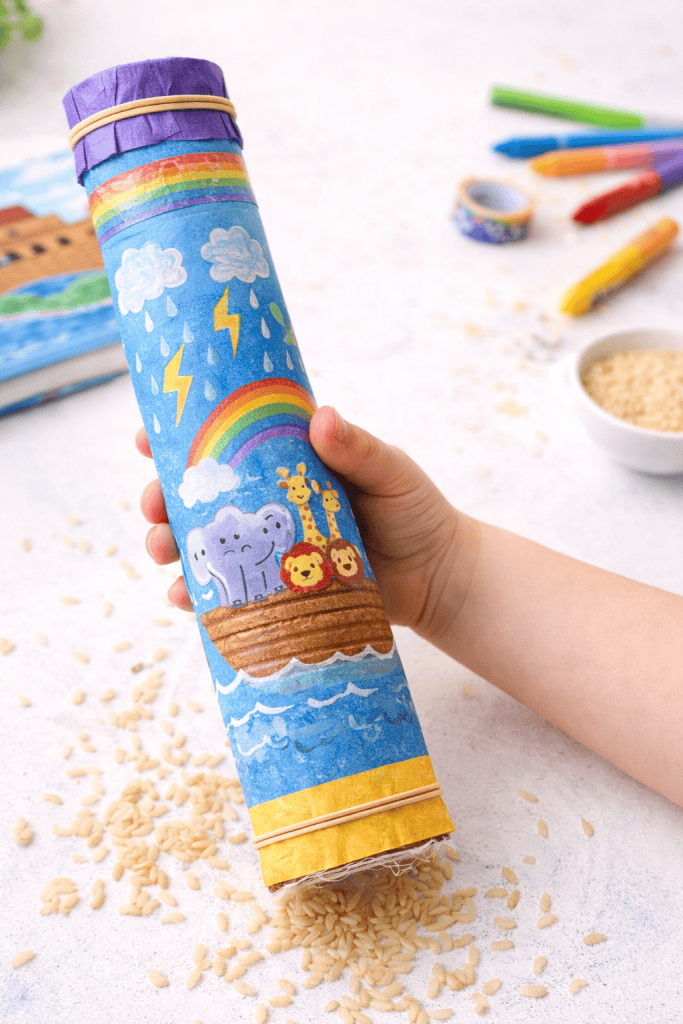
For 40 days and nights, rain poured while Noah was in the ark. This craft is a rainstick shaker – a simple instrument that mimics the sound of rain falling. Kids will make it using a cardboard tube and some common pantry items.
They’ll love turning it over to hear the “rain” sound, connecting them to that part of the Noah’s Ark story in a sensory way.
Materials: An empty paper towel roll (or a long Pringles canister or gift wrap tube), aluminum foil, a handful of dry rice or beans, paper (for sealing ends), rubber bands or tape, markers/paint and stickers for decorating, 2 small squares of fabric or paper (to cover the ends).
Instructions:
- Make the Rainstick Core: Cut a piece of aluminum foil about 1.5 times the length of your tube. Twist the foil into a long coil (spiral) that will fit inside the tube. The foil spiral will slow down the falling rice/beans and make the sound of rain last longer. Older kids can help twist the foil; for little ones, an adult can prepare this part.
- Seal One End: Cover one end of the cardboard tube with paper or fabric (place it over like a cap) and secure it tightly with a rubber band or heavy tape. Make sure it’s well sealed so nothing will spill out.
- Add “Rain” Inside: Have your child spoon a handful or two of dry rice, beans, or even small pasta into the tube. Just enough to make a good sound when you shake – not so much that it just fills up; you want it to trickle. You can experiment with the amount. You might also mix a few different things (rice makes a lighter sound, beans a heavier rain sound).
- Insert the Foil Coil: Gently push the twisted foil coil into the tube until it’s completely inside. The coil will wind through the tube’s length. This is what the rice/beans will bounce against as they fall.
- Seal the Other End: Cap off the open end of the tube with your second piece of paper or fabric. Rubber band or tape it securely, just like the first end. Now you have a closed tube with the noise-makers inside.
- Decorate the Shaker: Now for the fun part – decorating! Have your child paint the tube or wrap construction paper around it. They can draw rain clouds, lightning, animals on the ark, or just fun colors and patterns. Stickers or washi tape can also be used to add flair. For a Noah’s Ark theme, maybe draw raindrops or a mini ark on it.
- Make It Rain!: Show your child how to use the rainstick by slowly tipping it upside down. The rice and beans will tumble through the foil coil and sound like falling rain. It’s quite soothing to listen to! Kids will likely flip it again and again to hear the rain sounds. As they do, you can talk about the great rainstorm Noah and the animals experienced. This craft is both a musical instrument and a storytelling prop.
- Safety Note: Ensure the ends are taped well if you have very young children, so they can’t open it and access the small beans/rice without supervision.
- Connect to the Story: While your child gently shakes the rainstick, you might read a portion of the Noah’s Ark story about the rain, or sing a related song. This engages their senses – they can hear the “rain” while imagining the story. It’s a wonderful way to make the tale of the flood more real to them, and when the rainstick stops, you can mention how eventually the rain did stop and the sun came out again, leading to the rainbow.
Tips for Crafting with Kids (Ages 3–8)
Craft time with young children can be joyful (and a little messy!).
Here are some handy tips to make your Noah’s Ark crafting session smooth, safe, and fun:
- Keep it simple and safe: Use supplies you already have around the house and that are age-appropriate. For example, child-safe scissors and non-toxic glue/paint are a must. The focus should be on fun, not fancy materials.
- Prepare in advance: Do a bit of set-up before calling the kids over. Pre-cut shapes (like ark pieces or animal outlines) for the youngest kids so they can jump right into coloring and gluing. Lay out newspapers or a plastic tablecloth to catch messes. Having materials ready means more creating and less waiting.
- Encourage creativity: There’s no “right” or “wrong” way for these crafts to look. If your child wants to put a purple elephant on the ark or give the lion a polka-dot mane, let it happen! No two crafts need to look the same – the goal is self-expression. Their unique designs reflect their individual imagination.
- Tell the story as you craft: Use craft time to talk about Noah’s Ark. Ask questions like, “How do you think Noah felt building the ark?” or “What sound do you think the rain made on the ark’s roof?”. This makes the craft more meaningful because it ties back to the lesson. It also keeps kids engaged as their hands are busy.
- Embrace the process (and the mess): Understand that crafting with little ones might get messy – glue on fingers, scraps on the floor, paint in hair (it happens!). Dress kids in play clothes or aprons. Enjoy the process with them, even if the end product looks hilariously off-script. The experience is what counts. And when it’s time to clean up, involve the kids in that too – it teaches responsibility (make it a game by seeing how many scraps you can pick up in 30 seconds).
With a little prep and a lot of patience, crafting can be a cherished time of learning and bonding. The giggles and pride on their faces when they finish their craft will be well worth any minor chaos!
For more hands-on activities that teach valuable lessons, check out my other post on inspiring God’s promises crafts – it’s full of fun projects that help kids connect with Bible stories in a creative way.
Ready to Set Sail on Your Noah’s Ark Craft Adventure?
Each of these Noah’s Ark crafts is easy to prepare, fun to make, and memorable for your child. By combining a beloved Bible story with creative hands-on play, you’re helping your kids see and touch the lessons they learn – turning faith into something personal and practical.
Whether your little one is finger-painting a rainbow or building a mini ark from a cardboard box, they’re not just making a craft – they’re making connections to ideas of faith, obedience, and hope that Noah’s story carries.
So gather those household craft supplies and give one of these projects a try this afternoon. The most important thing is that your child feels involved, capable, and proud of what they create.
Crafts like these become more than just busywork – they become anchors for understanding and sweet reminders of God’s love and promises. Plus, you’ll be creating wonderful family memories (and maybe starting a new tradition) as you craft and tell stories together.
Which of these Noah’s Ark crafts will you try first? We’d love to hear how your crafting adventure goes or if you have your own Ark-themed craft ideas. Share your experiences and tips in the comments below – happy crafting!
Get the FREE Fruit of the Spirit Tree Craft
 - 2026-02-09T234426.555")
Bring the Fruit of the Spirit to life with this FREE Fruit of the Spirit Tree Craft—a fun, hands-on printable kids can build and display.
It features a 3D accordion-fold tree and comes in two versions (one with Bible verses for each fruit from Galatians 5:22–23, and one simplified for younger kids). This makes it easy for children to learn love, joy, peace, patience, kindness, goodness, faithfulness, gentleness, and self-control at their own pace.
Click below to grab the free tree craft and start creating together.
FAQs
1. What age group are these Noah’s Ark crafts suitable for?
These crafts are great for preschool to early elementary kids (ages 3–8). Younger kids may need help with cutting or assembly, while older kids can handle more detailed work. Adapt each craft to your child’s skill level, and always supervise scissors, glue, or small pieces.
2. What if I don’t have all the materials? Can I substitute things?
Yes! Household items often work as substitutes:
- Cardboard for paper plates
- Twigs or cardboard for popsicle sticks
- Colored scrap paper for tissue paper
- Draw eyes if you don’t have googly eyes
Improvise creatively – it’s a fun way for kids to problem-solve while crafting.
3. How can I incorporate the Noah’s Ark story while doing these crafts?
- Read first: Storytime before crafting sets the scene.
- Narrate during crafting: Talk about animals, rain, and the rainbow as you go.
- Use crafts as props: Puppets or rainsticks can retell the story.
- Sing related songs: Simple Noah’s Ark songs make it fun and interactive.
4. How can I manage a group of kids with these crafts?
- Prep materials in kits and choose age-appropriate crafts.
- Demonstrate each craft step-by-step.
- Set up stations if doing multiple crafts.
- Have extra activities for kids who finish early.
- Plan for cleanup – involve kids in tidying up.
5. How can I minimize mess and ensure safety during these craft activities?
- Cover surfaces and dress kids in old clothes or aprons.
- Use washable markers, crayons, and paints.
- Use child-safe scissors and supervise carefully.
- Manage glue with glue sticks or small applicators.
- Be cautious with small pieces and remove hazards.
- Introduce materials step-by-step and include a clean-up routine.
