Mother’s Day is such a sweet opportunity to slow down and celebrate the gift of motherhood.
It is a beautiful time to create something meaningful with your children.
Some of the most meaningful gifts are the simplest ones. Little painted hands. A favorite Bible verse. A heartfelt “thank you” written in careful handwriting.
Handprint crafts feel joyful and life-giving because they capture this season exactly as it is.
And when you pair those tiny prints with Scripture, you create something that carries both love and faith.
If you are looking for Mother’s Day handprint Bible crafts for kids, these seven projects are simple, meaningful, and easy to follow step by step.
They work beautifully at home, in homeschool, or in Sunday School settings.
7 Meaningful Mother’s Day Handprint Bible Crafts for Kids
Let’s create something that blesses mom and points back to God’s goodness at the same time.
1. “Because of You, I Bloom” Handprint Flower Bouquet
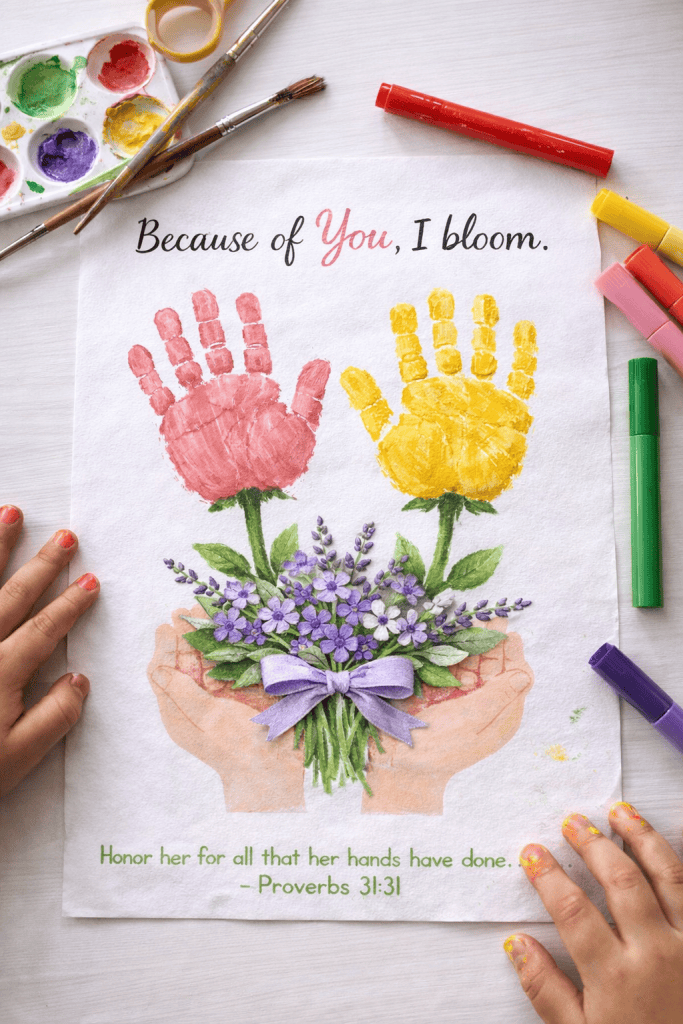
(Proverbs 31:31)
This craft turns painted handprints into blooming flowers held in loving hands. It feels cheerful, symbolic, and incredibly sweet.
Verse: “Honor her for all that her hands have done.” (Proverbs 31:31)
What You’ll Need
- Washable tempera paint (pink, yellow, or favorite flower colors)
- White cardstock
- Green paint or marker (for stems)
- Paintbrush or sponge
- Black or green marker
- Optional watercolor florals printed or painted for the bouquet base
Step-by-Step Instructions
Step 1: Create the handprint flowers
Paint your child’s hand evenly. Press firmly onto cardstock with fingers spread wide. This creates a flower shape.
Make two prints in different colors to resemble blooming flowers.
Allow the paint to dry completely.
Step 2: Add stems
Once dry, use green paint or a marker to draw stems extending downward from each handprint.
You can keep them straight or gently curved.
Step 3: Create the bouquet base
At the bottom of the stems, either:
- Paint or glue a small watercolor-style flower bundle
- Or draw simple flowers and greenery
This gives the illusion that the handprint flowers are growing from a bouquet being held.
Step 4: Add the message
At the top, write:
“Because of you, I bloom.”
At the bottom, write the verse:
“Honor her for all that her hands have done. – Proverbs 31:31”
Add your child’s name and the year.
This one feels especially meaningful because it honors both a mother’s love and her faithful work. just like Mother’s Day itself.
If your children enjoy creative Scripture activities, you might also love my fruit of the Spirit basket craft, which are wonderful for reinforcing biblical truths in a hands-on way.
2. “Happy Mother’s Day” Handprint Card
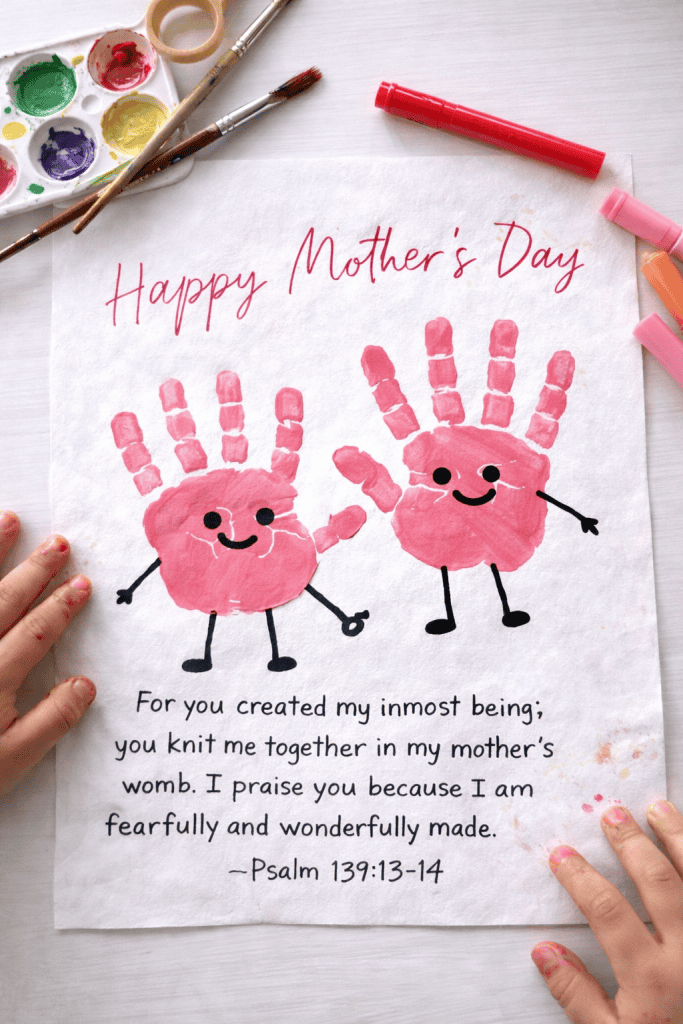
(Psalm 139:13–14)
This design turns handprints into playful little characters on a card. It’s joyful, lighthearted, and full of personality.
Verse: “For you created my inmost being; you knit me together in my mother’s womb. I praise you because I am fearfully and wonderfully made.”
(Psalm 139:13–14)
What You’ll Need
- White cardstock folded in half
- Pink washable paint
- Black marker
- Optional colored markers
Step-by-Step Instructions
Step 1: Make the handprints
Paint your child’s hand and press it onto the front of the folded card.
Repeat to create two prints side by side.
Let dry completely.
Step 2: Turn prints into characters
Using a black marker, add:
- Small eyes
- A smiling mouth
- Simple stick arms and legs
This makes the handprints look cheerful and alive.
Step 3: Add the greeting
Write “Happy Mother’s Day” across the front.
Inside the card, write the Psalm 139:13–14 verse.
Add a personal message from your child.
This craft feels playful while still grounding everything in Scripture.
If your little ones love crafts centered on Jesus’ love, you may also enjoy my Jesus Loves Me crafts for kids, which are simple, faith-filled, and perfect for preschool ages.
3. Handprint Cross Keepsake

This craft forms a cross using multiple handprints arranged vertically and horizontally.
It is bold, simple, and powerful.
Below the cross, write:
“Thank you for teaching me about God’s love.”
What You’ll Need
- White cardstock
- Washable paint (pink or favorite color)
- Black marker
Step-by-Step Instructions
Step 1: Form the vertical beam
Paint your child’s hand and press it vertically in the center of the page.
Repeat below it to lengthen the cross.
Step 2: Create the horizontal beam
Press one handprint sideways across the top portion.
Repeat on the opposite side.
Let dry fully.
Step 3: Outline (optional)
If desired, outline the cross shape with a black marker for definition.
Step 4: Add the message
Write: “Thank you for teaching me about God’s love.”
Add the child’s name and year.
This one feels especially meaningful because it connects Mother’s Day to the foundation of faith.that anchors their home.
If you’re planning ahead for seasonal faith activities, you might also love my Easter story snack mix idea, which makes the resurrection story interactive and memorable for little ones.
And for Old Testament storytelling crafts, my Adam and Eve crafts ideas for preschoolers are simple and age-appropriate for younger children.
4. “Blessed Mom” Cut-Out Handprint Wreath
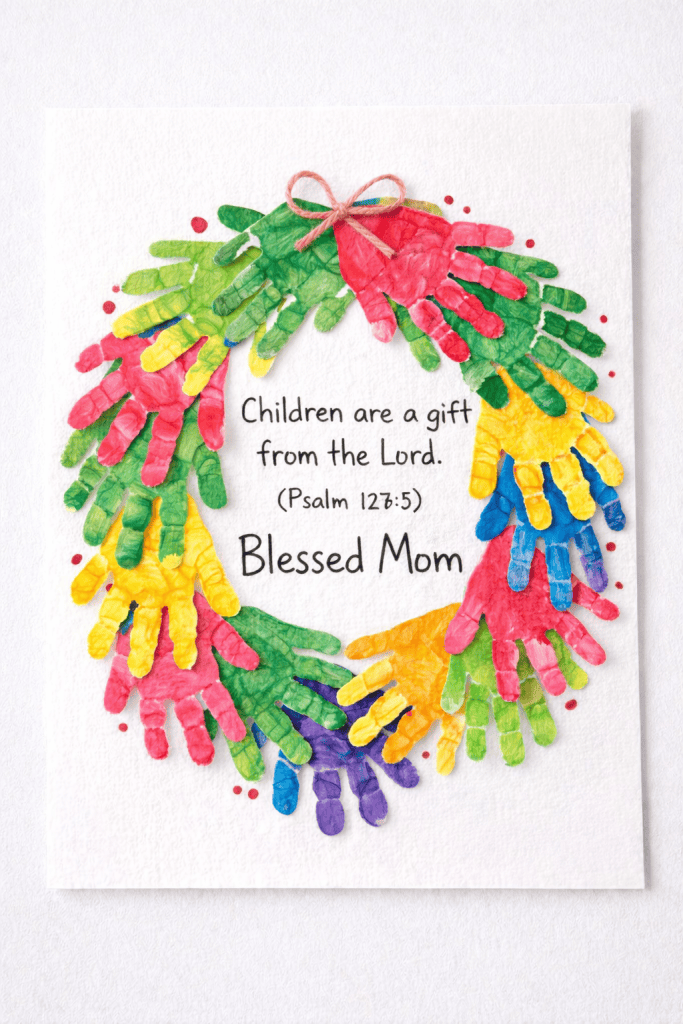
Verse: Psalms 127:3 “Children are a gift from the Lord.”
What You’ll Need
- Washable tempera paint
- White cardstock (for handprints)
- A second sheet of cardstock (for the wreath base)
- Scissors
- Glue stick
- Pencil
- Black marker
- Optional ribbon, twine, or small decorative berries
Step-by-Step Instructions
Step 1: Make the handprints first
Paint your child’s hands one at a time and press them onto white cardstock.
Leave space between each print so you can cut them out easily later.
You’ll usually need 8 to 15 handprints depending on how full you want the wreath to look.
Let the paint dry completely before cutting.
Step 2: Cut out each handprint
Carefully cut around each handprint.
You can trim closely to the edges or leave a thin white border for a softer look.
This is a great step for older kids to help with.
Step 3: Prepare the wreath base
On a fresh sheet of cardstock, lightly draw two circles.
One large outer circle and one smaller circle inside it. This creates a ring guide.
You can also cut out the inner circle if you want a true wreath opening in the center.
Step 4: Arrange before gluing
Lay the cut-out handprints around the ring shape without glue first.
Slightly overlap them so the fingers fan outward like leaves. Rotate some slightly for a more natural look.
Adjust spacing until it feels balanced and full.
This step makes a big difference in the final appearance.
Step 5: Glue them down
Once you’re happy with the layout, begin gluing one handprint at a time.
Press firmly and work your way around the circle.
You can layer some slightly on top of others to create depth.
Step 6: Add the verse in the center
In the open center space, neatly write:
“Children are a gift from the Lord.”
(Psalm 127:3)
Underneath, add “Blessed Mom.”
Step 7: Add simple embellishments
You can:
- Paint small red dots as berries
- Glue tiny paper circles between the fingers
- Tie a small ribbon bow at the top
- Add the child’s name and the year at the bottom
5. “Rooted in Love” Tree Handprint Art
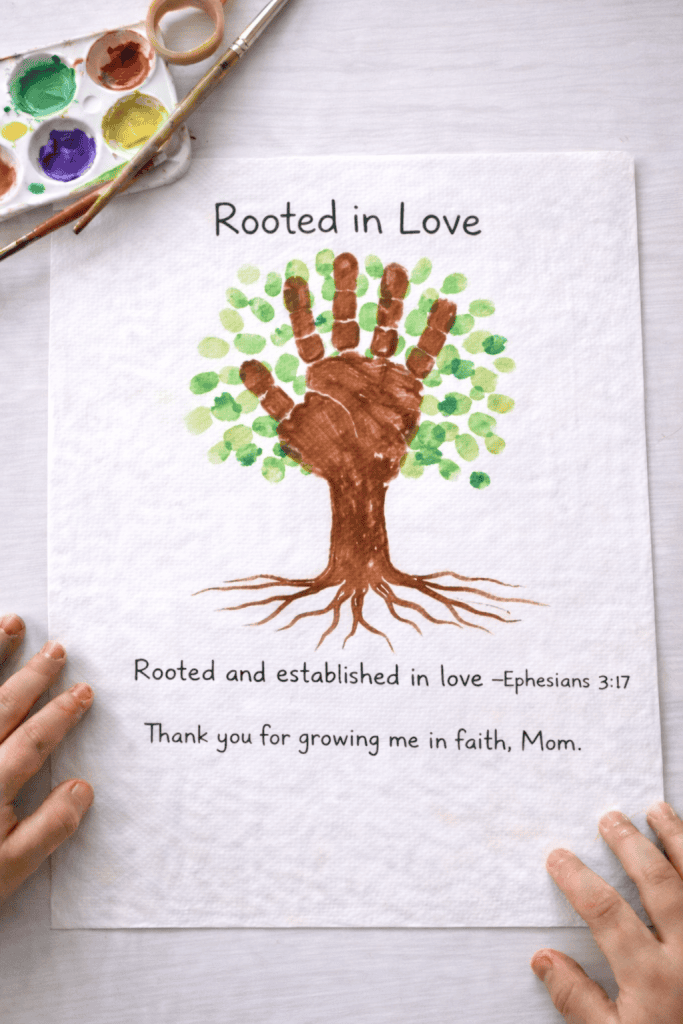
(Based on Ephesians 3:17)
What You’ll Need
- Brown paint
- Green paint
- White cardstock
- Marker
Step-by-Step Instructions
Step 1: Paint the child’s forearm and hand brown
Use a paintbrush or sponge to coat the forearm and hand evenly with brown paint.
Make sure the fingers are well covered since they will become the tree branches.
Step 2: Press onto paper to form the trunk and branches
Carefully press the painted arm and hand onto white cardstock.
The forearm creates the tree trunk, and the fingers spread out naturally to form the branches.
Lift straight up to avoid smudging. Let dry completely.
Step 3: Add green fingerprint leaves
Dip a fingertip into green paint and press small prints around the branches.
Layer different shades of green if you’d like for depth. This creates a full, leafy tree canopy.
Step 4: Draw visible roots at the bottom
Using a marker, draw thin root lines spreading outward from the base of the trunk.
This detail reinforces the meaning of being rooted and grounded.
Write: “Rooted and established in love. – Ephesians 3:17”
You can add: “Thank you for growing me in faith, Mom.”
6. “Light of the World” Handprint Candle
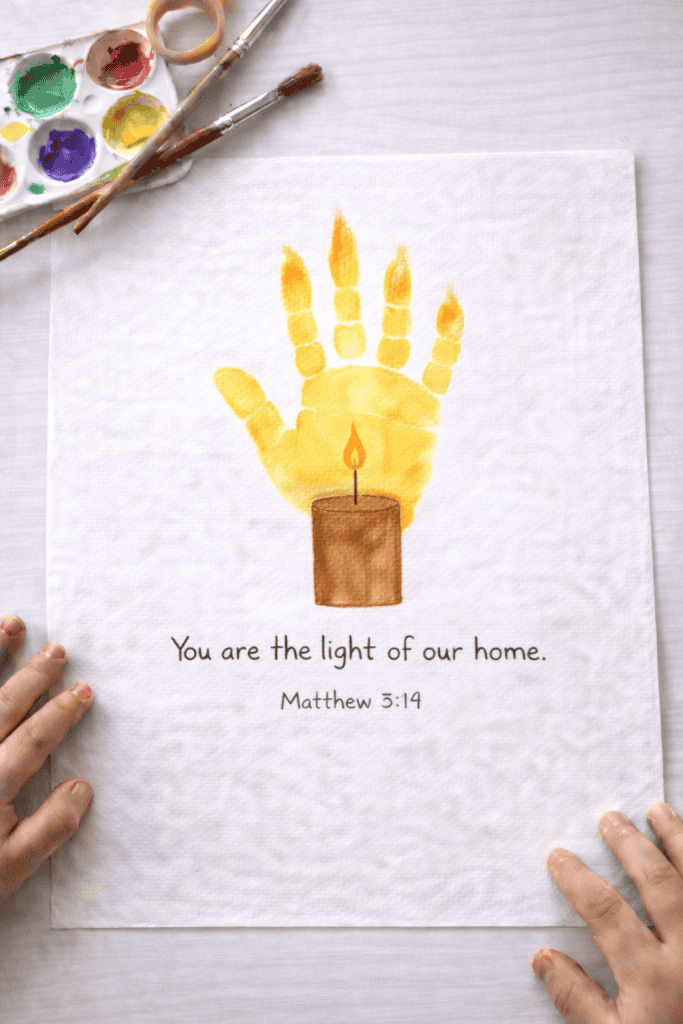
(Based on Matthew 5:14)
What You’ll Need:
- Yellow and orange paint
- White paper
- Brown or gold marker
Step-by-Step Instructions
Step 1: Paint the child’s hand yellow
Cover the palm and fingers fully with yellow paint.
You can lightly blend a bit of orange onto the fingertips for a flame effect.
Step 2: Stamp vertically to form the flame
Press the hand straight down onto white paper with fingers pointing upward.
The fingers become the glowing flame. Lift carefully and allow to dry.
Step 3: Draw the candle base
Once dry, draw a rectangle underneath the palm to create the candle body.
You can add subtle lines for dimension if desired.
Step 4: Add a wick in the center
Draw a short vertical line in the middle of the palm area to represent the wick.
You can outline the handprint lightly to define the flame shape.
Write “You are the light of our home.” Matthew 5:14
Simple. Warm. Very sweet.
7. “Two Hands, One Heart” Christian Mother’s Day Handprint Craft

A simple layered keepsake that says: We are held together in love.
Perfect for toddlers, siblings, or even a mom and child handprint together.
What You’ll Need
- White cardstock
- Red or pink construction paper
- Washable paint (any color you like)
- Pencil
- Scissors
- Glue stick
- Black fine-tip marker
Step-by-Step Instructions
Step 1: Create the Heart Base
Lightly draw a large heart on red or pink construction paper.
Make it big enough to hold two handprints inside.
Carefully cut out the heart.
This will be your layered background piece.
Step 2: Make the Two Handprints
Paint both of the child’s hands (or two children’s hands in different colors).
Press them side by side on white cardstock.
You can slightly angle them inward so they feel connected.
Let completely dry.
Step 3: Cut Out the Handprints
Once dry, carefully cut around each handprint.
Leave a small white border if you like. It makes them pop more when glued down.
This step gives it that sweet handmade, dimensional look.
Step 4: Assemble the Heart
Glue the two cut-out handprints onto the large heart shape.
Place them so the palms meet slightly in the center, forming the inside of the heart.
Press gently and allow to dry.
Step 5: Mount on Final Background
Glue the finished heart onto a clean sheet of white or pastel cardstock.
This gives it a finished, frame-worthy look.
You can write: “Mom, we are held together in love.” Colossians 3:14
Practical Tips for a Smooth Craft Time
- Prepare materials before inviting children to the table so the process flows easily.
- Complete all handprints first and allow them to dry before writing verses.
- Keep wipes nearby and encourage children to press firmly but gently.
- If working with a group, lightly pre-write verses in pencil to save time and reduce stress.
A little preparation helps the experience stay calm and positive.
(And if you’re looking for even more faith-based craft inspiration beyond Mother’s Day, I share a full collection of easy Bible crafts for kids that work throughout the year.)
Start a Simple Faith-Filled Mother’s Day Tradition
Each year, the hands will grow. The handwriting will improve. The messages will deepen.
Over time, you will see a beautiful record of growth and faith through something as simple as paint on paper.
If you try one of these Mother’s Day handprint Bible crafts for kids, I would love to hear how it turned out.
Share in the comments below which craft you chose or how you personalized it for your family.
Get the FREE Easter Egg Story Printable Craft

Make Easter more meaningful for your kids with TWO free printables that bring the resurrection story to life in a simple, hands-on way.
When you sign up, you get both the Easter Egg Story Craft and the Easter Tomb Craft — no need to sign up twice!
The Easter Egg Craft has kids color four eggs and fold them into a 3D keepsake, walking through the story from the Last Supper to Jesus rising again. The Easter Tomb Craft features a colorable tomb with doors that open and close to reveal the risen Savior inside.
Click below to grab both printables and start crafting together.
FAQs
What paint works best for handprint crafts?
Washable tempera paint works best for children because it provides good coverage and cleans easily from skin and surfaces.
How long should the paint dry before writing over it?
Allow at least 20 to 30 minutes for drying. Thicker layers may require additional time.
Can I use canvas instead of paper?
Yes. Canvas creates a longer-lasting keepsake and works especially well for the handprint heart or cross design.
What if my child struggles with sensory discomfort from paint?
You can trace their hand instead of painting it and let them color it in with markers or crayons.
How can I store these crafts long term?
Store flat in a keepsake box or frame them behind glass to preserve them for years to come.
