Hand smocking is a simple method of gathering fabric and securing it with decorative stitches.
It looks detailed, but the process is clear and repeatable once you understand the steps.
Each pleat and stitch serves a purpose – adding stretch, texture, and shape to a garment or project.
This technique has been used for generations because it’s practical and adaptable.
You can apply it to clothing, home textiles, or small accessories, and it only requires basic tools and steady focus.
In this article, you’ll learn the essentials – from choosing the right fabric to mastering your first stitches – so you can begin smocking with confidence and ease.
What You Will Need for Hand Smocking

Hand smocking starts with a very simple toolkit, and the beauty of it is how little is required to get going.
A few well-chosen supplies make the process smooth, accurate, and enjoyable.
Here’s what to gather before you begin.
Fabric
Choose a lightweight woven fabric such as cotton lawn, voile, muslin, or linen.
These hold pleats evenly and are easy to needle through.
Avoid stretch fabrics; the goal is to let your stitches shape the fabric, not the fabric itself.
Tip: Prewash and press your fabric before marking. This removes any factory coating and helps the pleats stay crisp.
You can also double-check that your fabric is truly natural by learning how to do a burn test for natural fabrics, especially if you are working with thrifted or unlabeled yardage.
Thread
Use embroidery cotton, sewing cotton, or silk thread in a medium weight (size 8 or 12).
Quality thread glides smoothly through fabric and resists fraying – a small detail that makes your work cleaner and easier.
If you’re practicing, use a contrasting color so your stitches are easy to see.
For final projects, match or complement the fabric tone.
Needle
A fine hand-sewing or embroidery needle (size 7–9) works best.
It should pass through the pleats smoothly without tugging the fabric.
A shorter needle gives you more control while learning even spacing.
If you are unsure which needle works best for different fabrics or projects, this quick guide on sewing machine needle sizes and types can help you match the needle to your fabric and get cleaner, more even stitches.
Marking Tools
Precision begins with marking. You can use:
- A water-soluble fabric pen
- A tailor’s pencil, or
- Iron-on smocking dots (available in craft stores)
These marks guide your stitches and keep spacing consistent.
Choose the marking method that’s easiest for you to see and remove.
Ruler or Measuring Gauge
A clear sewing ruler or gauge helps you space rows evenly – typically ¼ inch apart for fine fabric or ⅜ inch for heavier fabric.
Consistent spacing is what gives smocking its tidy structure.
Iron
Pressing is an active part of smocking, not just a finishing step.
Use a clean, dry iron to flatten fabric before marking and to gently steam pleats after stitching.
Always press from the back to protect your threads.
Optional: Embroidery Hoop
If you’re new to hand stitching, a small embroidery hoop can help maintain even tension as you work.
It’s especially useful when you’re learning to keep rows straight and stitches uniform.
Preparation Checklist
Before you begin:
- Fabric washed and pressed
- Grid or dots marked evenly
- Threaded needle ready
- Good lighting and a flat surface
That’s all you need to begin – simple, reliable tools that help you focus on building skill, not managing equipment.
Understanding Smocking Basics – Pleats, Patterns, and Purpose
Before you start stitching, it helps to understand what smocking actually does.
The goal is to control how fabric gathers and stretches – not just for decoration, but for function and fit.
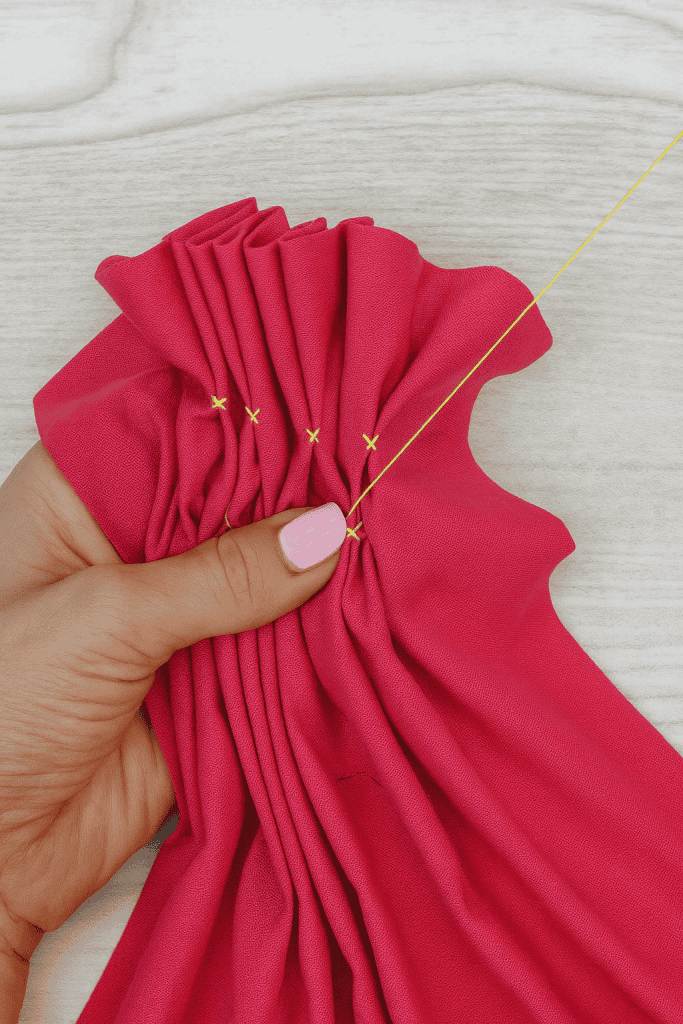
Pleats

Smocking starts with pleats, which are small, even folds gathered across a section of fabric.
These pleats create flexibility. When stitched, they hold their shape while allowing the fabric to expand slightly.
- For lightweight fabric, space the dots or grid ¼ inch apart.
- For heavier fabric, ⅜ inch spacing keeps the folds balanced.
To create pleats, you thread through the marked points in a straight row, draw the fabric together, and tie off the ends.
The tension should feel even and springy under your fingertips.
If you want a beginner-friendly primer on gathering techniques, you might also enjoy this guide on how to easily make gathers for beautiful ruffles.
Patterns

Once the pleats are in place, the stitching turns those folds into a stable, textured design.
Each stitch crosses or loops around pleats in a specific pattern – this is what forms the geometric lines and shapes in smocking.
Patterns aren’t just visual. The way you stitch affects how much stretch the finished piece will have. For example:
- Cable stitches keep the pleats close together and firm.
- Honeycomb stitches allow more give, perfect for sleeves or waistbands.
Understanding this helps you choose the right stitch for the job – structure where you need it, flexibility where you want movement.
Purpose
Traditional smocking replaced elastic by shaping fabric through thread tension.
It still serves the same purpose today: to add form and comfort without bulk or extra seams.
You’ll often see smocking on cuffs, bodices, or gathered panels – anywhere fabric needs to flex without losing structure.
In home projects, it can add detail to pillow fronts, aprons, or decorative bands.
Smocking is built on logic and order – marked points, even pleats, and measured stitches. Once you understand how those elements work together, you’ll see that the technique is more mechanical than mysterious.
How to Hand Smock for the First Time
Learning to smock is about building small, repeatable steps.
Here’s how to begin from the very first mark to your first stitched row.
Step 1: Mark Your Fabric
Lay your pressed fabric flat on a clean surface.
Using your water-soluble pen, tailor’s pencil, or transfer dots, mark small, even points in a grid.
- Rows: Space them ¼ inch apart for light fabrics or ⅜ inch for medium weight.
- Columns: Keep them the same distance apart as the rows so your grid forms perfect squares.
These dots act as your stitching guide.
The more precise your marking, the more even your smocking will look later.
Step 2: Thread and Knot
Cut about 18 inches of thread – long enough to run a row but short enough to prevent tangling.
Thread your needle and tie a small, secure knot at the end.
For beginners, it’s best to work with a single thread (not doubled).
If your thread slips easily, make a tiny backstitch at the starting point to anchor it.
Step 3: Create the Pleats
Starting at the first dot in the top row, insert your needle in and out of each dot across the row (a running stitch).
When you reach the end, pull gently to gather the fabric.
The dots will form small, even pleats.
Do not pull too tightly – the goal is consistent folds, not bunching.
Tie off the end with a small knot or wrap the thread around a pin to hold tension while you move to the next row.
Tip: The pleats should stack neatly, like a paper fan. If they twist, ease the gathers gently until they align.
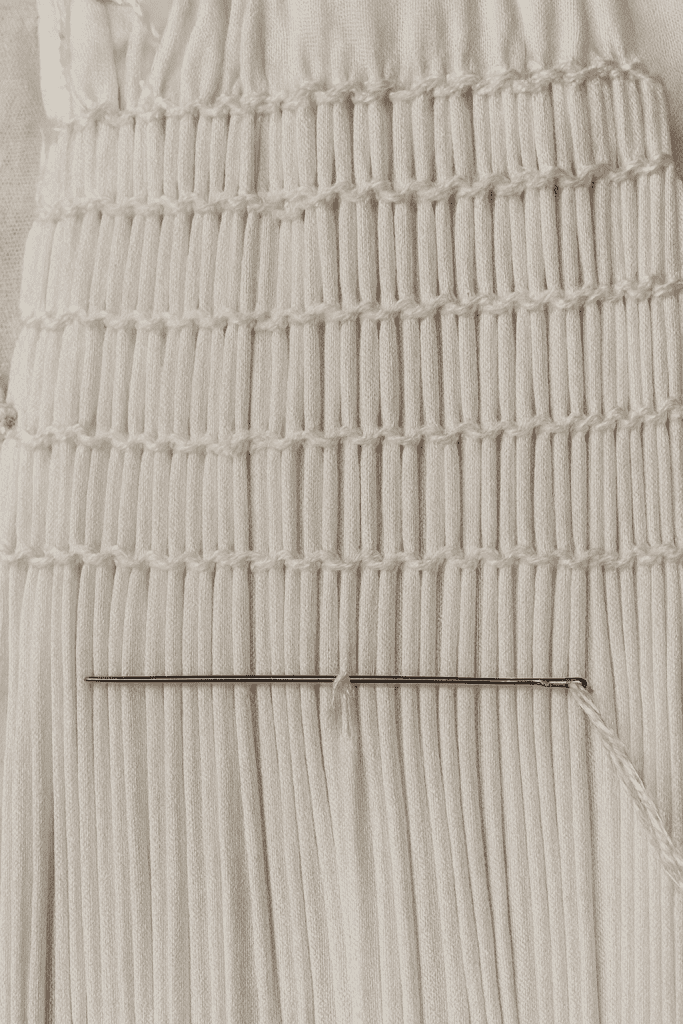
Step 4: Secure the Rows
Once you’ve pleated three or four rows, your fabric should look evenly gathered.
At this stage, use pins or light stitching along the edges to hold the pleats in place.
Press lightly with steam from the back – just enough to set the folds, not flatten them.
Step 5: Start the Smocking Stitch
Now comes the decorative stitching that holds the pleats permanently.
Begin with the cable stitch, the simplest and most stable type:
- Bring your needle up through the first pleat.
- Move horizontally across the next pleat and bring the needle up again.
- Alternate left and right, keeping your thread tension even.
Each stitch links two pleats together. Continue across the row, keeping the spacing consistent.
After the first few stitches, you’ll see the pattern form clearly.
Step 6: Add Pattern Rows
When the top row looks even, move to the next marked row below.
You can repeat the same stitch for structure or alternate with a decorative one like the wave stitch for variation.
Smocking often looks best with three to six stitched rows, depending on the project.
Step 7: Press and Set
Once you’ve finished stitching, press from the back using a light steam setting.
This helps the pleats settle into place and keeps the front stitches raised and defined.
If you’re making a sample piece, label it with the stitch type – it’s a useful reference for future projects.
Quick Review Checklist
Before moving on, check these points:
- Pleats are even and aligned.
- Thread tension is firm but not pulling.
- Rows stay parallel with consistent spacing.
Once you can complete one clean smocked panel, you’ve learned the core structure that applies to every smocking project – from cuffs to bodices to decorative trims.
5 Beginner Smocking Stitches to Master
Once your pleats are in place, the stitches you choose will determine how your fabric looks and moves.
Start with a few core stitches that build confidence and consistency.
These are the foundation of most smocking patterns and can be used alone or combined for more complex designs.
1. Cable Stitch
The cable stitch is the starting point for most smocking. It links pleats side by side in a straight line, giving structure and strength to your work.
How to do it:
- Bring the needle up through the first pleat on your row.
- Move horizontally to the next pleat, insert the needle, and bring it up again through the top of that pleat.
- Keep alternating from left to right across the row, crossing the thread just above the pleats each time.
Purpose: The cable stitch keeps pleats firm and evenly spaced – ideal for waistbands, cuffs, or areas that need gentle stretch but stable shape.
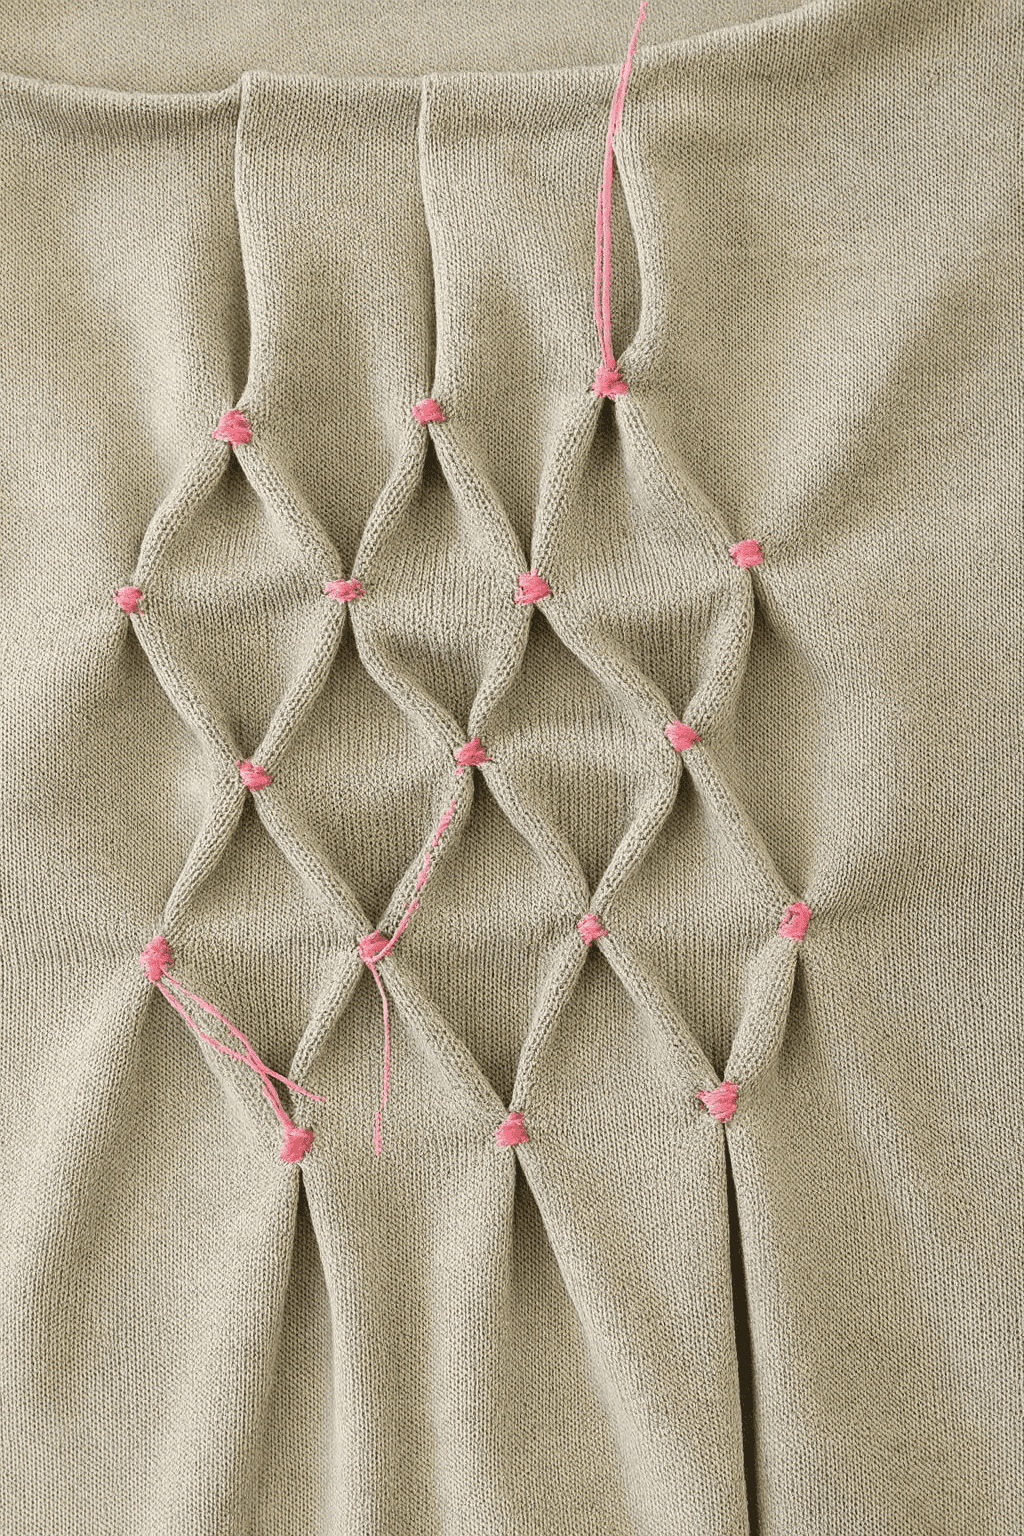
2. Honeycomb Stitch

The honeycomb stitch creates a diamond-shaped texture that allows more movement in the fabric.
It’s a classic pattern often used in blouses, children’s clothing, and smocked yokes.
How to do it:
- Start at the first pleat, bring the needle up, and insert it diagonally down into the next pleat.
- Skip one pleat below and move diagonally again in the opposite direction, forming a crisscross.
- Continue in this rhythm across the row, alternating direction each time.
Purpose: Honeycomb smocking adds flexibility and visual interest – perfect when you want decorative texture that also stretches comfortably.
3. Wave Stitch

The wave stitch adds motion and gentle curves to your smocked section. It looks complex but follows an easy repeating pattern.
How to do it:
- Work one cable stitch, then on the next row, shift your starting point by one pleat.
- The staggered placement creates a flowing, wave-like line as you add each row.
Purpose: This stitch is ideal for panels or trim that benefit from a bit of movement, such as the edge of a dress or apron front.
4. Outline Stitch

The outline stitch isn’t structural – it’s used to define shapes or borders around your smocking.
How to do it:
- Bring your needle up just beside a completed row of smocking.
- Use small, even backstitches or stem stitches to trace the outline.
- Keep thread tension firm so the border looks clean.
Purpose: Adds contrast and neat finishing detail around patterned sections, turning simple smocking into a polished design element.
5. Surface Embellishment (Optional for Practice)
Once you’re comfortable, try adding tiny seed stitches or French knots within the smocked panels for subtle texture.
These should enhance the structure, not weigh it down.
Don’t rush to memorize every stitch. Focus on neatness, spacing, and rhythm first.
Mastering one or two stitches cleanly will make every future design easier to control.
If you are brand new to hand sewing or decorative work, it helps to get familiar with the essential stitches for beginners first, since many smocking techniques build directly on those same basic movements and stitch control.
Easy Practice Projects to Learn Hand Smocking

Once you’ve learned how to pleat and stitch, the best way to build skill is through small, focused projects.
Each project below helps you practice a specific part of smocking – spacing, tension, or pattern consistency – while creating something useful or worth keeping.
1. Smocked Sampler Square
This is the simplest way to start.
Cut a 10 x 10-inch piece of lightweight cotton and mark your grid as you would for a full project.
Practice two or three rows of different stitches – cable, honeycomb, and wave.
Keep this piece as a reference sample. Label it with the stitch names using a fine-tip fabric marker.
Over time, you can build a small library of samples that help you compare thread types, spacing, and tension.
Goal: Improve precision and confidence with basic stitches.
2. Smocked Pillow Front
A smocked pillow cover lets you see how texture changes the look of a flat surface.
Use a 12 x 12-inch square of cotton or linen for the smocked panel, then sew it onto a plain backing.
You can work two rows of honeycomb stitches for soft dimension, or try wave stitches for subtle texture.
Goal: Learn to maintain straight rows across a larger section and understand how smocking affects fabric width.
3. Smocked Neckline on a Toddler Dress or Blouse
Smocking adds gentle stretch and comfort to children’s clothing.
Use a simple dress pattern and replace the gathered section at the neckline with smocking.
Mark and pleat a 2 to 3-inch deep area, then stitch three or four rows of cable or honeycomb smocking before attaching it to the garment.
Goal: Practice working smocking into curved edges and managing consistent tension on a real piece of clothing.
4. Smocked Band on a Reusable Cloth Bag
Cut a rectangular strip of fabric for the top band of a reusable bag.
Smock two rows of stitches across the center of the band, then attach it to the main body of the bag.
The texture adds grip and structure without elastic, making the bag both sturdy and decorative.
Goal: Apply smocking to functional, everyday sewing.
5. Smocked Trim for Aprons or Table Linens
If you prefer home projects, try a narrow strip of smocking along the top of an apron pocket or the edge of a table runner.
Choose a contrasting thread for visible detail.
This approach uses small sections of smocking to introduce texture without extra bulk.
Goal: Refine neatness in small, precise areas and learn how smocking complements other sewing techniques.
Practice on similar fabric types to what you plan to use later. Each fabric reacts differently – cotton holds pleats firmly, while linen softens over time. Repeating small projects builds familiarity with how the materials behave and helps your stitches stay consistent.
If you want even more low-pressure ideas to practice your skills alongside smocking, this list of easy sewing projects for beginners is a great way to build confidence while learning how different fabrics and techniques behave.
Pro Tips for Smoother Smocking
These simple habits and techniques make the process easier and your results cleaner – no extra tools required.
- Work under clear, even light.
- Cut thread lengths 16–18 inches to avoid tangles.
- Keep tension firm but not tight.
- Use an embroidery hoop for stability.
- Press lightly from the back after a few rows.
- Take short breaks to maintain accuracy.
- Check pleat alignment every few rows.
- Store work flat, not folded.
- Focus on one skill per practice session.
- Build steady habits – not speed.
Quick Fixes for Common Beginner Mistakes
Even with careful work, small inconsistencies happen – and that’s part of learning.
Smocking teaches attention to detail, and each correction sharpens your technique.
Uneven Pleats
If your pleats vary in size, pause and ease the gathering thread slightly.
Smooth the folds gently between your fingers until they line up evenly.
This takes only a moment and prevents uneven tension later.
Most unevenness begins with marking, so double-check your grid before pleating. Straight, evenly spaced dots will naturally guide the fabric into balance.
Thread Tangles or Knots
Threads can twist as you work, especially if they’re too long.
When you feel resistance, stop, lift the needle, and let it dangle freely for a few seconds.
This simple reset prevents loops and keeps your stitches neat.
Using shorter lengths of thread also helps you maintain control.
Crooked Rows
Rows that start to slant are usually the result of uneven pulling or skipping a pleat.
Realign by pausing every few stitches to check that your row stays parallel with the marking lines.
If a section drifts off course, gently remove only that part and re-stitch it with slower, more deliberate movements. Small corrections save the entire piece.
Uneven Stitch Size
When some stitches look larger than others, focus on the rhythm of your pull – a steady, consistent motion works better than varying pressure.
Over time, your hands will memorize the movement and naturally adjust to the right tension.
Flattened Texture
Pressing too firmly can flatten the raised texture of smocking.
Always press from the back using light steam and a pressing cloth.
This protects the stitches while setting the pleats.
If the surface ever looks too flat, lightly mist the back and press again to lift the texture back into shape.
Loose Stitches
If your smocking begins to gap or loosen, reinforce the area by adding a second row of the same stitch just above or below it.
This stabilizes the fabric without undoing previous work and adds subtle depth to the design.
Visible Marking Lines
Most marking lines fade naturally after a rinse or light steam, but it’s best to test your pen or pencil on a fabric scrap first.
Avoid scrubbing; gentle blotting preserves both your pleats and your threadwork.
Finishing and Caring for Smocked Pieces

Once the stitching is complete, careful finishing protects your work and helps it last.
Smocking is durable when treated well – each pleat and thread holds its structure for years with proper care.
Pressing and Setting the Stitches
Pressing is the final step that brings order to the fabric.
Lay your smocked piece face down on a clean towel or pressing cloth.
Using a warm iron and light steam, press gently from the back to set the pleats without flattening the raised stitches.
Avoid pressing directly on the front – this can compress the design.
If you want extra definition, hold the iron just above the fabric and let the steam relax and reshape the folds naturally.
Trimming and Securing Threads
Before assembling your final piece, check that all thread ends are tied securely.
Trim loose threads neatly at the back. If you’ve joined sections, press the seams open to prevent bulk.
This small detail gives the finished work a smooth, professional look.
Washing and Drying
Hand smocked fabric should be washed gently.
Use cool water and mild detergent, then rinse thoroughly.
Avoid twisting or wringing – instead, press out water gently with a towel and lay the piece flat to dry.
For garments, reshape the smocked area with your fingers while the fabric is still damp. This helps the pleats stay crisp and even.
Storing Smocked Items
Store smocked pieces flat whenever possible. Folding can leave sharp creases that distort the pleats.
For delicate garments, roll them around a soft towel or tube and cover with clean cotton fabric to protect from dust.
If you plan to store them long-term, keep them in a dry, shaded space away from direct light. Fabric and thread colors stay truer this way.
Ongoing Care
Over time, smocked pieces may soften – that’s part of the fabric’s natural aging.
A quick steam press from the back restores texture easily.
If you’ve used high-quality thread and fabric, your stitches will hold their pattern even with regular use and gentle laundering.
Practice, Observe, Improve
Smocking becomes easier each time you repeat the process.
The more you handle fabric, thread, and tension, the more naturally your hands learn what “even” feels like.
Start small, make one clean sample, then another.
When you finish your first sample or project, take a moment to look closely at your work.
You’ll notice progress in the spacing, the steadiness, and how your stitches begin to look intentional.
That’s the mark of a developing skill – and it’s worth celebrating.
Try one small project this week, and when you do, share your experience in the comments below.
Your insight might help another beginner start with confidence.
FAQs
1. How do I keep my pleats even without a pleater machine?
Use a clearly marked grid and take your time when stitching the gathering threads. Even spacing at the start leads to uniform pleats later. Consistency comes from slow, steady movement, not extra tools.
2. Can I smock thicker fabrics like denim or canvas?
Smocking works best on light to medium-weight woven fabrics. Heavy materials resist fine pleats and can strain your thread. If you want texture on thicker fabric, try larger pleats and heavier thread for support.
3. How much fabric should I allow for smocking?
Smocking reduces the fabric width by about one-third. For example, if your finished section needs to be 10 inches wide, start with 15 inches of fabric. It’s always safer to cut a little extra and trim after stitching.
4. What thread color looks best for visible smocking?
For visible detail, choose a thread that’s a few shades darker or lighter than your fabric. Neutral tones create subtle texture, while contrast colors highlight the stitch pattern and show off precision.
5. Can I add smocking to pre-made clothing or home items?
Yes, if the fabric is accessible and not too thick. Mark and gather only the section you want to smock – such as the waistband of a skirt or the border of a pillow cover. This is an effective way to customize ready-made pieces.
