Every well-made garment has a quiet detail that makes it look polished: the facing.
You might not see it when the piece is finished, but it’s what gives necklines their clean curve and hems their smooth edge.
Facing is the step that transforms a homemade project into something that feels beautifully complete.
If you’ve ever sewn a blouse, dress, or skirt and wondered how to make your edges look crisp and professional, you’re in the right place.
In this article, I’ll cover everything you need to know about facing – from what it is and when to use it, to the best fabrics, techniques, and finishing touches.
With a few simple steps, you can create flawless finishes that make your handmade clothes look refined, durable, and confidently made.
What Is Facing in Sewing?

In sewing, a facing is a shaped piece of fabric that finishes the raw edge of a garment.
You’ll usually find it on areas like the neckline, armholes, front openings, hems, or waistbands – places that need a clean edge but no visible stitching on the outside.
The facing is cut from the same pattern as the garment’s edge so that it matches perfectly.
For example, if you’re sewing a sleeveless linen top, you’ll cut an armhole facing that mirrors the curve of the armhole.
Once sewn and turned to the inside, it creates a smooth, structured finish that looks just as refined as store-bought clothing.
Facings can be separate pieces (stitched along an edge and turned inside) or extensions of the main garment (folded over instead of attached).
They’re often interfaced with a lightweight fusible layer to add stability and help the edge hold its shape through washing and wear.
Think of it this way: seams hold your garment together, but facings make it look complete.
Without them, necklines can stretch, armholes can curl, and hems can lose their shape.
With them, your project keeps its form, feels balanced, and looks truly finished – inside and out.
By the way, if you’re still learning how seam and hem measurements affect your projects, you might like my essential guide to seam and hem allowances for perfect sewing patterns.
3 Main Types of Facing in Sewing
Facings come in different forms.
The type you choose depends on the shape of your garment edge, the weight of your fabric, and how you want the inside of your garment to look.
Here are the main kinds of facings you’ll use most often – and when to reach for each one.
1. Shaped Facing

A shaped facing is cut from the same pattern piece as the edge it finishes.
It perfectly matches the neckline, armhole, or hem curve, which makes it ideal for structured garments.
You’ll typically see this type in woven fabrics such as cotton, linen, or wool, where the shape needs to hold steady.
For example, a fitted linen blouse or a tailored dress often uses a shaped facing around the neckline.
Add a lightweight fusible interfacing to prevent stretching and to help it keep its contour through washing and pressing.
Best for: Necklines, armholes, hems on woven garments
Fabric match: Medium to heavy fabrics with stable weaves
2. Bias Facing

A bias facing is made from a strip of fabric cut on the bias (at a 45° angle to the grain).
This makes it flexible and easy to shape around curves – perfect for lightweight or fluid fabrics.
Instead of cutting a separate pattern piece, you simply create a long bias strip, press it into shape, and sew it along the edge.
Bias facing works beautifully on garments like silk camisoles, cotton lawn tops, or curved hems, where a shaped facing might add too much bulk.
Best for: Curved edges, lightweight fabrics, and soft drapes
Fabric match: Light cottons, silks, rayons, or blends
3. Extended Facing

An extended facing is part of the garment itself – it’s built into the main pattern piece.
You’ll see this method on center fronts, jackets, or coats, where the front edge simply folds back to the inside and is stitched down.
It’s efficient because you don’t need to cut extra pieces, and it keeps the inside of the garment smooth and seamless.
A light interfacing along the fold helps the facing maintain its structure and prevents stretching.
Best for: Front openings, jackets, coats, and minimalist garments
Fabric match: Medium to heavy fabrics with good structure
Each facing type serves a different purpose, but all share one goal: to give your garment a clean, durable edge that holds up beautifully over time.
Once you understand which type fits your fabric and pattern, your sewing becomes smoother and your finishes more consistent.
How to Choose the Right Fabric for Facing

The fabric you use for facing can make a big difference in how your project turns out.
It gives your garment shape, helps edges lie flat, and keeps everything looking neat.
The best facing fabric supports your garment without standing out or adding bulk.
Match the Main Fabric When You Can
Most of the time, you’ll want to use the same fabric as your main garment for the facing.
This ensures the color, stretch, and drape behave the same way.
For example, if you’re sewing a cotton poplin blouse, cut your facing from the same cotton.
When pressed, the edges will lie flat and move naturally with the rest of the garment.
Go Lighter for Thick or Bulky Fabrics
When your main fabric is thick (like denim, corduroy, or wool) using the same material for the facing can create stiffness around edges.
In those cases, choose a lighter fabric in a similar fiber and color. A fine cotton lawn or lightweight lining fabric works beautifully.
This keeps the inside clean and prevents the neckline or waistline from feeling heavy.
If you’re unsure which fabric to choose, check out our guide on how to read fabric labels – it helps you quickly identify fiber content, weight, and care instructions so your project turns out perfectly.
Use Interfacing for Structure
Most facings need interfacing to help them hold their shape.
A lightweight fusible interfacing is usually enough – it adds stability, keeps curves crisp, and helps prevent stretching during wear.
Choose an interfacing that matches the weight of your fabric:
- Light woven fabrics → lightweight fusible interfacing
- Medium fabrics → standard fusible interfacing
- Heavy fabrics → sew-in interfacing for more flexibility
Always test a small piece first to make sure the interfacing doesn’t alter the drape or show through to the right side.
Color and Fiber Considerations
Facings are often invisible, but color still matters – especially with light or sheer fabrics.
A slightly darker facing can shadow through. Always test under good lighting before cutting.
For natural-fiber garments, choose natural-fiber facings (cotton, linen, silk) so both layers wash and breathe the same way.
Choosing the right fabric for facing comes down to balance. It needs to support the edge without feeling stiff or heavy.
When the fabrics match well, sewing is easier, pressing goes smoothly, and your edges look clean and professional.
How to Sew a Facing in 9 Easy Steps
Sewing a facing is pretty simple once you know the order to follow.
Here’s how to do it step by step for results that look polished every time.
1. Cut the Facing Pieces
Use your pattern’s facing pieces or trace the shape of the neckline, armhole, or hem directly from the main garment.
Be precise – an accurate cut ensures the facing lies flat later.
If you’re making your own pattern (for example, for a bias facing), measure the edge, add seam allowance, and cut a strip on the bias for flexibility.
2. Apply Interfacing
Press fusible interfacing to the wrong side of each facing piece.
This gives structure and prevents stretching.
Use a pressing cloth and firm, steady pressure – don’t slide the iron.
The goal is even adhesion without bubbles.
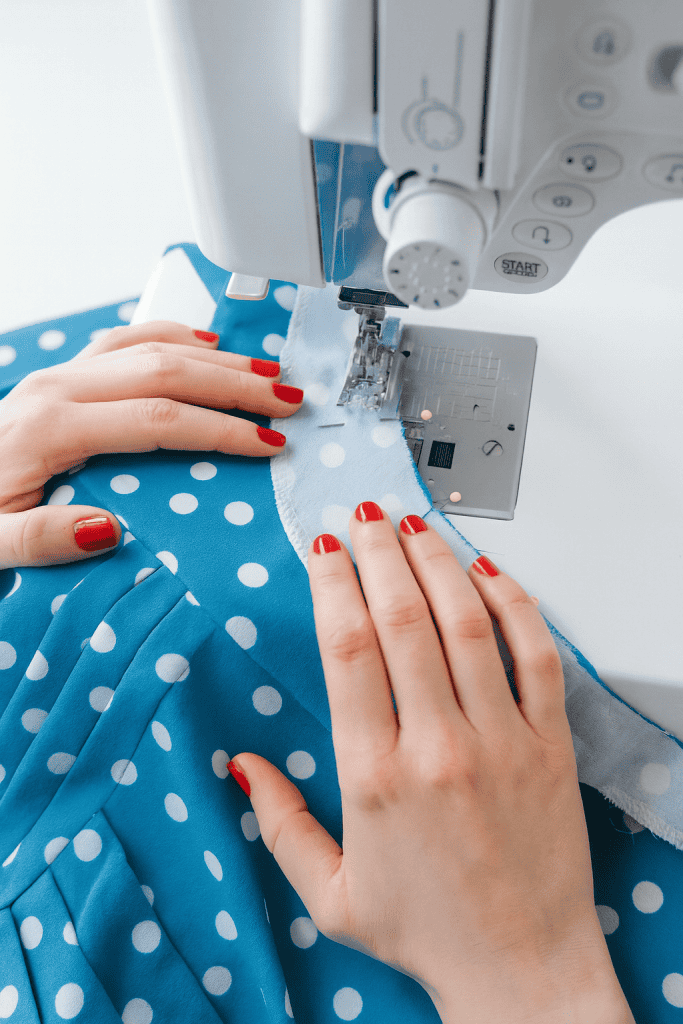
3. Finish the Outer Edge
Before attaching the facing, finish the outer edge (the edge that won’t be sewn to the garment) to keep it from fraying.
Choose the method that suits your setup:
- Zigzag stitch or serger for most fabrics
- Pinked edge for light cottons
- Turned-under hem for lightweight or sheer fabrics
This small step keeps the inside of your garment neat and durable.
4. Sew the Shoulder or Side Seams of the Facing
If your facing has multiple pieces (like front and back neck facings), sew them together first.
Press the seams open or toward the back for a flat, tidy result.
5. Attach the Facing to the Garment
With right sides together, align the facing to the garment edge.
Pin or clip carefully to match notches and seams. Sew along the edge using the seam allowance provided in your pattern.
Keep your stitching smooth, especially around curves – small, even stitches make pressing easier later.
6. Clip Curves and Press
To help the facing turn neatly, clip into the seam allowance around curves and corners.
Make small clips close to (but not through) the stitching.
Press the seam allowance toward the facing. Pressing at this stage shapes the curve and trains the fabric to lay flat.
7. Understitch for a Smooth Edge
Understitching is the secret to a professional-looking facing.
Sew a line of stitching close to the seam line on the facing side, catching the seam allowance underneath.
This keeps the facing from rolling to the outside and helps the edge stay crisp.
8. Turn and Press Again
Turn the facing to the inside of the garment.
Roll the seam slightly inward so it’s invisible from the right side.
Press firmly along the edge until it lies smooth and even.
9. Secure the Facing (Optional but Recommended)
To keep your facing from flipping out during wear, tack it down at the shoulder seams or side seams.
A few hand stitches or short machine stitches are enough.
When done carefully, your facing should sit flat and invisible, with edges that look as clean on the inside as they do on the outside.
It’s a small detail – but it’s what makes your work look truly finished.
If you’re just getting started, check out our guide on how to start sewing as a beginner – it’s full of tips and step-by-step advice to help you feel confident from your very first project.
How to Finish Necklines, Armholes, and Hems with Facing
Once you understand how to sew a facing, you can apply it anywhere a clean edge is needed.
Necklines, armholes, and hems all benefit from this technique, each with a slightly different approach.
Neckline Facing
A neckline facing gives structure and keeps the neckline flat against your collarbone.
Here’s how to get that crisp, smooth edge:
- Cut the facing to match the neckline exactly (usually a front and back piece).
- Join the shoulder seams of both the garment and the facing.
- Attach, clip, and understitch as outlined in the previous steps.
- Press carefully, rolling the edge slightly to the inside.
If your fabric is lightweight, use a light fusible interfacing only on the facing pieces to prevent stretching.
Once finished, the neckline should hold its curve and sit evenly all the way around, with no gaping or rippling.
Pro Tip: For a polished look, tack the facing to the shoulder seams so it doesn’t shift while wearing or washing.
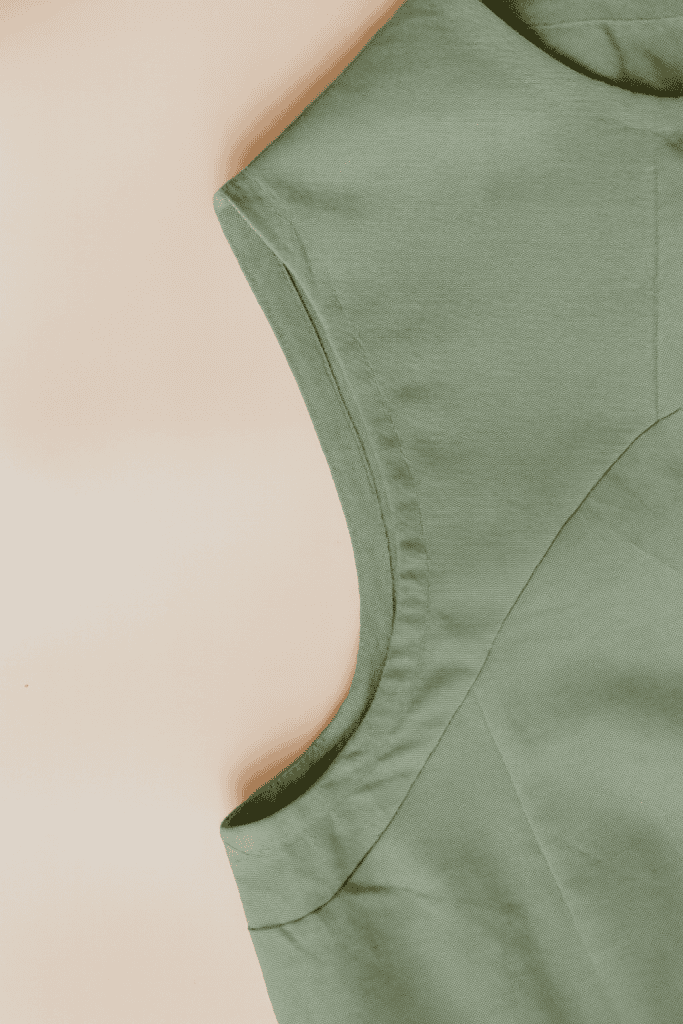
Armhole Facing
Armhole facings finish sleeveless tops and dresses with a clean edge that doesn’t add bulk.
Because armholes are tight curves, accuracy and pressing are key.
- Sew the shoulder seams of the garment and facing.
- With right sides together, stitch the facing around the armhole edge.
- Clip into the curve every half inch so it turns smoothly.
- Press, understitch, and turn to the inside.
If your pattern includes both neck and arm facings, attach and finish them before sewing the side seams.
This makes turning and pressing much easier, especially for sleeveless styles.
Pro Tip: If your fabric is prone to fraying, finish the facing’s outer edge before you attach it.
Hem Facing
A hem facing is ideal for curved hems or thick fabrics that don’t fold easily.
It gives weight and structure while keeping the hemline smooth and rounded.
- Cut a facing that matches the curve of your hem (often about 2 to 3 inches deep).
- Join the facing ends, finish the outer edge, and press the seam open.
- Sew the facing to the hem edge, right sides together.
- Clip curves, press the seam toward the facing, and understitch.
- Turn the facing to the inside and topstitch or hand-sew it in place.
A hem facing works beautifully for circle skirts, jackets, or curved coat hems – places where a turned-up hem might cause bulk or uneven folds.
When each facing is shaped and pressed with care, your garment edges stay smooth and durable through wear and washing.
These small construction details add strength, shape, and polish – the marks of skillful sewing.
For a playful touch, you can also add gathers or ruffles before attaching the hem facing.
Check out our guide on how to make gathers for beautiful ruffles to add volume and charm to your garments.
6 Simple Tricks to Keep Your Facings Smooth and Flat

A well-sewn facing should disappear into the garment – no ripples, no rolls, no bulk.
These small refinements make your handmade clothes look clean, structured, and intentionally crafted.
1. Press Every Step – Not Just the End
Pressing is what shapes a facing into place. Press each seam as you go:
- After sewing seams, press them open or toward the facing.
- After understitching, press again so the seam rolls slightly inward.
Use a tailor’s ham or pressing mitt to support curves and prevent creases. Good pressing gives edges that professional, ready-to-wear look.
2. Always Understitch
Understitching keeps the facing turned to the inside and prevents visible edges.
Sew a line of stitching about ⅛ inch from the seam line, through the facing and seam allowance.
This single step often makes the difference between a smooth neckline and one that keeps flipping out.
3. Clip or Notch Curves Properly
Curves can’t lie flat unless they’re released.
- Clip inward curves (like necklines) every half inch so the seam can spread.
- Notch outward curves (like hem edges) so excess fabric can overlap neatly.
Always stop just short of the stitching line to protect your seam.
4. Match Fabric Weight and Drape
If the facing fabric is stiffer or heavier than the main fabric, it will show.
Keep both layers balanced – same fiber type, similar thickness, and compatible drape.
That balance ensures your edges move naturally and don’t pucker or pull.
5. Secure Strategically
Facings that shift or roll over time can be easily controlled.
- Tack at seams: a few small hand stitches at the shoulder or side seams hold the facing in place.
- Topstitch lightly: on casual garments, a narrow topstitch along the edge adds stability and style.
These small anchors keep your facings neat through wear and washing.
6. Trim Bulk Before Turning
For heavy fabrics, grade (trim) the seam allowances so the facing layer is slightly narrower than the garment layer.
This removes bulk and helps the edge press flat without ridges.
When each of these habits becomes part of your sewing rhythm, facings start behaving exactly as they should – flat, flexible, and invisible.
The reward is a garment that looks refined on both sides and feels effortless to wear.
5 Creative Ways to Use Facing in Your Sewing Projects
Once you’re confident sewing basic facings, you can start having fun with them.
A facing can become a thoughtful design detail that shows your creativity and care for craftsmanship.
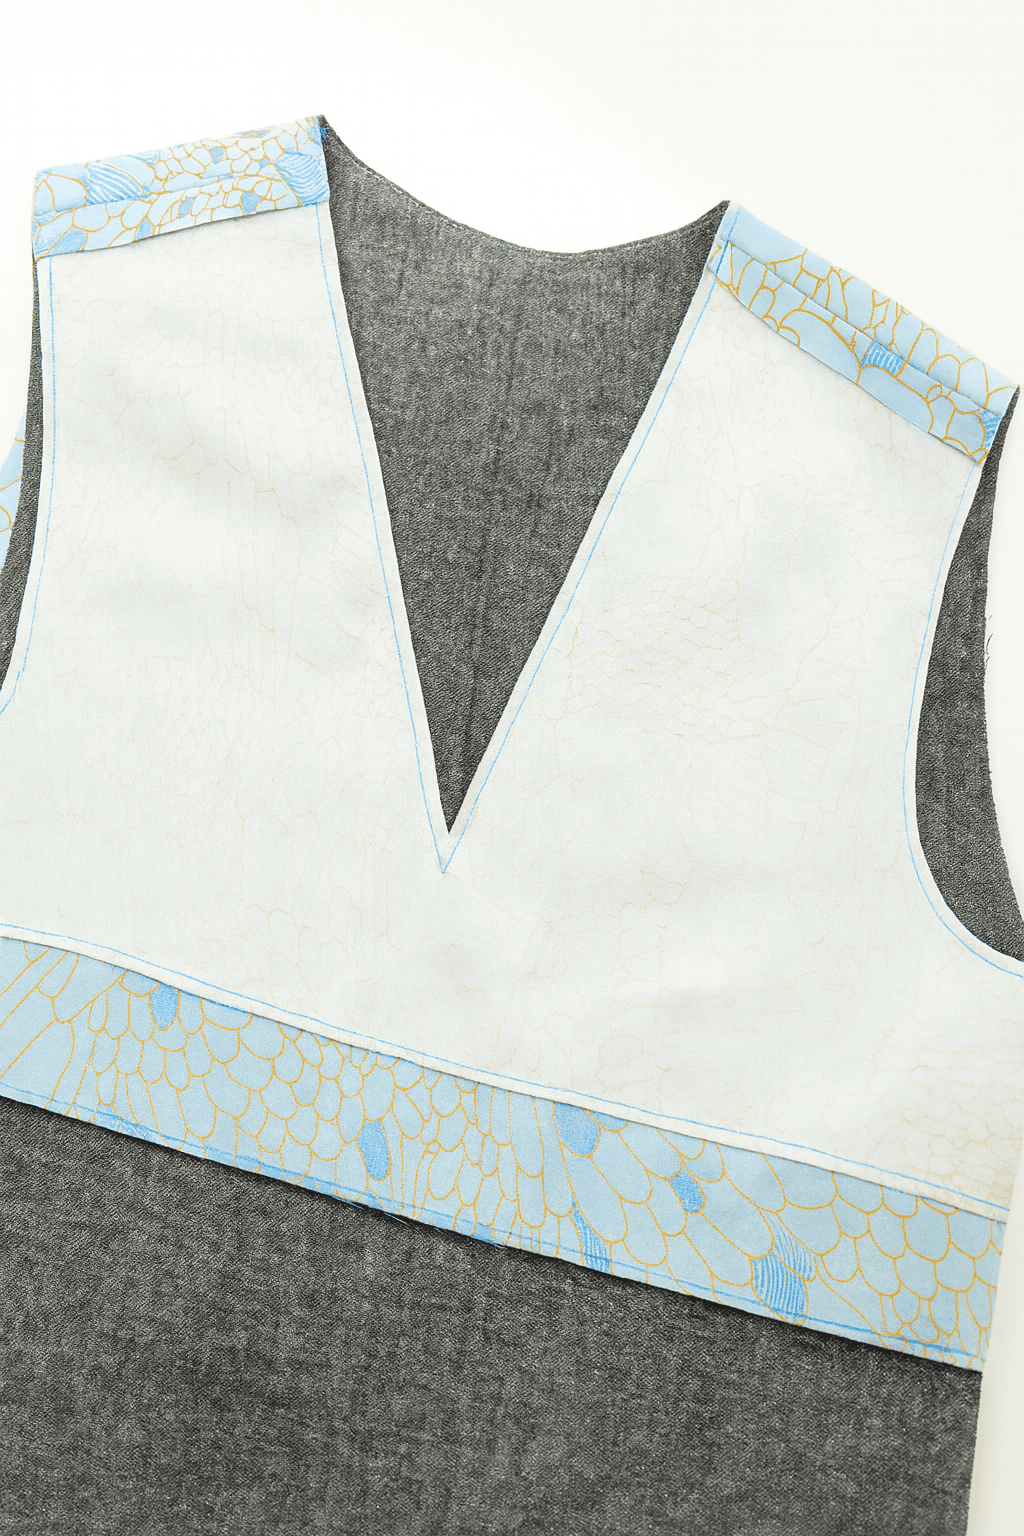
1. Add a Pop of Contrast
Instead of cutting your facing from the same fabric, try a contrasting color or print.
It’s an easy way to add personality to the inside of a blouse, jacket, or dress.
Think of a navy linen dress with a mustard cotton facing, or a neutral chambray top with floral cotton peeking inside the neckline.
The contrast stays mostly hidden but adds a charming surprise every time you put it on.
2. Use Decorative Topstitching
A line of visible stitching along the edge of a facing can serve both function and style.
Use matching thread for a subtle tailored look, or contrast thread for modern detail.
This works especially well on casual garments (like linen tops, denim skirts, or lightweight jackets) where a clean, visible stitch reinforces the edge and adds texture.
If you’re new to hand techniques, check out our guide on hand smocking for beginners – it’s a simple way to add texture and charm while building your confidence with hand sewing.
3. Try a Bias-Bound Facing
A bias-bound facing combines structure and beauty. Instead of turning the facing to the inside, wrap the edge with bias tape and stitch it down neatly.
It’s a durable and visually appealing option for unlined garments or sheer fabrics where the inside will be visible.
4. Use Facing to Shape Unique Edges
Facings aren’t only for standard necklines.
You can use them to support square, sweetheart, or V-neck shapes, curved hems, or even decorative cutouts.
Because facings mirror the garment edge, they help hold crisp angles or smooth curves that stay consistent through wear and washing.
5. Add Labels or Hidden Details
The inside of your facing is the perfect spot to add a handmade label, embroidery (check out our simple guide to embroidery), or a tiny date tag.
These personal touches remind you of when and why you made the piece – quiet details that make handmade garments feel more meaningful and lasting.
Facings may be functional, but they’re also an opportunity for artistry.
Start Creating Flawless Finishes Today
Facing is one of the techniques that instantly elevates your work.
Once you learn how to stabilize edges, press curves, and choose the right fabric, every garment you make will look polished – inside and out.
If you’re still learning, try practicing on scrap fabric first.
Play around with different weights, try a bit of understitching, and see how much pressing changes the final look.
It’s these little bits of practice that quietly make you better over time.
Do you use facings in your sewing projects? What’s your favorite trick for getting smooth, flat edges?
Share your experience in the comments below – your insight might be exactly what helps another sewist feel more confident.
FAQs
1. Should I always use interfacing with a facing?
Not always – but usually. Interfacing helps maintain shape and prevents stretching, especially around necklines and waistlines. For very lightweight fabrics, test a small section first; sometimes the fabric holds well on its own.
2. How do I stop my facing from rolling out while wearing the garment?
Understitching is key. Stitch close to the seam line on the facing side to keep the edge turned in. For extra security, tack the facing to shoulder or side seams with a few hand stitches.
3. Can I replace a facing with bias binding?
Yes, for lightweight garments or unlined pieces, bias binding is a great alternative. It’s less structured but adds a soft, flexible edge – perfect for airy cottons, silks, or summer tops.
4. What if my facing fabric shows through my garment?
Choose a facing fabric that’s similar in color and weight to your main fabric. For sheer materials, use self-fabric facings or organza to prevent show-through without adding bulk.
5. How do I keep facing edges neat without a serger?
You can finish the outer edge with a zigzag stitch, pinking shears, or by turning the edge under and stitching it down. Each method works well depending on your fabric type and desired finish.
