Teaching children about the seven days of creation can be both fun and meaningful with a hands-on craft.
If you’re looking for an engaging Days of Creation craft for kids, a creation wheel is a perfect project. This simple activity uses paper plates and pictures to create a spinning wheel that reveals each day of God’s creation story.
Not only will kids enjoy coloring and assembling the wheel, but they’ll also learn the Bible story in an interactive way. In the beginning, God created everything! – and this craft will help your kids remember each part of that amazing week of creation (Genesis 1:1).
Let’s dive into how to make a creation wheel, along with tips to weave in scripture and encourage faith-based learning.
Why Make a Creation Wheel Craft?
A Creation Wheel is a type of story wheel, and it’s fantastic for helping kids remember the order of events in the Creation story. Each section of the wheel represents one of the seven days, so as children spin it, they can practice recalling what God created day by day.
Educators note that a story wheel helps children pay attention to a narrative’s sequence and makes it easier for them to retell the story in their own words. In other words, this craft isn’t just arts-and-crafts time – it’s a learning tool that builds comprehension and memory.
From a faith perspective, a creation wheel craft reinforces the foundational truth that God made the world and everything in it in six days and rested on the seventh. Genesis chapters 1 and 2 describe how God created the heavens, the earth, and all living things in the span of a creation week.
By making a wheel with a section for each day, kids can visually connect with what happened on each day of Creation. This helps them grasp that “In the beginning, God created the heavens and the earth” (Genesis 1:1) – meaning God made light, sky, land, animals, people… everything!
You can briefly share Genesis 1:1 with your children and explain in simple terms that before anything existed, God spoke and the world began. Encourage them with the idea that the same creative God who made the sun, ocean, and stars also made them and loves them.
Another great reason to try this craft is how simple and low-cost it is. It uses everyday materials you likely have on hand, and there’s no need for special printables or kits (though templates exist, we’ll show you how to do it all yourself).
It’s also easily adaptable: you can simplify it for younger kids or add extra details for older ones. Plus, creating the wheel can spark wonderful conversations about God’s creation.
As the kids draw a sun or paste on animal pictures, you can talk about the beauty of God’s world. By the end, they’ll have a colorful, spinnable wheel to proudly show off – and to use for storytelling.
If you’re looking for more fun holiday-themed crafts, you might enjoy our wholesome Easter crafts for kids post.
So, let’s gather our supplies and get ready to make a Days of Creation Wheel!
Materials Needed for the Creation Wheel Craft

Before we start, prepare the following materials:
- 2 paper plates (standard size paper plates work best – one will be the base, one will be the top cover)
- Brad (paper fastener) – to act as the pivot that lets the wheel spin. (This is a small metal fastener with split pins, sometimes called a split pin or paper brad.)
- Markers, crayons, or colored pencils – for drawing and coloring the scenes on each day.
- Construction paper or scrap paper (optional) – in various colors, if you want to cut out shapes (like sun, moon, animals) to glue on instead of drawing.
- Scissors – for cutting a “window” in the top plate and any pictures or shapes. (Ensure an adult handles any tricky cutting, especially for younger kids.)
- Glue or tape (optional) – if you plan to cut out pictures or use decorative materials to paste onto the wheel.
- Pencil and ruler (optional) – to help divide the plate into sections and mark where to cut the window.
Optional extras: You can get creative with craft supplies you have. For example, cotton balls can make fluffy clouds, star stickers or glitter can create a sparkly night sky, and bits of blue cellophane or tissue paper can represent water. I’ll mention more ideas for embellishments as we go.
The great thing is this craft is flexible – use whatever art supplies help bring the Creation story to life!
How to Make a 7 Days of Creation Wheel Craft (Step-by-Step)
Now for the fun part – making the Creation Wheel!
Follow these step-by-step instructions. Older kids can do many of these steps on their own, while younger children will need some help with the cutting parts. Feel free to prepare a few steps in advance if you’re doing this with a group of kids.
Let’s get started:
1. Prepare the base plate

Take one paper plate (this will be the base of your wheel) and turn it upside down so the surface is flat and easy to draw on. Using a pencil, divide the plate into seven sections (like seven pizza slices). Don’t worry if they’re not perfectly equal – approximate spacing is fine.
An easy way is to first divide the plate in half, then into thirds, etc., until you have seven slices. Label each section with the numbers 1 through 7, which correspond to Day 1, Day 2, and so on. These numbered sections will each show what God created on that day.
(Tip: You can write the numbers near the edge of the plate or in the center of each slice; just ensure there’s room for the drawings or pictures.)
If you have very young children, an adult can pre-draw the divided sections and numbers ahead of time, so the kids can jump straight into the fun part – decorating!
If you enjoy crafts that tie into the Bible, simple Passover crafts for kids are another easy and engaging way to teach children about God’s plans through hands-on activities.
2. Draw or paste the creation scenes for each day

Now comes the creative work. In each numbered section, draw or glue pictures that represent what God created on that day of Creation. Encourage the kids to use lots of color and detail. You can use markers, crayons, or cut-outs from construction paper or magazines.
Here are some ideas for each day:
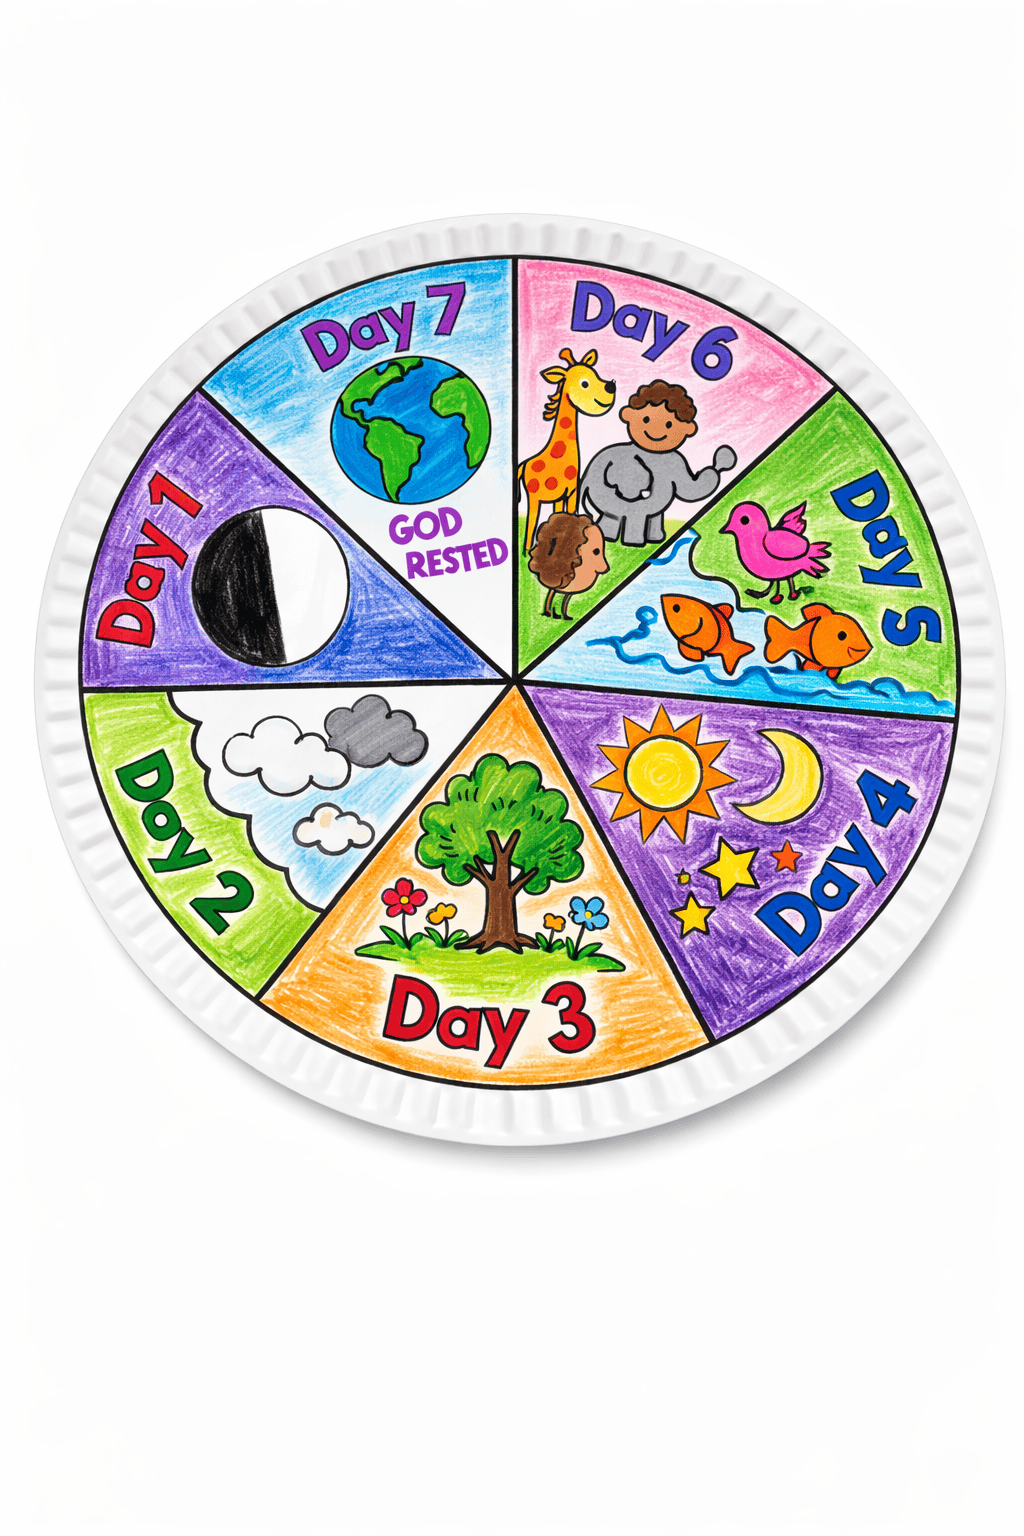
Day 1 (Light and Dark)
The Bible says God created light on the first day, separating light from darkness. A simple idea is to color one half of the Day 1 section yellow or white (for light) and the other half black or dark blue (for darkness).
You could also draw a big sun on one side and a moon or stars on the other, or just a bright day sky and a dark night sky. This visually shows day and night. (Genesis 1:3-5)
Day 2 (Sky and Water)
On Day 2, God made the sky and separated the “waters above” from “waters below.” For this section, you might draw clouds and a blue sky in the upper part, and an ocean or waves in the lower part.
One fun idea: glue on some pulled-apart cotton balls as fluffy clouds in the sky, and a strip of blue paper or blue crayon waves for the water. This gives a nice texture – the cotton can represent the clouds or “waters above” in the sky. (Genesis 1:6-8)
Day 3 (Land and Plants)
God gathered the waters so that dry land appeared, and He created plants and trees on Day 3. To illustrate this, you can color part of the wedge green or brown for land (maybe draw a little patch of grass or a hill) with blue for water on the side.
Add some simple plant drawings: flowers, trees, or crops. If you have magazine clippings or stickers of plants and trees, you can glue a few on.
Another creative touch: a small sprinkle of sand glued at the bottom can represent the sandy land (though this can get messy, so use sparingly and with glue that dries). The key is to show land separated from sea, with some vegetation. (Genesis 1:9-13)
Day 4 (Sun, Moon, and Stars)
On the fourth day, God made the sun, moon, and stars to fill the sky and give light for day and night. For this section, draw a bright sun (perhaps in one corner of the slice) and a crescent moon with stars (in the opposite corner or center).
You can color the background a dark blue or black to represent space for the moon and stars. Kids love making this part sparkle – you could use star stickers or even dab some glue and add glitter to create twinkling stars. (Just be prepared for a little glitter mess if you go that route!)
Another idea is to cut small star shapes from yellow paper and glue them on. (Genesis 1:14-19)
Day 5 (Birds and Fish)
On Day 5, God created creatures of the sea and sky – basically, fish and other sea animals, and birds. In this section, you can split it visually into two parts: the upper area for sky and the lower area for water.
Draw one or two birds flying in the sky (simple “M” shaped birds or a basic bird outline is fine), and draw some fish or a whale in the water. If drawing animals is tricky, use stickers or find small pictures of fish and birds to paste on.
For example, a child could cut out a picture of a fish from an old magazine or draw a very simple fish shape (a curved “football” shape with a triangle tail). Make the water blue and maybe add some waves. (Genesis 1:20-23)
Day 6 (Land Animals and People)
Day 6 is very special because God made land animals and the first people on this day. This section might end up a bit crowded because there’s so much created!
Have the kids draw a couple of their favorite animals – for instance, a dog, cat, elephant, dinosaur, lion, etc. (whatever animals they like, because God made them all). Stickers or magazine cutouts of animals can help here if drawing is hard.
Then, for people, you can simply draw stick figures of a man and woman (to represent Adam and Eve), or a family. Another adorable idea: let the child draw themselves or glue a tiny photo of the child in this slice to represent people.
This personal touch helps them remember that God created them, too! If you have multiple kids, they can each put their own photo in their wheel’s Day 6 section. (Genesis 1:24-31)
This is a perfect place to remind kids about the story of Noah too! If you want more animal-themed crafts, check out our amazing Noah’s ark crafts post for ideas that build on God’s creation stories.
Day 7 (Day of Rest)
On the seventh day, the Bible says God rested from all His work. Nothing new was created on Day 7; instead, this day is about rest and appreciating God’s finished creation. For this section, you can get creative with the concept of rest.
Some kids might draw a person sleeping on a hammock or bed (with “Zzz” to show sleeping), or simply draw a church or Bible to signify a holy day of rest. You could also just decorate the section nicely and write the word “REST” in big letters, or use the number 7 and make it decorative.
Another idea is to draw the earth (a small circle with blue and green for water and land) and a heart or a smiley face, to show God was pleased and “rested.” Use a calming color like blue or purple for the background. Explain to the children that Day 7 reminds us that resting is important – God blessed this day. (Genesis 2:2-3)As the kids work on each section, it’s a great opportunity to talk about each day of Creation.
For example, while they color the sun and moon for Day 4, you can say, “Isn’t it cool that God made the sun to keep us warm and give us light? And he made the moon and stars for the night – have you seen the stars at night?” Encourage them to imagine each part of creation.
By engaging in conversation, you turn craft time into a faith-learning moment. Also, remind them of the day numbers frequently (“Day 3: land and plants, Day 4: sun, moon, stars…”) – this repetition will help them memorize the order.
3. Create the spinning cover plate

Now that the base plate has all the beautiful drawings for Days 1–7, we’ll make the top plate (cover) that allows the wheel to reveal one day at a time. Take your second paper plate and place it right-side up (so the rim is facing you). This plate will sit on top of the base like a cover.
You need to cut a “window” or opening in this top plate: the opening will be a triangular wedge shape that is just big enough to show one of the seven sections underneath.
The easiest way to do this is:
Place the top plate over the decorated one, aligning them evenly. With a pencil, lightly trace one of the wedge sections from the bottom plate onto the top plate – this outlines the size of the window needed. (Alternatively, you can draw a triangle about the size of one of your sections freehand on the top plate. Aim for roughly 1/7 of the circle.)
Adults should do the cutting: use scissors (or a craft knife, if available and you’re comfortable with it) to cut out that wedge-shaped section from the top plate. Cut it out completely, so now the top plate has a pie-slice shaped hole in it.
When you place it over the base plate, you should be able to see one of the day scenes through the hole.
Before attaching, it’s a nice touch to decorate the top plate as well. You can write a title on it, like “7 Days of Creation” or “Creation Wheel”. Let the kids add some color to the cover – maybe they want to draw something on the cover itself (just not covering the hole).
For instance, they might draw the Earth or some stars around the title. This makes the craft look nice even when the wheel is closed. (If writing on the cover, do it before assembly, as it’s easier on a flat plate.)
You could also tie this into other faith-based crafts. Our inspiring God’s promises crafts post has plenty of ideas for reinforcing God’s Word through creative projects.
4. Assemble the creation wheel
It’s time to put it all together. Place the top plate (with the window) on top of the base plate (with the drawings), aligning them in the center. All the Day pictures on the base plate should be hidden by the top plate except whichever section is under the open window.
Using a pencil or the tip of the scissors, poke a small hole through the center of both plates. (Many paper plates have a small center dip – aim for that spot.) Make the hole just big enough for your brad to go through.
Now insert the brad through both plates from the top, and split its prongs open at the back to secure it. Be sure not to fasten it too tightly – the plates should be able to spin. You might leave a tiny bit of looseness so the wheel rotates freely.
Once the brad is in place, test your wheel: hold the bottom plate and gently turn the top plate. You should see the different day scenes appear one by one through the window as you spin. If something catches, loosen the brad a little or trim the window opening more if needed.
5. Add finishing touches and enjoy
With the wheel assembled, do any final touch-ups. You can draw a small arrow or triangle on the top plate pointing to the window, to indicate where to look.
Some people like to mark the days on the rim of the top plate so you know which day you’re looking at – for example, writing numbers 1–7 spaced around the very edge of the top plate so that the number aligns with the window.
This is optional; it can help kids learn the day numbers, but it’s fine to simply rely on the pictures they made. Now, use the wheel to review the Creation story. Have the child turn the wheel to Day 1 and explain what God created.
Then turn to Day 2, and so on. They’ll be proud to show off their artwork for each day. You can even turn it into a little presentation: ask your child to spin the wheel and teach you about each day of creation.
This active retelling is fantastic for reinforcing what they’ve learned. By the time they’ve gone through all seven days, they’ll likely have the order down pat!
For more learning and crafting ideas in a Sunday School or homeschool setting, check out meaningful crafts that each the 10 commandments or easy Sunday school crafts on a budget. These are simple ways to reinforce Bible lessons while keeping children engaged.
Easy Tips for a Successful Creation Wheel Craft
Every craft session can have its hiccups or opportunities for extra creativity. Here are some practical tips and fun variations to consider:
Safety and prep
Since cutting a window in the plate can be tricky, it’s best for an adult to handle that part. You can pre-cut the wedge in the top plate before class or crafting time if you have several kids (especially young ones) to help.
Similarly, pre-drawing the 7 sections on each child’s plate can save time and ensure everyone’s wheel lines up correctly in the end. In a group setting like Sunday School, having these preparations done will make the process smoother.
Use sturdy materials
If you want the wheel to last longer, consider using cardstock or poster board to make the circles instead of paper plates (or in addition to them). Printables often use cardstock for durability.
You can glue the paper plate onto a cardboard circle for extra strength, especially if kids will be handling and spinning the wheel a lot.
Also, reinforce the center hole with a small piece of tape or a paper reinforcement sticker (the kind used for binder paper holes) before putting the brad through – this prevents the hole from tearing with repeated use.
Not an artist? No problem!
If drawing is intimidating for you or the kids, use alternative methods:
- Stickers – Many craft or dollar stores have sticker sets of animals, sun/moon, stars, etc. Stickers are easy for little hands to place and can make the scenes lively.
- Printed pictures or clipart – You can find free clipart online of creation symbols (like a sun, a cloud, animals) and pre-print them for the kids to color and glue on. Some websites offer free “creation wheel” templates with images, but even without a formal template, simple images will do. Cutting pictures from old magazines is another great idea. For example, flip through a magazine with nature photos and cut out a tree for Day 3 or a fish for Day 5. Kids can paste these onto the appropriate section. Using magazine pictures or family photos (as mentioned for Day 6) adds a personal touch and requires no drawing skills.
- Rubber stamps or coloring pages – If you have Bible story coloring books, you might find small pictures of creation items that you can cut out and use. Or use rubber stamps (like a stamp of a star or animal) to decorate each section.
The goal is to make each day’s creation visible – it doesn’t matter whether it’s a child’s original drawing or an image they glued on. As long as they understand what it represents, it works!
Creative embellishments
To make the craft even more engaging, incorporate some 3D or textured elements:
- Use cotton balls or fiberfill for clouds on Day 2 (just stretch a cotton ball and glue it down – a little goes a long way).
- For Day 3’s land, you can crumple a tiny piece of green tissue paper to make a tree top, or glue real sand or dirt (mixed with glue so it sticks) to form land.
- For Day 4’s stars, glitter glue or shiny star sequins will make the night sky sparkle. A dot of yellow glitter glue can become a twinkling star when it dries.
- For Day 5, maybe glue a small feather to represent a bird, or a bit of shiny foil for fish scales.
- For Day 6, if you have animal print scrapbook paper or stickers of animals, those can save drawing time. And as mentioned, a photo of the child in the Day 6 section (surrounded by little animal drawings or stickers) really drives home that people were made on Day 6, including them!
These extra touches not only make the craft more fun, but they also engage kids’ senses (soft cotton, gritty sand, shiny glitter), reinforcing their learning through sensory experience. Just supervise anything that involves small pieces if you have very young crafters.
Adapting for different ages
The suggested age range is 5–9 years old, but you can certainly adapt this craft for other ages.
- If you’re doing this with preschoolers (3–4 years), they will need more assistance. You might do the cutting and section drawing for them, and let them do simple coloring or sticker-pasting. Keep the design basic – maybe large simple shapes (a big sun, a big cloud, etc.). The spinning wheel concept might delight them even if they don’t fully grasp all the days yet. They’ll still learn that God made everything. One idea is to make a creation collage wheel for little ones: provide pre-cut pictures for each day and have them glue one per section. They will love the glue stick and placing things, and you can talk about each picture as they glue.
- For older kids (10+ years), you can challenge them to be more detailed. Perhaps they can write the Genesis verses for each day in each section if there’s space, or on the back of the plate. They could draw more complex scenes or even make a double-layered wheel with two windows (though that complicates things!). Older kids might also enjoy researching or adding fun facts (like drawing specific animals and labeling them). The craft can be a starting point for deeper discussion (for example, talking about what it means that humans are made in God’s image on Day 6).
Alternate idea – Creation number cards
If you don’t have materials for a spinning wheel, or want a quicker activity, try making Creation sequence cards. Take seven index cards or paper pieces. On each, write a number from 1 to 7 and either draw or glue a picture of what God made that day (similar to what we did on the wheel).
The children can color these and even decorate the cards. Once done, they can practice putting the cards in order from Day 1 to Day 7, explaining each one. You could even punch a hole in the cards and tie them together as a little flip-book, or hang them as a banner.
This is a great supplement to the wheel or an alternative if a wheel isn’t feasible. It reinforces the same concepts of the Creation week, in a format that might be easier for very young kids (no moving parts).
It’s essentially a DIY printable: you can design the cards however you like with whatever images represent each day.
Group use (classroom or VBS)
This craft works wonderfully in group settings too. If you’re a teacher or volunteer doing this in a Sunday School class, prepare by pre-cutting the brad holes and window wedges for each child’s wheel (unless they’re old enough to carefully use scissors).
You might also lightly pencil in the seven divisions on each base plate beforehand to save time. Set up “creation stations” with supplies for each day’s decorations (for example, a station with cotton and blue crayons for Day 2 sky and water, a station with plant stickers for Day 3, etc.), and have the kids rotate or pass around materials.
This way, they can share supplies like glitter or stickers without chaos. Plan for about 30 minutes of craft time for a group of 5–9 year olds to complete the wheel, possibly a bit more if you include drying time for glue.
It can be helpful to have an assistant or parent help if you have many kids, just to attach brads and do final assembly. The result is worth it – each child goes home with a fantastic visual reminder of the lesson.
…
Now that you know all about making a Creation Wheel and enriching the experience, let’s wrap up and get you ready to create your own!
Time to Create Your Own Creation Wheel!
You’ve got the know-how – now it’s time to get crafting your very own Days of Creation wheel! This project is a fun, hands-on way to deepen a child’s understanding of the Bible’s first chapter.
With a few paper plates, some art supplies, and a little bit of time, you and your kids can create a keepsake that makes learning Genesis 1 interactive and memorable. Gather your materials, open up your Bible to the creation story, and enjoy the creative process with your little ones.
As you make this craft, celebrate the creativity God gave your children. After all, we’re creative because He is the Master Creator! Encourage your kids to proudly use their Creation Wheel to tell the story of how God made the world.
This not only reinforces their learning, but also builds their confidence in sharing Bible truths with others. Whether you use the wheel at bedtime storytime, in a homeschool lesson, or as part of a Sunday School review, it will surely spark conversations and smiles.
If you’ve tried this Creation Wheel craft (or plan to), we’d love to hear how it went. What creative twists did you add? Share your experiences or questions in the comments below. Happy crafting, and enjoy watching your children grow in faith and creativity!
We can’t wait to see what you and your kids create – let us know in the comments!
FAQS
What if I don’t have a brad (paper fastener)?
No problem. You can use string or yarn by poking a small hole through the center of both plates and tying it loosely so the wheel can still spin. A twist-tie, pipe cleaner, or even a bent paperclip also works as a simple pivot. If none of these are available, you can stack the plates and rotate them by hand while teaching. The goal is to reveal each day in order, even if the wheel does not spin smoothly.
Is this craft suitable for younger or older kids?
Yes. While it works best for ages 5 to 9, it is easy to adapt. For preschoolers, adults can handle cutting and sectioning while kids focus on coloring or decorating. For older children, you can add details like written descriptions, Bible verse references, or more detailed artwork. In mixed-age groups, pairing older kids with younger ones works especially well.
How can I make the Creation Wheel sturdier?
To make the wheel last longer, use thicker paper like cardstock or reinforce the plates with cardboard from a cereal box. Laminating the plates before assembly also helps if you have access to clear contact paper or a laminator. Securing the brad tightly but not too tight and taping the back prongs can prevent wear. Keeping decorations lightweight will also help the wheel spin better over time.
What if I’m not very artistic?
You don’t need drawing skills to make this craft work. Stickers, magazine cutouts, printed images, or simple traced shapes are great alternatives to drawing. You can also use craft materials like cotton for clouds, leaves for plants, or foil stars for texture. The focus is on representing each day clearly, not creating perfect artwork.
Can this be used in Sunday School or VBS?
Yes, this craft works very well for group settings. To keep things running smoothly, prep materials ahead of time by dividing plates, pre-cutting windows, and poking center holes. Organizing supplies by day or type helps with flow, and having adults handle the final assembly keeps things safe and efficient. Afterward, letting kids share their wheels reinforces the lesson and builds excitement around the story of creation.
