Teaching children about the creation story in Genesis can be fun and interactive with the right crafts.
In this post, I’ve gathered 10 memorable “Days of Creation” crafts perfect for preschoolers to early elementary kids.
These crafts use simple household supplies (plus a few optional, inexpensive extras) so parents, homeschoolers, and Sunday School teachers can easily follow along.
Each craft is designed to be approachable and lightly instructional, helping little ones experience the Bible’s Genesis story through hands-on creativity.
Whether you’re a parent looking for a rainy-day activity, planning a Bible lesson, or searching for engaging Sunday School crafts, these projects will bring the seven days of creation to life in a fun, age-appropriate way.
Let’s get crafting!
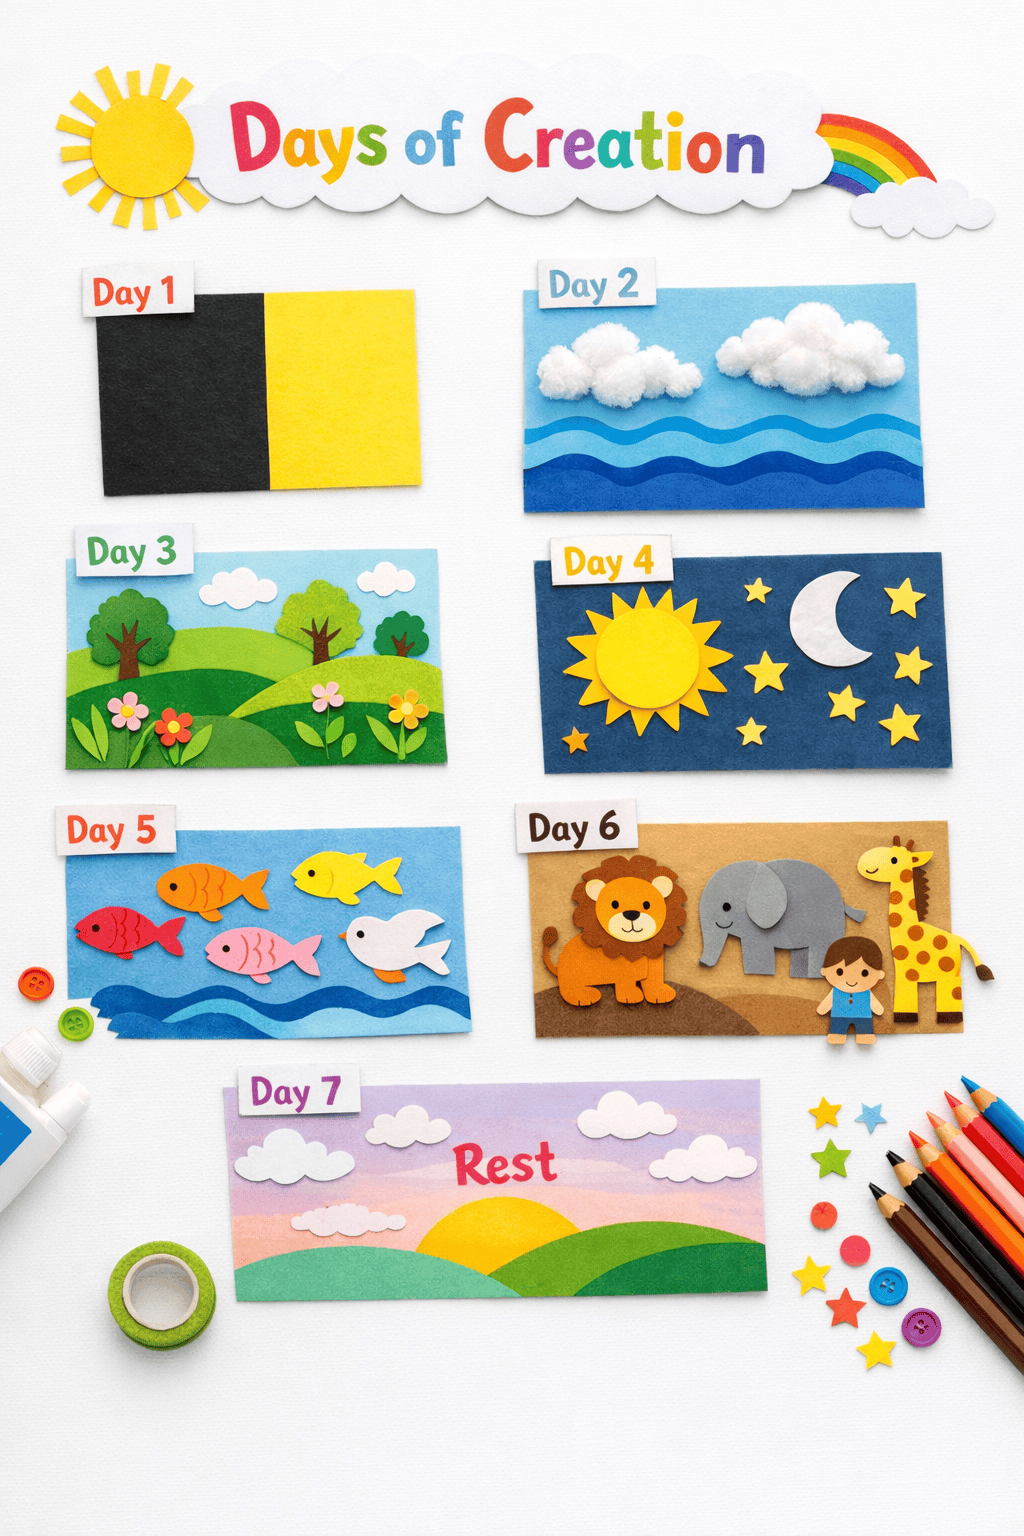
10 Creative Days of Creation Crafts for Kids
Below is our list of 10 crafts inspired by the 7 Days of Creation.
Each craft is labeled with the day of creation it represents, so you can tie it directly to your Bible lesson.
Feel free to do one craft per day over a week, or pick and choose your favorites.
(All of these ideas work great at home, homeschool, or Sunday School – anywhere you want to spark creativity while learning about Genesis!)
1. Day & Night Contrast Collage (Day 1)

Genesis Day 1 Theme: “Let there be light” – God created light and separated it from darkness, making day and night.
Craft Idea: Help kids make a striking Day and Night collage. You’ll need black and white (or yellow) construction paper, glue, and scissors, plus crayons.
- Materials: Black paper, white or yellow paper, scissors, glue stick, crayons or stickers (sun, moon, stars).
- How to Make: Cut one sheet of black paper and one sheet of white paper in half. Glue the black half to one side of a larger sheet and the white (or yellow) half to the other side, so it looks like a day/night split background. On the “day” side, kids can draw or stick a bright sun in the sky (using yellow paper or a crayon). On the “night” side, have them add a moon and stars (drawn with white crayon or by adding star stickers/foil pieces). This visual contrast of light versus dark is simple but memorable.
- Instruction Tip: Talk about how at first it was all dark, then God made light. You can even play a game of turning the lights off and on to illustrate day and night – a fun, quick lesson to go with the craft!
If your kids enjoy hands-on learning, check out my how to make a creation wheel craft for another interactive Genesis activity.
2. Fluffy Sky and Ocean Art (Day 2)
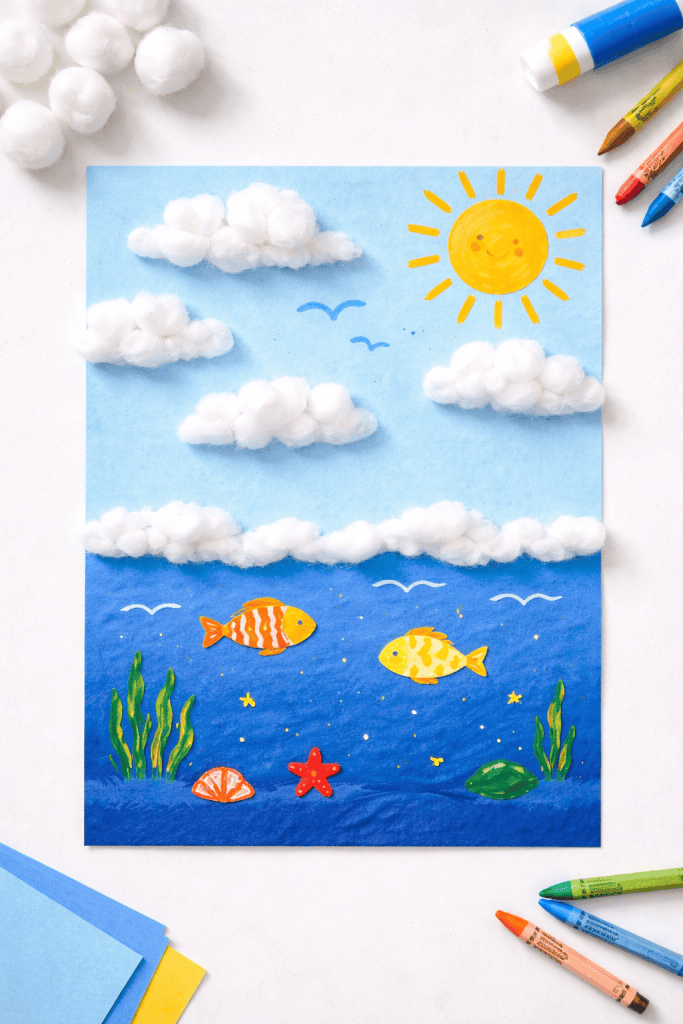
Genesis Day 2 Theme: God separated the waters to create the sky and sea.
Craft Idea: Create a Sky & Sea collage to show the separation of waters above and below. Using blue paper and cotton balls, this craft gives a cool texture representing clouds and ocean waves.
- Materials: Light blue paper (for sky), dark blue paper (for sea) or a white paper colored blue, cotton balls, glue, and crayons or blue paint.
- How to Make: Take a sheet of paper and cover the top half with a piece of light blue paper (sky) and the bottom half with dark blue (ocean water). Where they meet is the horizon. Stretch out cotton balls (unroll or fluff them) and glue them onto the sky part to make puffy clouds. If you like, you can also glue a few cotton pieces on the ocean half to look like sea foam or waves. Have your child color the sky blue (if not using colored paper) and add any ocean details (like simple fish or waves).
- Learning Tie-in: As you craft, explain that God made the sky above and waters below on Day 2. The cotton clouds and blue ocean visuals will help kids remember how God separated the sky from the sea.
3. Little Garden of Land and Plants (Day 3)
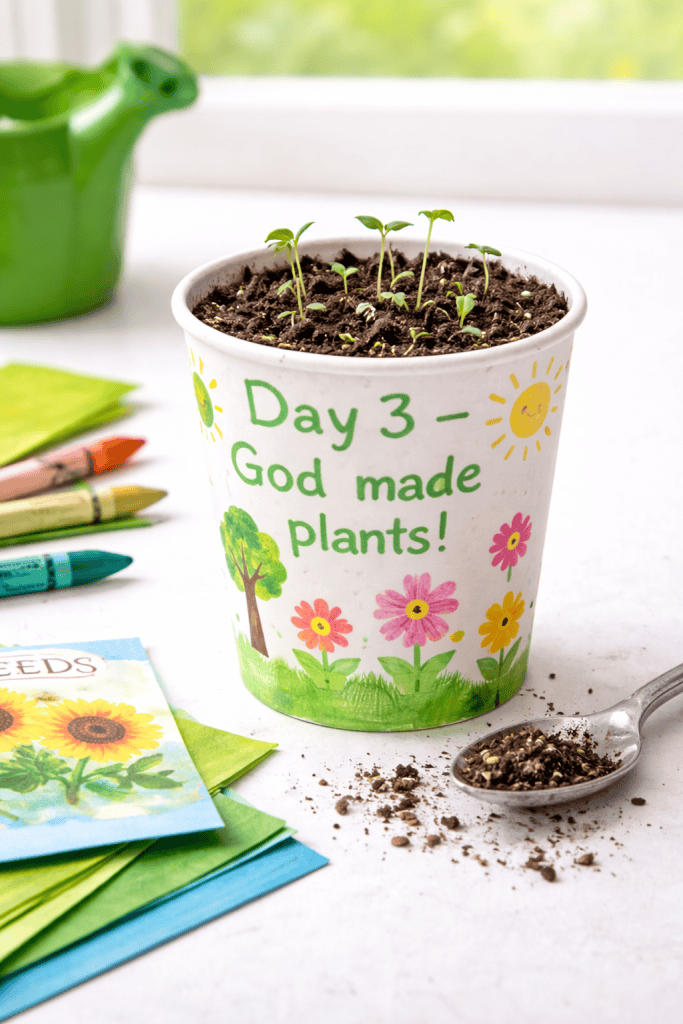
Genesis Day 3 Theme: God gathered the waters to reveal dry land and made plants and trees grow.
Craft Idea: Let’s get a bit green! For Day 3, kids can make a “mini garden” craft to celebrate God creating land and vegetation. There are a couple of options depending on your supplies: a collage or actual planting.
- Option 1 – Paper Garden Collage: Draw or cut out a landscape on paper – brown paper or crayon for soil at the bottom, and blue or green for the sky/grass. Have the child glue on bits of real nature (small dried leaves, grass, flower petals) or paper cut-outs of trees and flowers. They can also draw plants and tree trunks. The result is a pretty collage of land and plants.
- Option 2 – Planting Seeds Craft: If you want a more hands-on project, try planting seeds in a decorated cup. Take a paper or plastic cup and let your child decorate the outside with drawings of plants or stickers. (You can even write “Day 3 – God made plants!” on it.) Then fill the cup with a bit of soil and plant a few fast-germinating seeds (like beans or grass seeds). Water the seeds and place the cup by a window. Over the next few days, your child will see real plants sprout, reinforcing the lesson of Day 3 in a living way!
- Note: Preschoolers will need help with handling seeds or cutting shapes, but they’ll love sprinkling seeds and patting the soil. Emphasize how God made the land and every plant – just like the little seed “magically” growing into a plant now.
If you’re looking for more nature-themed craft ideas, see my wholesome Easter crafts for kids.
4. Sun, Moon, and Stars Painting (Day 4)

Genesis Day 4 Theme: God created the sun, moon, and stars to light the sky – the greater light for the day and the lesser light for the night.
Craft Idea: Capture the celestial wonders of Day 4 with a Sun, Moon & Stars artwork. Kids will make a scene showing the day sky and night sky.
- Materials: Dark blue or black paper (for night sky), white paper or light blue (for day sky), crayons/markers, aluminum foil (for stars), glue, scissors. Optional: glitter for stars (if you don’t mind a little mess!).
- How to Make: Divide a large sheet of paper in half (draw a line or fold). On one half, create a daytime sky: have your child color it light blue and then add a bright yellow sun (cut a circle from yellow paper or color one in). On the other half, create a night sky: color it dark (or glue on a piece of black paper). Cut small star shapes out of aluminum foil (or simply tear tiny foil bits) and glue them onto the night sky – the foil will shine like little stars. Add a moon by cutting a white paper circle (or foil moon). Kids can also draw additional stars or use star stickers. If using glitter, spread glue dots and sprinkle a pinch of glitter for a starry sparkle (adult supervision recommended for glitter with toddlers).
- Teaching Moment: Talk about how God made the sun for daytime and the moon and stars for night. You can ask, “Can you imagine the sky with no sun or stars? It would be empty! God filled the sky with lights.” This craft’s two-part scene really brings home the difference between day and night skies on Day 4.
If you’re looking for more faith-based craft ideas, check out simple Passover crafts for kids.
5. Birds in the Sky & Fish in the Sea Collage (Day 5)

Genesis Day 5 Theme: God created the creatures of the sea and the birds of the air.
Craft Idea: For Day 5, kids will create a lively birds and fish collage to remember all the flying and swimming creatures God made. This craft is bright and great for fine motor skills (cutting, gluing).
- Materials: Construction paper (blue, white, and other colors), crayons/markers, scissors, glue. Optionals: bird and fish stickers, googly eyes, feathers for birds if handy.
- How to Make: Start with a background paper divided into sky and water (similar to the Day 2 craft background, half sky-blue and half ocean-blue). Now, help your child make some fish and bird cut-outs. You can draw simple fish shapes on colored paper and simple bird shapes (like a flying bird silhouette or even just a “V” shape for birds in distance). Let the child cut them out (with safety scissors and help as needed). Decorate the cut-outs: draw an eye on the fish (or glue a googly eye) and add designs or color to their scales/fins. For birds, color them or glue a small craft feather onto the paper bird shape to give it texture. Finally, glue the fish onto the ocean half and the birds onto the sky half of your background. Younger kids might prefer using stickers or pre-cut shapes – that’s fine too!
- Make It Fun: As you create, ask your child to name the creatures: “What kind of bird is this? Maybe a dove? What kind of fish – a goldfish or a whale?” Encourage them to flap their arms like a bird or pretend to swim like a fish. Connecting movement and imagination will make Day 5 even more memorable.
Pair this with amazing Noah’s Ark crafts to explore more animals and reinforce biblical storytelling.
6. Animal Puppets (Day 6: Animals)
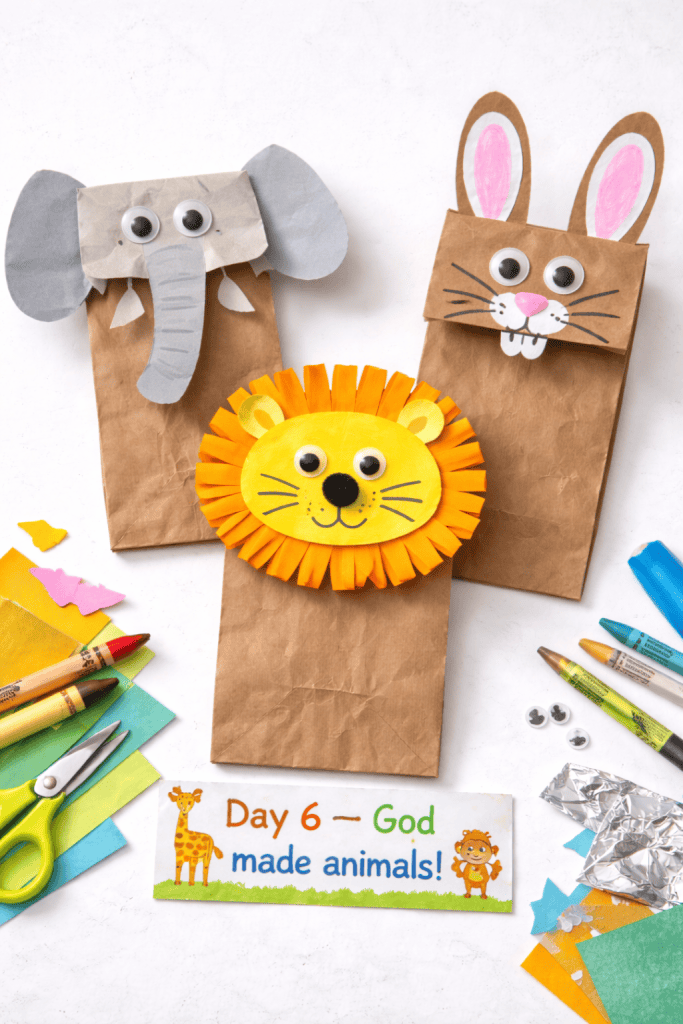
Genesis Day 6 Theme (part 1): God created the animals on the land.
Craft Idea: Day 6 actually has two parts – animals and humans. For the animal part, let’s craft some fun animal puppets or masks to celebrate all the land animals God made. This craft is flexible: you can focus on your child’s favorite animal or make a whole zoo!
- Paper Bag Animal Puppets: Grab a few small paper lunch bags (one for each animal you want to make). Using markers, paper scraps, and glue, help your child turn the paper bag into an animal puppet. For example, to make a lion puppet, draw a lion’s face on the bottom of the bag (the flap side), glue or draw a mane around it (cut out a spiky circle of yellow/orange paper for the mane and glue it on), and maybe add paper ears. For an elephant, you could cut out big paper ears and a trunk to glue on. The child can put their hand inside the bag to make the puppet “talk.”
- Bringing it to Life: Once your animal puppets are done, let your child play make-believe. Roar like a lion, moo like a cow, or slither like a snake – whatever animals they created! Remind them that God made all the animals on Day 6, from the fierce lions to the cute bunnies. It’s a great time to mention how diverse and amazing all the creatures are.
7. “God Made Me” People Craft (Day 6: People)
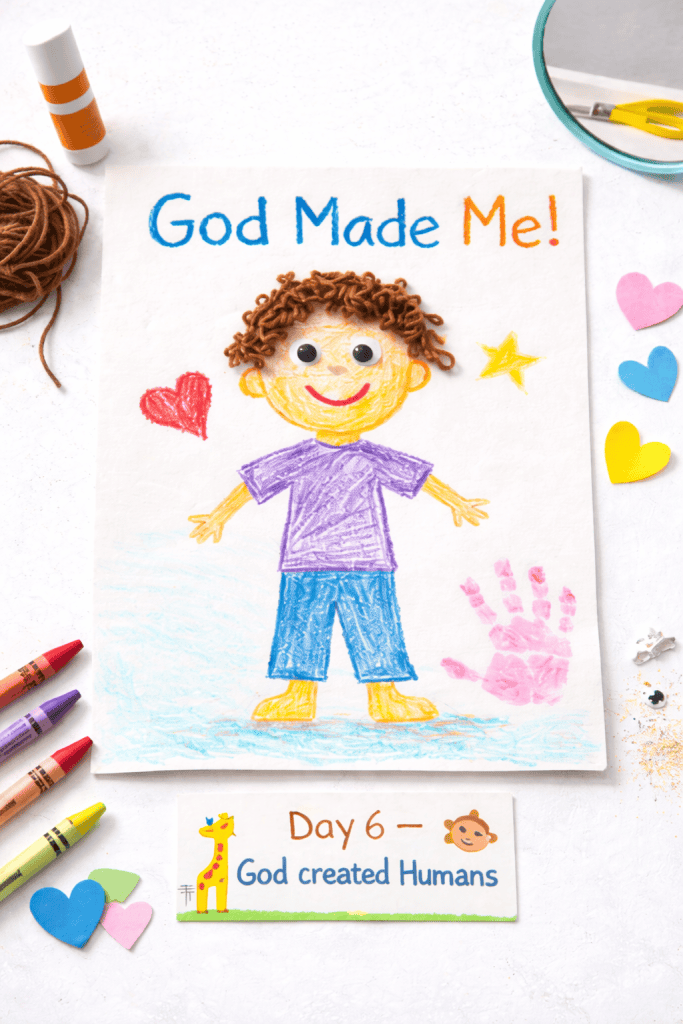
Genesis Day 6 Theme (part 2): God created humans (Adam and Eve) in His image.
Craft Idea: After making animals, Day 6 also includes the creation of people – and that includes us! A meaningful craft here is a “God Made Me” self-portrait. This helps kids appreciate that they, too, are God’s creation.
- Materials: Sheets of paper, crayons or markers, optional washable paint, and a mirror (if available). If doing paper dolls: gingerbread-man paper template or doll cut-out, yarn for hair, etc.
- How to Make (Option 1 – Self-Portrait Drawing): Give your child a piece of paper and have them draw themselves. For young ones, you might draw an outline of a person (a simple stick figure or use a printable outline) and let them color it to look like them. They can add their hair color, eye color, favorite clothes, etc. Label it “God made ___ (Child’s Name)!” at the top. This simple drawing activity becomes special when they realize they are drawing one of God’s creations – themselves!
- Conversation: As you craft, talk about how humans are unique in creation because we’re made in God’s image. Point out good traits in your child (“God gave you wonderful artistic hands to draw this!” or “God made you so kind and smart.”). It’s a gentle way to affirm them while teaching Day 6’s lesson that God made the first people and He made us too.
8. Explorer Binoculars for Creation (Day 7 – Enjoying Creation)
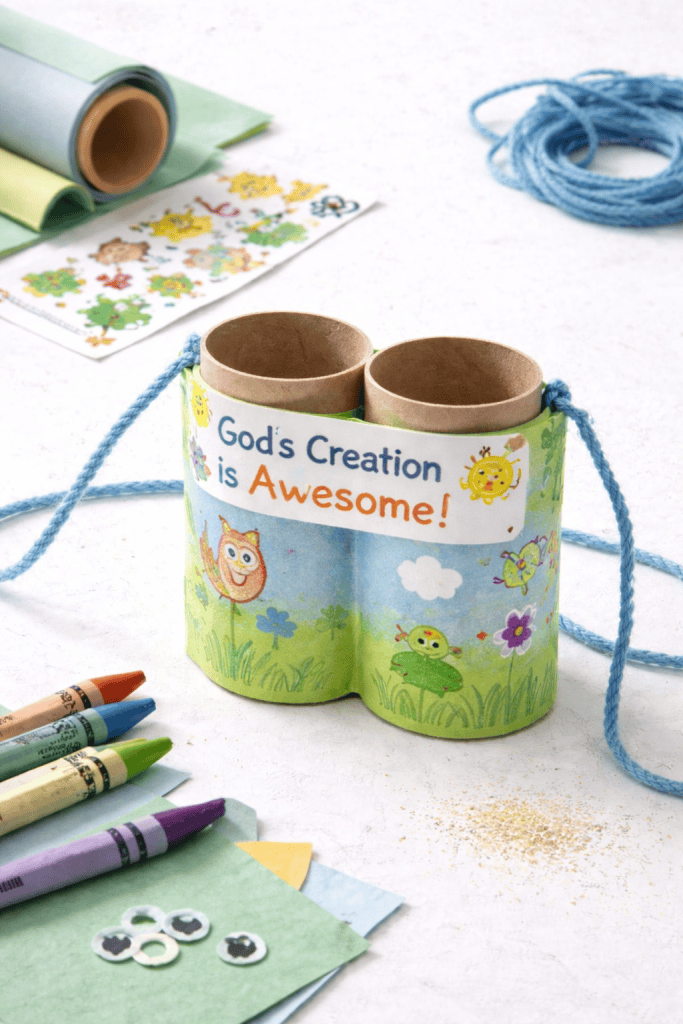
Genesis Day 7 Theme: God rested on the seventh day after creation.
Craft Idea: On Day 7, God didn’t create anything new – instead, He rested and saw that everything was good. A lovely way to convey this to kids is by making “creation explorer binoculars.”
This craft gives kids their own pretend binoculars to relax and observe the wonderful world God made. After working hard on creation crafts all week, they’ll enjoy this fun, easy project and then go outside to use it!
- Materials: Two empty toilet paper rolls (or cut a paper towel tube in half), construction paper, tape or glue, a hole-punch and string/yarn (for a neck strap, optional), and decorations like stickers or markers.
- How to Make: Take the two toilet paper tubes and place them side by side – these will be the two “lenses” of the binoculars. Tape or glue them together (adult can help to ensure they’re secure). Next, cut a strip of construction paper and wrap it around both tubes to cover them; tape or glue the paper in place. Punch a hole on the outer side of each tube and tie a piece of yarn through each hole so the binoculars can hang around the child’s neck (like real binoculars). Now comes the fun part: decorating the binoculars! Kids can color them, add stickers of animals, birds, stars – anything related to God’s creation that they might “spot.” You can also paste a little label that says “God’s Creation is Awesome” or the Bible reference “Genesis 1”.
- Use Them: Explain that on Day 7 God rested, and we too can rest and enjoy what God made. Take the child outside (or to a window) with their new binoculars and play a game of “I spy God’s creation.” They can look for birds in the trees, flowers, clouds, or even small bugs – all parts of creation. It’s a great way for them to appreciate nature. This restful observation activity paired with the craft will help them remember Day 7 as a special day to enjoy God’s work.
9. Seven Days of Creation Mobile (All Days)
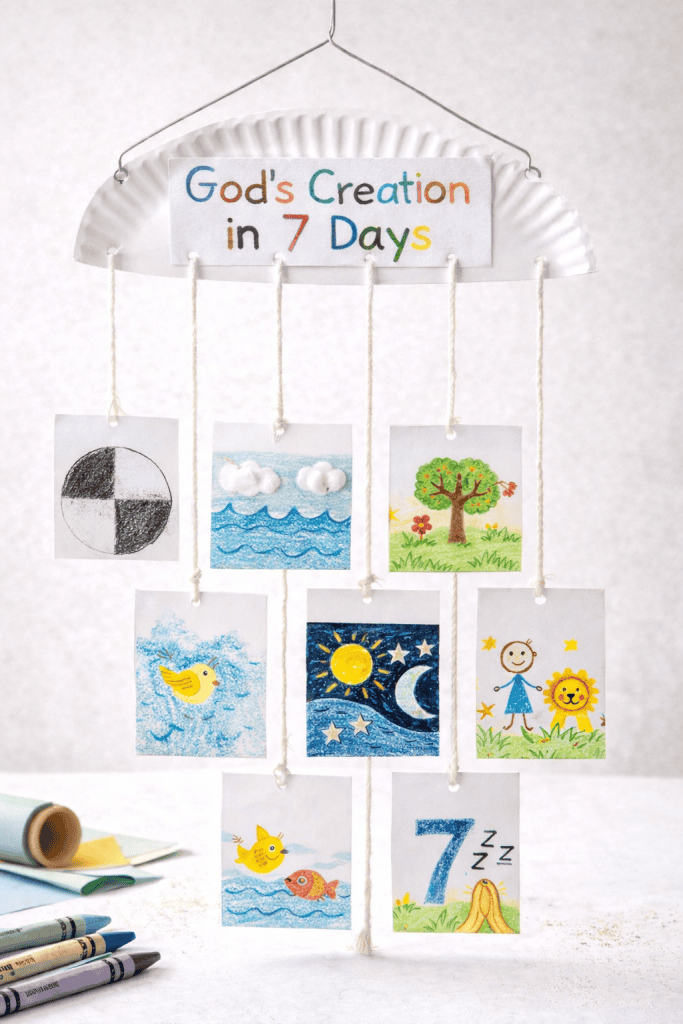
Now that we’ve gone through each day, here’s a bonus craft that captures all seven days of creation in one project!
A Days of Creation mobile is a hanging craft that displays something from each day – perfect for review and decoration.
- Materials: A wire hanger or a stick/dowel, string or yarn, paper (white or colored), scissors, markers/crayons, tape. (If no hanger, you can use a paper plate as the top of the mobile.)
- How to Make: Cut out seven small shapes or cards from paper – one for each day of creation. For example, you can use circles or squares about the size of an index card. On each piece, help your child draw or symbolize each day:
- Day 1: Draw light and dark (maybe half white, half black).
- Day 2: Draw clouds and ocean waves (sky and water).
- Day 3: Draw a tree or flower (land and plants).
- Day 4: Draw a sun, moon, and stars.
- Day 5: Draw a bird and a fish.
- Day 6: Draw an animal and a happy stick-figure person.
- Day 7: Write the number 7 and Zzz’s (to show resting) or draw praying hands for worship/rest.
Once each card is decorated, punch a hole at the top of each or tape a piece of string to each. Tie each card onto the hanger or stick, spacing them out so they hang in order (Day 1 through Day 7). If using a paper plate, punch seven holes around the edge and tie the strings through those. You can also add a title on the hanger or plate, like “God’s Creation in 7 Days.”
- Hang it Up: Find a spot to hang the mobile (perhaps in the child’s room or classroom). Now you have a beautiful display that retells the Genesis creation story at a glance. Kids will be proud to show off each part (“This is my Day 3 plant, this is my Day 4 sun…”). The mobile gently reinforces the sequence of creation every time they see it.
If you’re looking for holiday crafts, check out my easy Christian Valentine’s crafts where kids mix drawing and collage.
10. “My Creation Book” – DIY Story Booklet (All Days)
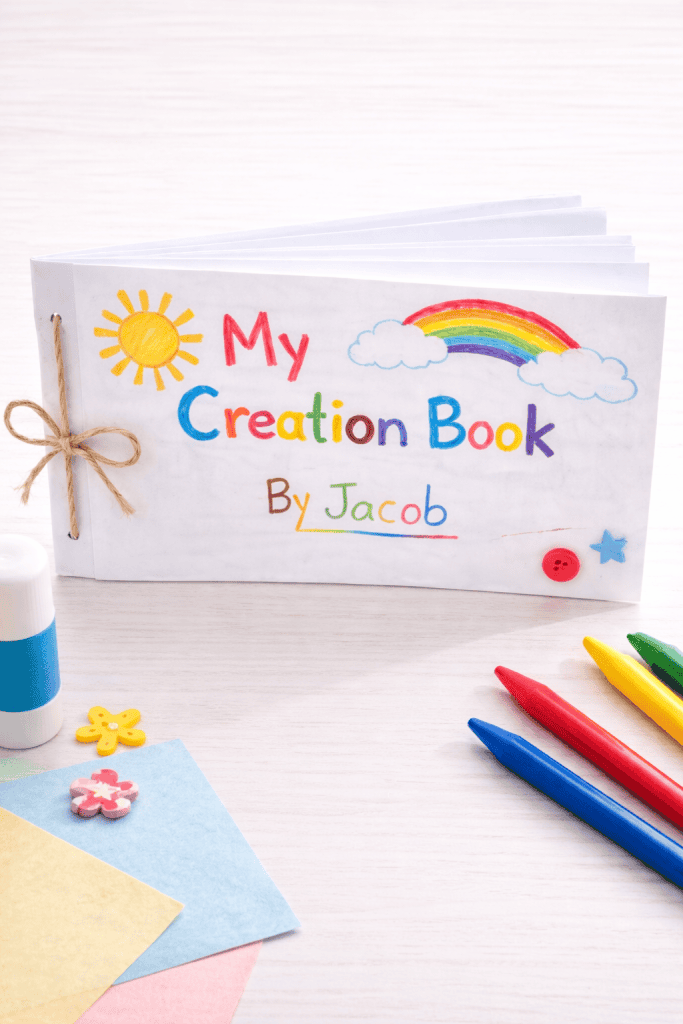
Our final craft idea is making a personalized Creation Story Book. This is a simple homemade booklet where each page represents one of the seven days of creation. It’s like having the child author their own Genesis story picture book!
This activity is fantastic for slightly older kids in our range (ages 5-8), though younger ones can do it with lots of help (or by coloring pre-drawn pages).
- Materials: 4 sheets of plain paper, crayons/markers, stapler or hole-punch & yarn to bind. Optional: stickers or magazine cut-outs for those who prefer collage over drawing.
- How to Make: Stack the paper and fold them in half to make a booklet (gives you 8 pages). Staple along the fold or punch two holes and tie with yarn to bind it. Title the first page “My Creation Book” and let the child write their name as the author/illustrator. Then label each subsequent page 1 through 7. Go page by page:
- Page 1: “Day 1 – God made light” – have them color half the page black (night) and half yellow or white (day), similar to Craft 1 but in mini form.
- Page 2: “Day 2 – God made sky and water” – draw clouds and water.
- Page 3: “Day 3 – God made land and plants” – draw some land with grass, flowers, or trees. You can even glue a tiny real leaf here for fun.
- Page 4: “Day 4 – God made the sun, moon, and stars” – draw a sun and a moon with stars around.
- Page 5: “Day 5 – God made birds and fish” – draw a bird in the sky and a fish in water.
- Page 6: “Day 6 – God made animals and people” – draw your favorite animal and yourself or your family. (This often ends up being the cutest page!)
- Page 7: “Day 7 – God rested” – draw something restful, like God sitting or you sleeping, or just a big “7” with Zzz.
- Enjoy: When the book is done, snuggle up and read it together. Let the child tell the story page by page in their own words. They’ll beam with pride because they made this book! It’s a wonderful keepsake to revisit and reinforces the creation story one more time in a personal way.
Ready to Get Creative? Bring Genesis to Life Today!
You’ve now got a treasure trove of crafts that bring the Genesis creation story to life. The best part is that they’re opportunities for meaningful moments with your kids. As you cut, glue, and laugh together, you’re also opening their young hearts to the wonder of God’s work in our world.
Pick a day (or all seven days) and get crafting! Set out some paper, grab those crayons and household odds-and-ends, and watch your little ones reenact God’s creation with their own hands.
Remember, the goal is to have fun and learn together. Encourage your kids, admire their creative touches (no matter how messy!), and let them feel proud of their creations.
Which of these creation crafts are you excited to try first? Do you have your own creative twist or a new idea that brings Genesis to life for kids? Comment down below and share your experiences or suggestions! Let’s inspire each other as we teach and celebrate the story of God’s creation.
Happy crafting!
Get the FREE Fruit of the Spirit Tree Craft
 - 2026-02-09T234426.555")
Bring the Fruit of the Spirit to life with this FREE Fruit of the Spirit Tree Craft—a fun, hands-on printable kids can build and display.
It features a 3D accordion-fold tree and comes in two versions (one with Bible verses for each fruit from Galatians 5:22–23, and one simplified for younger kids). This makes it easy for children to learn love, joy, peace, patience, kindness, goodness, faithfulness, gentleness, and self-control at their own pace.
Click below to grab the free tree craft and start creating together.
FAQS
What age group are these creation crafts suitable for?
These crafts are best for preschool to early elementary kids, roughly ages 3 to 8. Younger children will enjoy coloring, painting, and gluing with a bit of help, while older kids can add details like labels or drawings on their own. Each craft is flexible and can be adjusted to match your child’s skill level.
Do I need any special supplies for these crafts?
No special supplies are required. Most of the crafts use common household items like paper, crayons, glue, paper plates, cotton balls, or empty toilet paper rolls. Optional craft items like stickers or glitter can add fun but are not necessary, and simple substitutions work just fine.
How can I manage these crafts with a group of kids (like in Sunday School)?
These crafts are easy to adapt for group settings with a little preparation. Pre cutting shapes helps save time, and simpler crafts work best if class time is limited. You can also use stations or create one larger class project where each child contributes a piece.
How long does each craft take to complete?
Most crafts take about 10 to 20 minutes. More involved projects may take closer to 20 to 30 minutes, depending on how detailed kids want to be. Some children will finish quickly while others enjoy adding extra touches, and both are perfectly fine.
How do I tie these crafts into the Bible lesson so kids actually learn?
Begin by reading a short, child friendly version of the Genesis story for each day. While crafting, talk about what God created and ask simple questions. Displaying the finished crafts and revisiting them later helps reinforce the lesson and connect it to everyday life.
