
Every sewing journey begins with a needle, thread, and a few simple stitches.
These first stitches form the framework of every handmade project, from repairing a seam to creating something entirely new.
By learning a small set of reliable techniques, you’ll have the skills to handle everyday mending, add personal touches to fabric, and take on projects with greater ease.
In this article, I bring together twelve stitches every beginner can learn.
Each one offers a specific purpose – whether it’s securing a hem, finishing an edge, or adding a decorative element. Taken together, they give you a practical toolkit that supports both function and creativity.
With steady practice, these stitches will feel natural in your hands, opening the door to sewing with confidence and clarity.
Why Learn Hand Stitches First?
Hand sewing gives you a foundation that strengthens every project.
When you begin with stitches worked by hand, you gain control, precision, and an understanding of how fabric responds.
Each stitch teaches rhythm and consistency, which later makes machine sewing feel more natural (and helps when learning how to sew a perfect zigzag stitch on your machine).
These stitches are also practical in their own right. They allow you to mend seams, finish raw edges, or close up a lining without the need for a machine.
Small repairs, decorative details, and thoughtful finishing can all be accomplished with a needle and thread.
By starting here, you build confidence step by step.
You’ll know not only how a stitch is made, but also why it matters – giving your sewing a sense of purpose and reliability from the beginning.
12 Basic Stitches for Beginners
Before getting into bigger sewing projects, it helps to have a set of dependable stitches you can reach for again and again.
These twelve create a well-rounded foundation for hand sewing.
1. Running Stitch

The running stitch is the simplest hand stitch, often described as the “building block” of sewing.
To work it, you pass the needle in and out of the fabric in a straight line, keeping your stitches as even as possible.
It creates a dashed effect that can be adjusted: longer stitches move quickly across a seam, while shorter stitches provide more control and strength.
This stitch is practical for temporary seams (called basting), for gathering fabric to create gentle ruffles, or for stitching two layers together when strength isn’t the main concern.
In decorative projects, evenly spaced running stitches can form borders or outlines.
For beginners, it’s an excellent way to practice hand control, spacing, and thread tension.
Beginners will find this stitch a perfect starting point to practice hand control, spacing, and thread tension – a foundation that supports all other techniques (see also: how to start sewing as a beginner).
2. Backstitch

The backstitch offers strength where the running stitch leaves gaps.
Each new stitch overlaps slightly by entering the fabric just behind the previous one, forming a solid, continuous line.
This technique creates one of the strongest hand-sewn seams available and closely mimics the look of machine stitching.
Because of its durability, the backstitch is often used to repair seams that take stress, such as underarm seams or the side of a bag.
It’s also useful for outlining embroidery designs where you want a bold, unbroken line.
Beginners will quickly see the value of this stitch: it combines simplicity with strength, making it a cornerstone for both practical and creative sewing.
3. Overcast Stitch

The overcast stitch protects fabric edges from fraying by looping thread diagonally over the raw edge.
To work it, you bring the needle up from the underside, pass it over the edge, and bring it back through the fabric slightly inside the edge, repeating in evenly spaced intervals.
The result is a series of diagonal wraps that guard against unraveling.
This stitch is especially helpful for woven fabrics that tend to fray, like cotton or linen.
It’s often used on seam allowances, edges of patches, or any raw cut where a clean finish is important but a sewing machine isn’t available (a knowledge of basic sewing terminologies helps here).
It’s often used on seam allowances, edges of patches, or any raw cut where a clean finish is important but a sewing machine isn’t available.
Beginners benefit from practicing this stitch early, as it builds the habit of neat edge-finishing – a skill that makes projects look polished and last longer.
4. Blanket Stitch
The blanket stitch is worked along the edge of fabric, creating evenly spaced vertical stitches that loop over the edge.
To make it, bring the needle up near the edge, then loop the thread under the needle before pulling it through.
This forms a line of linked stitches that sit neatly along the edge while anchoring into the fabric.
This stitch is especially useful for finishing raw fabric edges that need both strength and style.
You’ll often see it on blankets, felt projects, and even decorative hems.
It prevents fraying while adding a distinctive look, making it practical and attractive at the same time.
For beginners, it teaches the skill of maintaining even spacing and consistent tension – habits that improve every type of hand sewing.
5. Whip Stitch
The whip stitch is one of the fastest ways to join two fabric edges together.
To create it, bring the needle up from the back of the fabric and pass it over the edge in a diagonal motion, repeating at regular intervals.
The stitches sit like slanted lines wrapping the two edges side by side.
This stitch works well for hand-finishing seams, attaching patches, or closing up fabric edges where neatness is more important than invisibility.
It’s especially common in felt crafts and small handmade projects, where it adds both strength and a handmade character.
Beginners will appreciate this stitch because it’s straightforward, flexible, and forgiving – ideal for quick joins and casual finishes.
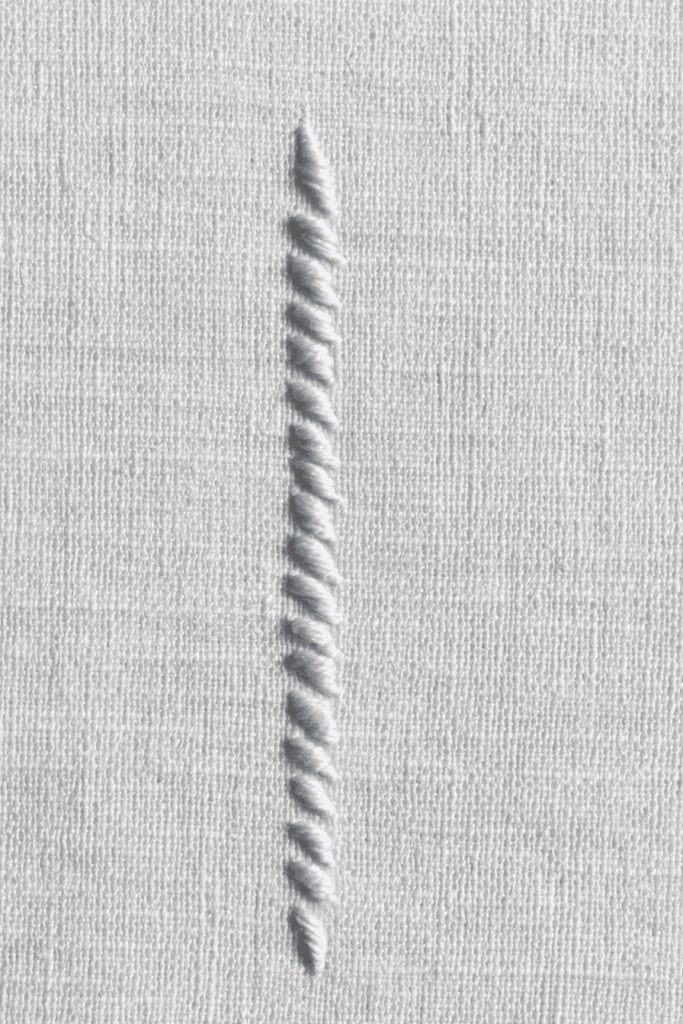
6. Chain Stitch

The chain stitch creates a series of looped links that resemble a chain, worked by pulling the thread through a loop before tightening.
Each stitch builds on the last, forming a textured line that can be either delicate or bold depending on thread thickness.
This stitch is often used for decorative purposes, such as outlining shapes or adding detail to embroidery.
Because it forms a strong but flexible line, it’s also been used historically for seams in garments before machine sewing was common.
For beginners, the chain stitch is a satisfying step into embroidery – it teaches precision and rhythm while producing a striking visual effect that encourages continued practice.
7. Slip Stitch (Ladder Stitch)
The slip stitch is designed to be nearly invisible.
To make it, you catch a tiny bit of fabric on one side of a seam, then cross directly to the other side and pick up a small bite of fabric there.
As you pull the thread tight, the stitches disappear into the fabric fold, creating a closed seam without visible lines.
This stitch is perfect for closing pillow openings, hems, or any seam where you want the stitching hidden.
It teaches beginners patience and precision, since the success of this stitch depends on taking small, consistent bites of fabric.
With practice, the slip stitch makes your hand sewing look polished and professional.
With practice, your hand sewing looks polished and professional (try combining this with projects like sewing lace on fabric).
8. Catch Stitch (Crossed Stitch)

The catch stitch is a flexible hemming stitch where each thread cross forms a small “X.”
It’s worked by taking diagonal stitches in one direction, then crossing over in the opposite direction.
This gives the hem a bit of stretch, making it less likely to pull or pucker.
It’s especially useful on hems of skirts, dresses, or garments where you need give and movement.
It also helps when working with fabrics that shift easily, like wool.
For beginners, this stitch demonstrates how a little elasticity in a hem can make a garment more comfortable and functional, while keeping the finish neat.
9. Overhand Stitch
The overhand stitch is worked by bringing the needle over and over through two fabric edges, pulling them tightly together.
Each stitch is small, vertical, and closely spaced, creating a seam with strength.
Unlike the whip stitch, which angles over the edge, the overhand stitch hugs the edges in an upright position.
This stitch is commonly used to join two pieces of fabric edge to edge, like in patchwork or when sewing thicker fabrics by hand.
It produces a strong join that resists pulling apart.
For beginners, the overhand stitch is a lesson in sturdiness – teaching how tight, consistent stitching can hold fabric together securely even without reinforcement.
10. Cross Stitch (Decorative)

The cross stitch is one of the most recognizable embroidery stitches, built by creating small “X” shapes in a grid-like pattern.
To work it, bring the needle up at one corner of a square, cross diagonally to the opposite corner, then repeat in the other direction to complete the “X.”
When repeated, the stitches create rows of neat crosses.
This stitch is best known for decorative work – samplers, borders, and patterns on fabric.
It’s straightforward, but it requires attention to spacing so the design stays even.
For beginners, cross stitch is an excellent introduction to embroidery.
It combines precision with creativity, allowing you to build designs while practicing uniform tension and spacing.
11. Satin Stitch
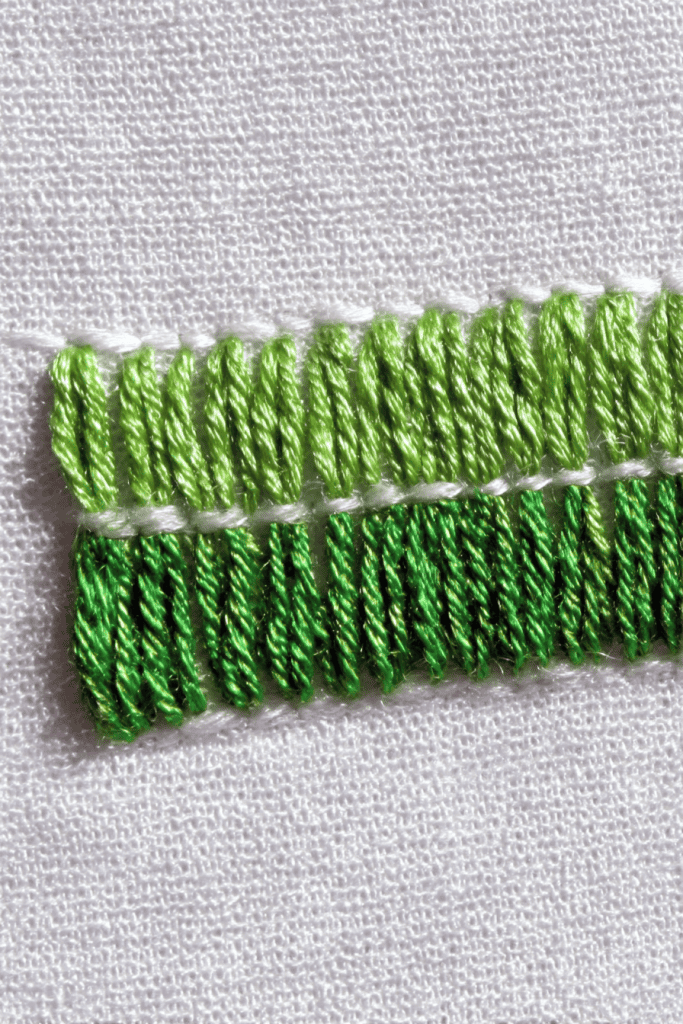
The satin stitch fills in shapes with smooth, parallel stitches that lie close together, almost like a layer of thread “paint.”
To make it, bring the needle up on one side of a shape and down directly across, repeating until the area is completely covered.
The result is a solid block of color with a glossy surface.
This stitch is especially useful for embroidery designs, monograms, or motifs where you want bold, filled shapes.
It teaches beginners control, as each stitch must be laid neatly to avoid gaps or uneven texture.
Practicing the satin stitch builds patience and discipline while showing how thread can transform into rich, decorative surfaces.
12. French Knot
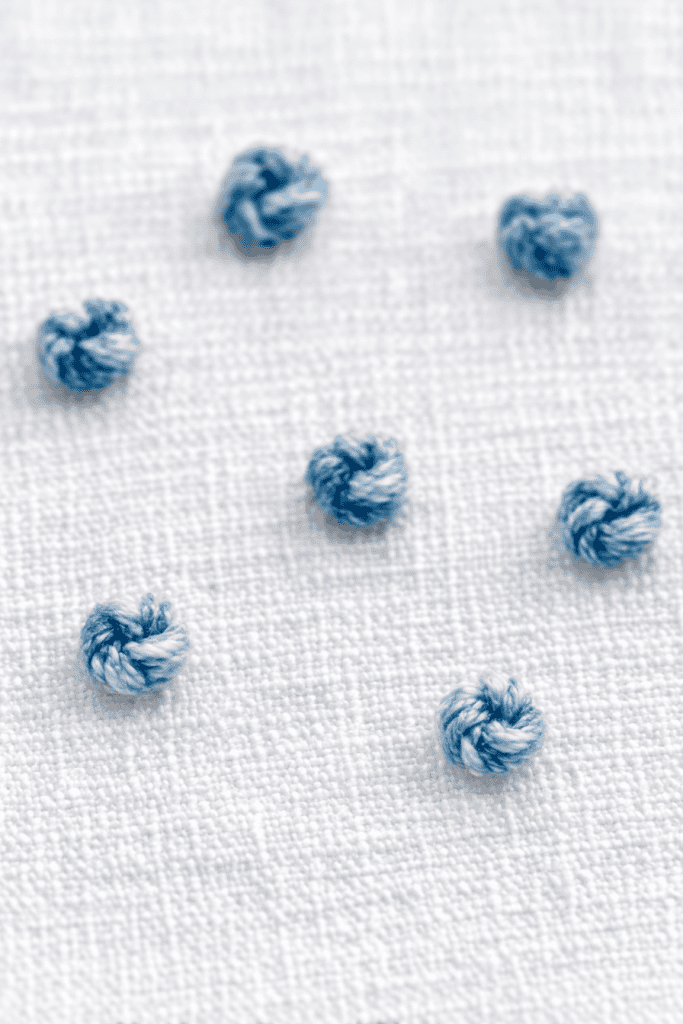
The French knot is a small, raised knot that adds texture and dotted detail.
To create it, wrap the thread around the needle once or twice, then reinsert the needle close to where it first emerged, holding the wrapped thread taut as the knot tightens against the fabric.
This stitch is often used for adding flower centers, scattered accents, or textured fills in embroidery.
Though small, it requires focus to keep the knots consistent and secure.
For beginners, it’s an introduction to building texture with thread – teaching how simple wraps and careful tension can create dimension and interest on fabric.
Practice Tips for Beginners
Stitching improves with steady practice, and a few focused habits will help you progress with clarity.
- Work on fabric scraps. Choose plain cotton or linen pieces. These give a stable surface so you can concentrate on the movement of the needle and thread.
- Use visible thread. A contrasting color makes it easy to see your progress and spot areas to adjust. Once you are confident, switch to matching thread for a refined finish.
- Keep spacing consistent. Lightly mark guide lines or measure with a ruler if needed. Even stitches come from training your eye as much as your hand.
- Balance the tension. Pull firmly enough to secure the stitch, but keep the fabric flat and smooth. Good tension ensures stitches look neat and hold well.
- Build a sampler. Keep a single piece of cloth where you practice all twelve stitches. This becomes a clear record of your progress and a reference you can return to later.
Each of these steps strengthens skill and confidence. With practice, your stitches will become steady, precise, and ready for any project.
Simple Projects to Try with These Stitches
Putting stitches into practice is the best way to remember them. Small, useful projects give you the chance to repeat each stitch until it feels natural.
- Handkerchiefs and Napkins. Practice running stitch, backstitch, or blanket stitch along the edges. These projects are quick and give you space to work on neat hems.
- Felt Coasters or Ornaments. Use whip stitch or blanket stitch to join felt pieces. These projects are sturdy and rewarding, while teaching you control over edge work.
- Patchwork Squares. Join small fabric pieces with overhand stitch or backstitch. This helps you practice seam strength while creating something practical.
- Simple Embroidery Hoops. Try chain stitch, cross stitch, or French knots on plain fabric. These projects highlight decorative techniques and build confidence with design.
- Repairs and Mending. Apply slip stitch or catch stitch on a hem, or reinforce a seam with backstitch. Practical use gives real value to what you’ve learned.
These projects are straightforward, manageable, and designed to build confidence step by step.
Build Your Sewing Confidence Today
With these twelve stitches in your toolkit, you can approach sewing projects with clarity and assurance.
These stitches serve different purposes – whether for securing, finishing, or adding decorative touches.
The true progress happens when you start applying them.
Pick a project, thread your needle, and dive in.
Do you have any questions or need help with a specific stitch?
Drop a comment below – I’m here to help as you work through your sewing projects!
FAQs
What kind of needle should beginners use for hand sewing?
A universal hand-sewing needle in sizes 6–8 is a good starting point. It’s sharp enough for woven fabrics and balanced for most beginner-friendly projects.
How do I keep my stitches straight without a sewing machine?
Use a ruler or fabric pencil to draw light guidelines on the fabric. These marks help train your eye and hand to stay consistent as you sew.
How long should my thread be when sewing by hand?
Cut thread no longer than 18–20 inches. Shorter lengths prevent tangling and are easier to control, especially when learning new stitches.
Can I use embroidery floss for these stitches, or do I need sewing thread?
Both work. Regular sewing thread is best for seams and edges, while embroidery floss is useful for decorative stitches like chain, cross, or French knots.
How do I secure the thread at the start and end of a stitch?
At the start, knot the end of your thread. At the finish, take two or three small stitches in place to anchor the thread securely, then trim close to the fabric.
